> ## Documentation Index
> Fetch the complete documentation index at: https://mcp.developerdoc.cn/llms.txt
> Use this file to discover all available pages before exploring further.
# 理解 MCP 授权
> 学习如何使用 OAuth 2.1 为 MCP 服务器实现安全授权,以保护敏感资源和操作
Model Context Protocol(MCP)中的授权用于保护 MCP server 暴露的敏感资源和操作访问。如果你的 MCP server 处理用户数据或管理操作,授权可以确保只有被允许的用户才能访问其端点。
MCP 使用标准化授权流程,在 MCP clients 和 MCP servers 之间建立信任。它的设计并不绑定某个特定授权或身份系统,而是遵循 [OAuth 2.1](https://datatracker.ietf.org/doc/html/draft-ietf-oauth-v2-1-13) 所概述的约定。详细信息见[授权规范](/specification/latest/basic/authorization)。
## 何时应该使用授权?
虽然 MCP servers 的授权是**可选的**,但在以下情况中强烈建议使用:
* 服务器访问用户特定数据(邮件、文档、数据库)。
* 你需要审计谁执行了哪些操作。
* 服务器授权访问需要用户同意的 API。
* 你正在为具有严格访问控制的企业环境构建。
* 你希望按用户实现速率限制或使用量跟踪。
**本地 MCP 服务器的授权**
对于使用 [STDIO transport](/specification/latest/basic/transports#stdio) 的 MCP servers,你可以改用基于环境变量的凭据,或直接嵌入 MCP server 的第三方库所提供的凭据。由于基于 STDIO 的 MCP server 在本地运行,在获取用户凭据方面有一系列灵活选项,可以依赖也可以不依赖浏览器内认证和授权流程。
OAuth 流程则面向基于 HTTP 的传输方式,此时 MCP server 是远程托管的,client 使用 OAuth 确认某个用户已被授权访问该远程 server。
## 授权流程:分步说明
下面演示当 client 想连接受保护的 MCP server 时会发生什么:
当 MCP client 首次尝试连接时,server 会返回 `401 Unauthorized`,并告诉 client 在哪里查找授权信息。这些信息记录在 [Protected Resource Metadata (PRM) document](https://datatracker.ietf.org/doc/html/rfc9728) 中。该文档由 MCP server 托管,遵循可预测路径模式,并通过 `WWW-Authenticate` header 中的 `resource_metadata` 参数提供给 client。
```http theme={null}
HTTP/1.1 401 Unauthorized
WWW-Authenticate: Bearer realm="mcp",
resource_metadata="https://your-server.com/.well-known/oauth-protected-resource"
```
这会告诉 client,该 MCP server 需要授权,并说明从哪里获取启动授权流程所需的信息。
拿到 PRM 文档的 URI 指针后,client 会获取元数据,以了解授权服务器、支持的 scopes 和其他资源信息。数据通常封装在类似下面的 JSON blob 中。
```json theme={null}
{
"resource": "https://your-server.com/mcp",
"authorization_servers": ["https://auth.your-server.com"],
"scopes_supported": ["mcp:tools", "mcp:resources"]
}
```
更完整的示例见 [RFC 9728 Section 3.2](https://datatracker.ietf.org/doc/html/rfc9728#name-protected-resource-metadata-r)。
接下来,client 会获取授权服务器元数据,以发现该授权服务器能做什么。如果 PRM 文档列出多个授权服务器,client 可以决定使用哪一个。
选定授权服务器后,client 会构造标准元数据 URI,并向 [OpenID Connect (OIDC) Discovery](https://openid.net/specs/openid-connect-discovery-1_0.html) 或 [OAuth 2.0 Auth Server Metadata](https://datatracker.ietf.org/doc/html/rfc8414) 端点发起请求(取决于授权服务器支持情况),再获取另一组元数据属性,以了解完成授权流程所需的端点。
```json theme={null}
{
"issuer": "https://auth.your-server.com",
"authorization_endpoint": "https://auth.your-server.com/authorize",
"token_endpoint": "https://auth.your-server.com/token",
"registration_endpoint": "https://auth.your-server.com/register"
}
```
获取所有元数据后,client 需要确保自己已在授权服务器注册。这可以通过两种方式完成。
首先,client 可以在给定 authorization server 中**预注册**。在这种情况下,它可以内嵌 client 注册信息,并用这些信息完成授权流程。
或者,client 可以使用 **Dynamic Client Registration** (DCR) 向 authorization server 动态注册自身。后一种场景要求 authorization server 支持 DCR。如果 authorization server 支持 DCR,client 会将自身信息发送到 `registration_endpoint`:
```json theme={null}
{
"client_name": "My MCP Client",
"redirect_uris": ["http://localhost:3000/callback"],
"grant_types": ["authorization_code", "refresh_token"],
"response_types": ["code"]
}
```
如果注册成功,authorization server 会返回包含 client 注册信息的 JSON blob。
**没有 DCR 或预注册**
如果 MCP client 连接的 MCP server 所使用的 authorization server 不支持 DCR,且该 client 也没有在该 authorization server 中预注册,那么 client 开发者需要为最终用户提供手动输入 client 信息的入口。
接下来,client 需要打开浏览器访问 `/authorize` 端点,用户可在其中登录并授予所需权限。authorization server 随后会携带 authorization code 重定向回 client,client 再用该 code 换取 tokens:
```json theme={null}
{
"access_token": "eyJhbGciOiJSUzI1NiIs...",
"refresh_token": "def502...",
"token_type": "Bearer",
"expires_in": 3600
}
```
access token 将被 client 用于向 MCP server 认证请求。该步骤遵循标准 [OAuth 2.1 authorization code with PKCE](https://oauth.net/2/grant-types/authorization-code/) 约定。
最后,client 可以在 `Authorization` header 中携带 access token,向你的 MCP server 发起请求:
```http theme={null}
GET /mcp HTTP/1.1
Host: your-server.com
Authorization: Bearer eyJhbGciOiJSUzI1NiIs...
```
MCP server 需要校验 token;如果 token 有效且具备所需权限,则处理该请求。
## 实现示例
为了开始实际实现,我们将使用托管在 Docker container 中的 [Keycloak](https://www.keycloak.org/) authorization server。Keycloak 是开源 authorization server,可以轻松在本地部署用于测试和实验。
请确保已下载并安装 [Docker Desktop](https://www.docker.com/products/docker-desktop/)。我们需要用它在开发机器上部署 Keycloak。
### Keycloak 设置
在终端应用中运行以下命令启动 Keycloak container:
```bash theme={null}
docker run -p 127.0.0.1:8080:8080 -e KC_BOOTSTRAP_ADMIN_USERNAME=admin -e KC_BOOTSTRAP_ADMIN_PASSWORD=admin quay.io/keycloak/keycloak start-dev
```
该命令会将 Keycloak container image 拉取到本地,并引导基础配置。它会运行在 `8080` 端口,并带有用户名为 `admin`、密码为 `admin` 的用户。
**不适用于生产环境**
上述配置适合测试和实验,但绝不应在生产环境中使用。对于需要可靠性、安全性和高可用的场景,请参考 [Configuring Keycloak for production](https://www.keycloak.org/server/configuration-production) 指南,了解如何部署 authorization server。
你可以在浏览器中通过 `http://localhost:8080` 访问 Keycloak authorization server。
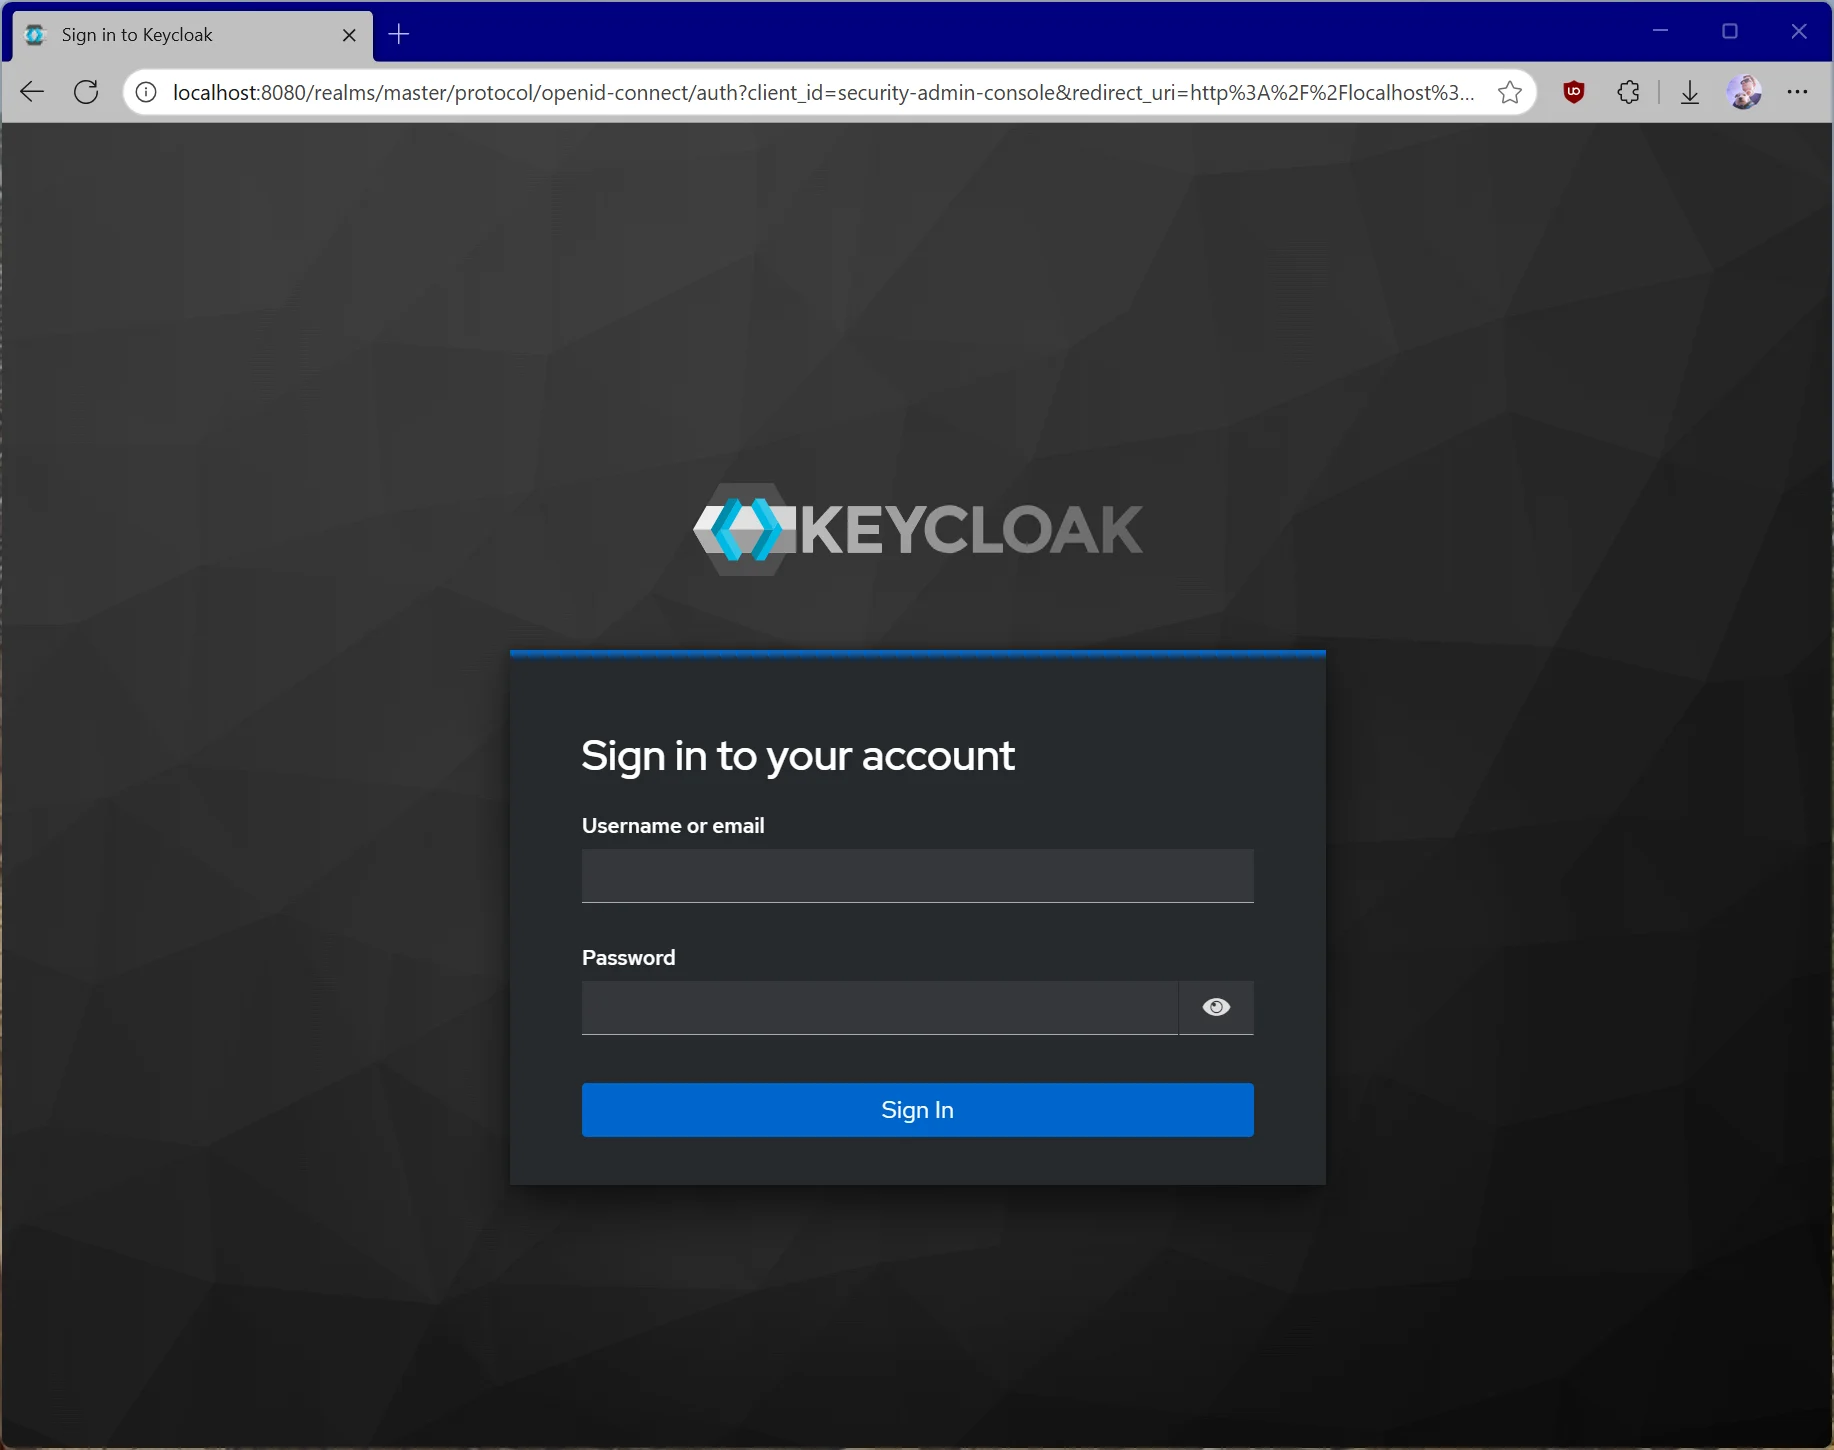 使用默认配置运行时,Keycloak 已经支持 MCP servers 所需的许多能力,包括 Dynamic Client Registration。你可以查看 OIDC 配置来确认,地址如下:
```http theme={null}
http://localhost:8080/realms/master/.well-known/openid-configuration
```
我们还需要设置 Keycloak,使其支持我们的 scopes,并允许 host(本地机器)动态注册 clients,因为默认策略会限制匿名 dynamic client registration。
进入 Keycloak dashboard 中的 **Client scopes**,创建新的 `mcp:tools` scope。我们会用它访问 MCP server 上的所有 tools。
使用默认配置运行时,Keycloak 已经支持 MCP servers 所需的许多能力,包括 Dynamic Client Registration。你可以查看 OIDC 配置来确认,地址如下:
```http theme={null}
http://localhost:8080/realms/master/.well-known/openid-configuration
```
我们还需要设置 Keycloak,使其支持我们的 scopes,并允许 host(本地机器)动态注册 clients,因为默认策略会限制匿名 dynamic client registration。
进入 Keycloak dashboard 中的 **Client scopes**,创建新的 `mcp:tools` scope。我们会用它访问 MCP server 上的所有 tools。
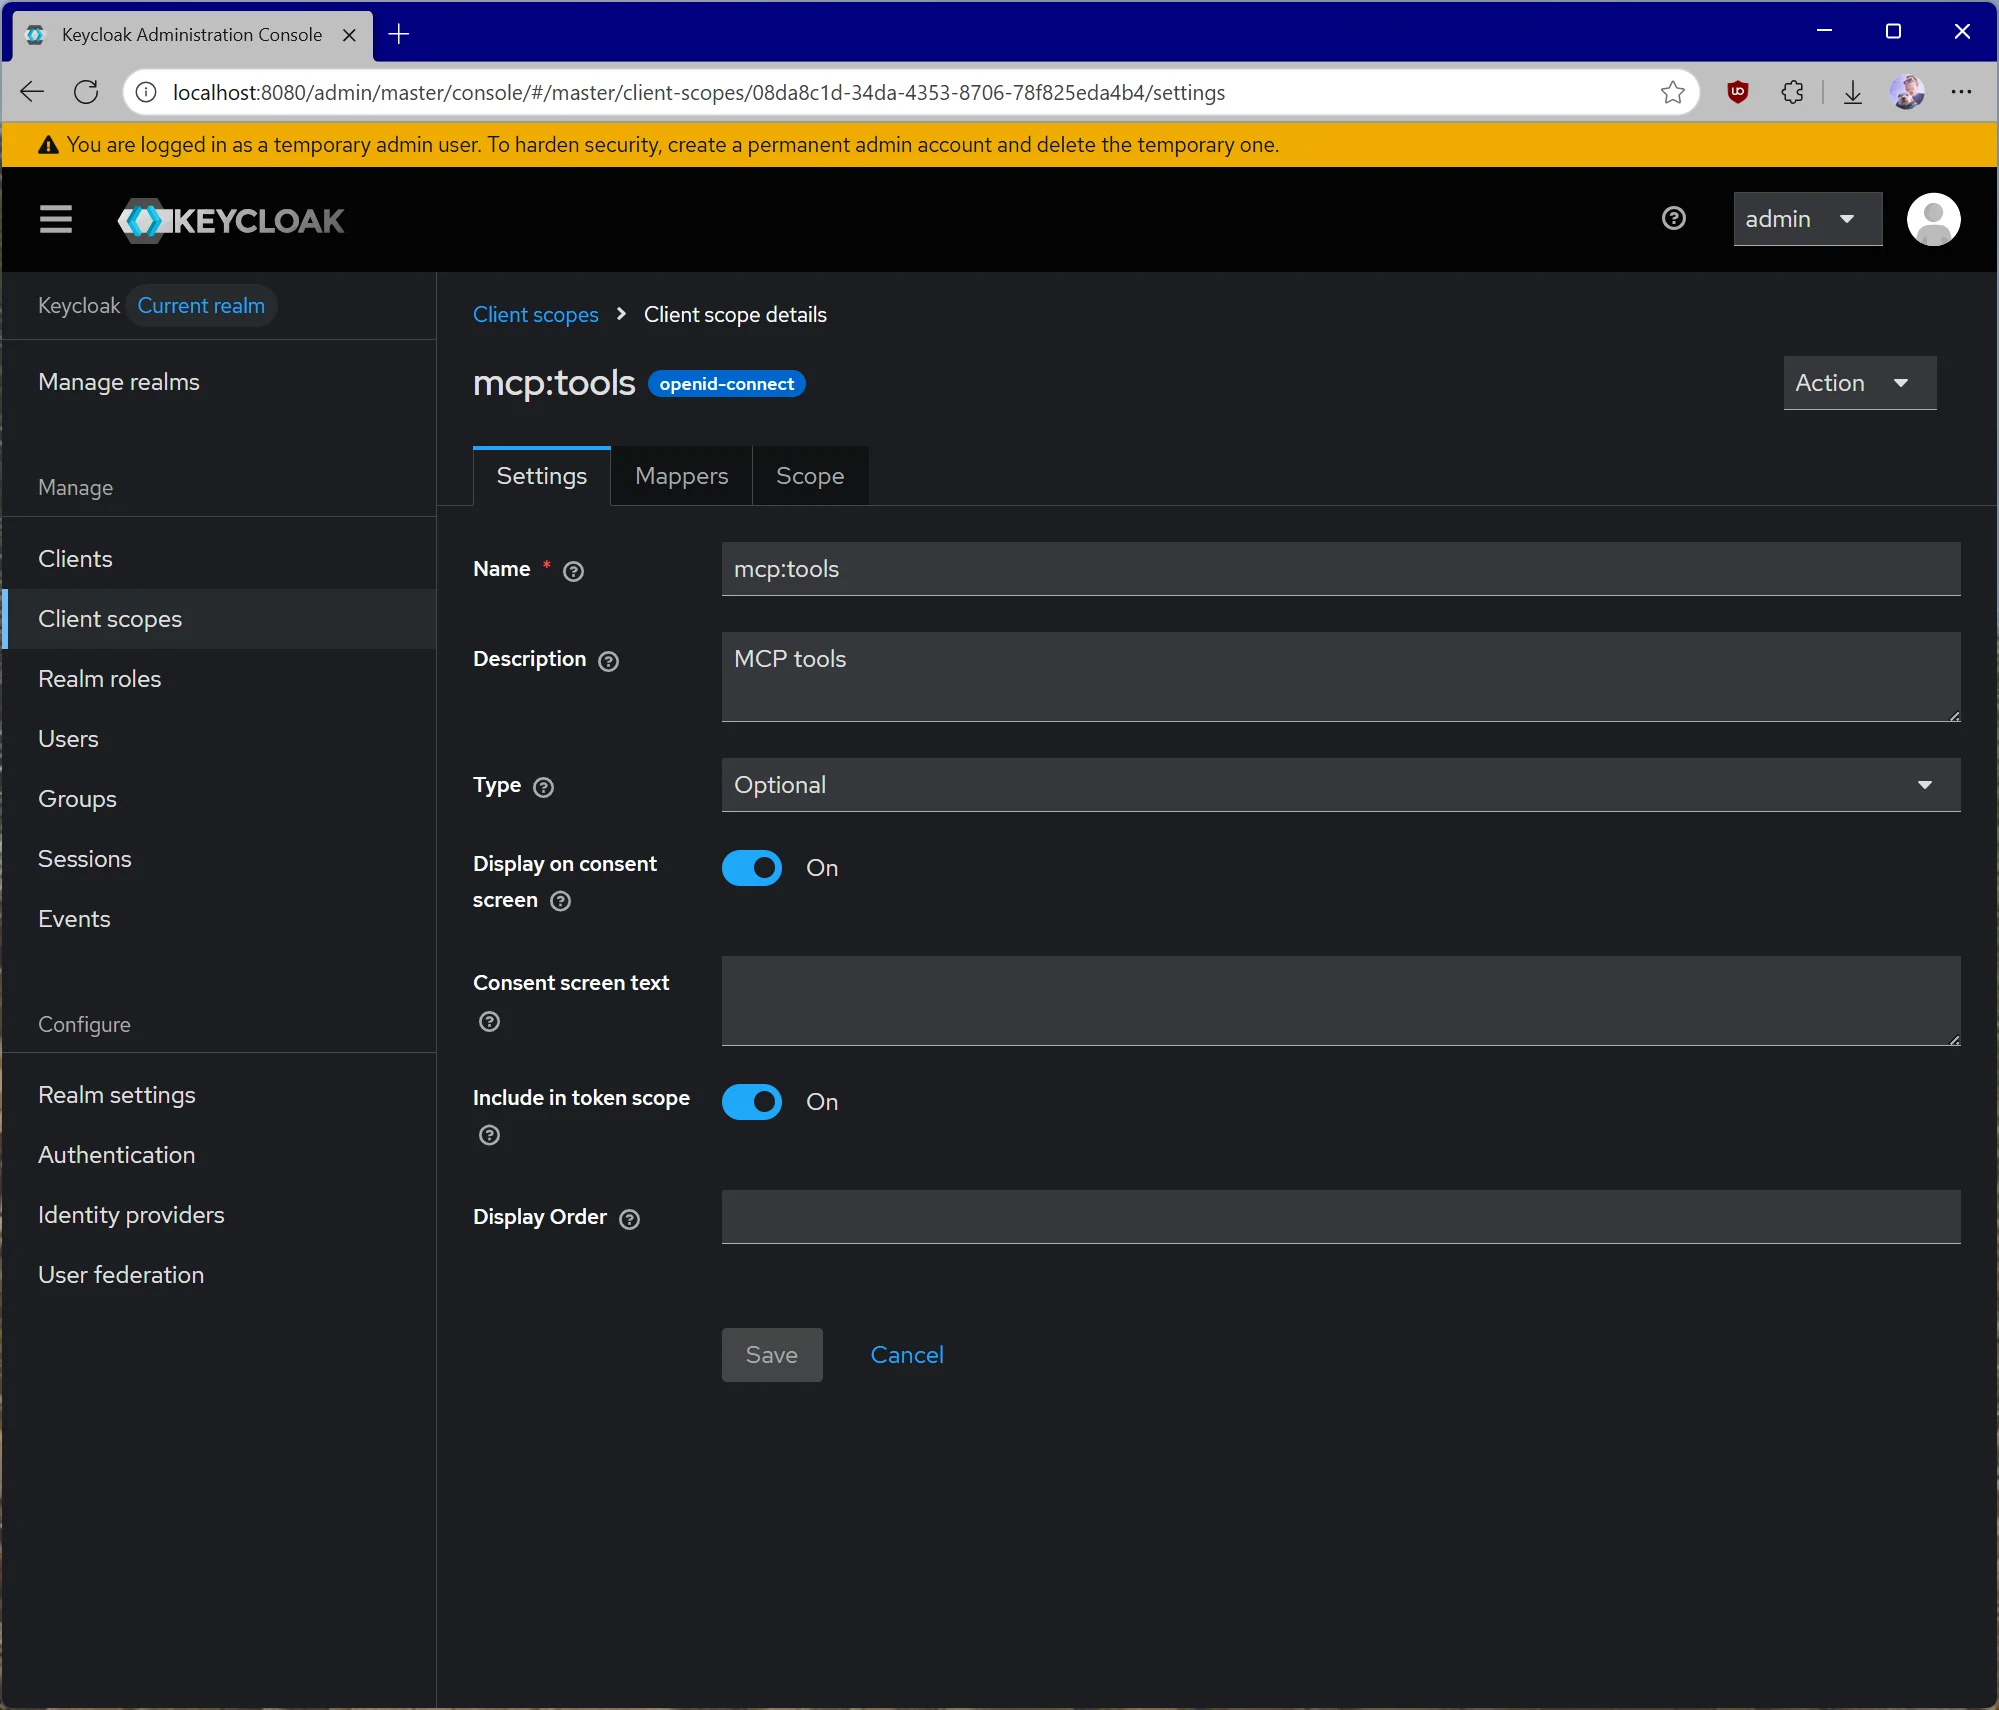 创建 scope 后,确保将其类型设为 **Default**,并打开 **Include in token scope** 开关,因为 token 校验会需要它。
接下来还需要为 Keycloak 签发的 tokens 设置 **audience**。配置 audience 很重要,因为它会将预期目的地直接嵌入签发的 access token。这可以帮助 MCP server 验证收到的 token 确实是发给它的,而不是发给其他 API 的。这是避免 token passthrough 场景的关键。
为此,打开 `mcp:tools` client scope,点击 **Mappers**,再点击 **Configure a new mapper**。选择 **Audience**。
创建 scope 后,确保将其类型设为 **Default**,并打开 **Include in token scope** 开关,因为 token 校验会需要它。
接下来还需要为 Keycloak 签发的 tokens 设置 **audience**。配置 audience 很重要,因为它会将预期目的地直接嵌入签发的 access token。这可以帮助 MCP server 验证收到的 token 确实是发给它的,而不是发给其他 API 的。这是避免 token passthrough 场景的关键。
为此,打开 `mcp:tools` client scope,点击 **Mappers**,再点击 **Configure a new mapper**。选择 **Audience**。
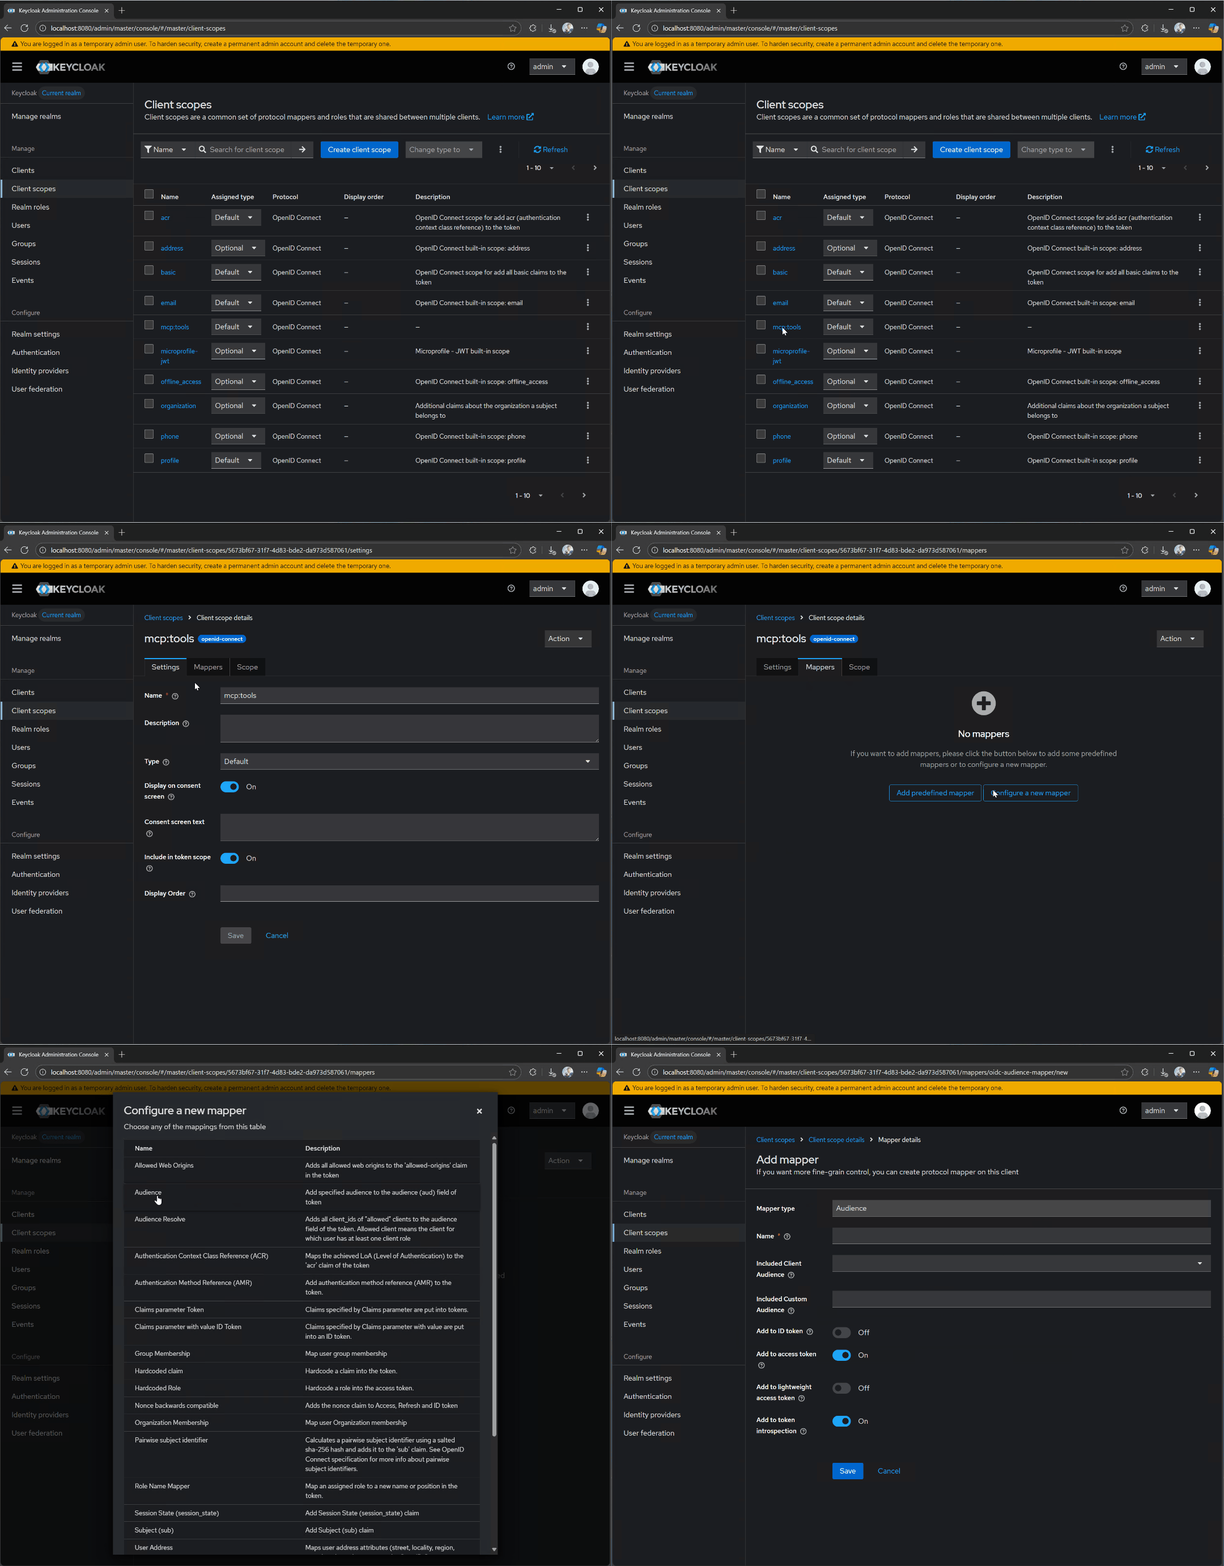 **Name** 使用 `audience-config`。为 **Included Custom Audience** 添加值 `http://localhost:3000`。这将作为测试 server 的 URI。
**不适用于生产环境**
上面的 audience 配置用于测试。生产场景需要额外设置和配置,以确保签发 tokens 的 audiences 得到正确约束。具体来说,audience 需要基于 client 传入的 resource 参数,而不是固定值。
现在,进入 **Clients**,然后进入 **Client registration**,再进入 **Trusted Hosts**。禁用 **Client URIs Must Match** 设置,并添加你用于测试的 hosts。你可以在 Linux 或 macOS 上运行 `ifconfig`,或在 Windows 上运行 `ipconfig` 来获取当前 host IP。也可以查看 Keycloak 日志中类似 `Failed to verify remote host : 192.168.215.1` 的行,找到需要添加的 IP 地址。请确认该 IP 地址与你的 host 关联。根据你的 Docker 设置,它可能来自 bridge network。
**Name** 使用 `audience-config`。为 **Included Custom Audience** 添加值 `http://localhost:3000`。这将作为测试 server 的 URI。
**不适用于生产环境**
上面的 audience 配置用于测试。生产场景需要额外设置和配置,以确保签发 tokens 的 audiences 得到正确约束。具体来说,audience 需要基于 client 传入的 resource 参数,而不是固定值。
现在,进入 **Clients**,然后进入 **Client registration**,再进入 **Trusted Hosts**。禁用 **Client URIs Must Match** 设置,并添加你用于测试的 hosts。你可以在 Linux 或 macOS 上运行 `ifconfig`,或在 Windows 上运行 `ipconfig` 来获取当前 host IP。也可以查看 Keycloak 日志中类似 `Failed to verify remote host : 192.168.215.1` 的行,找到需要添加的 IP 地址。请确认该 IP 地址与你的 host 关联。根据你的 Docker 设置,它可能来自 bridge network。
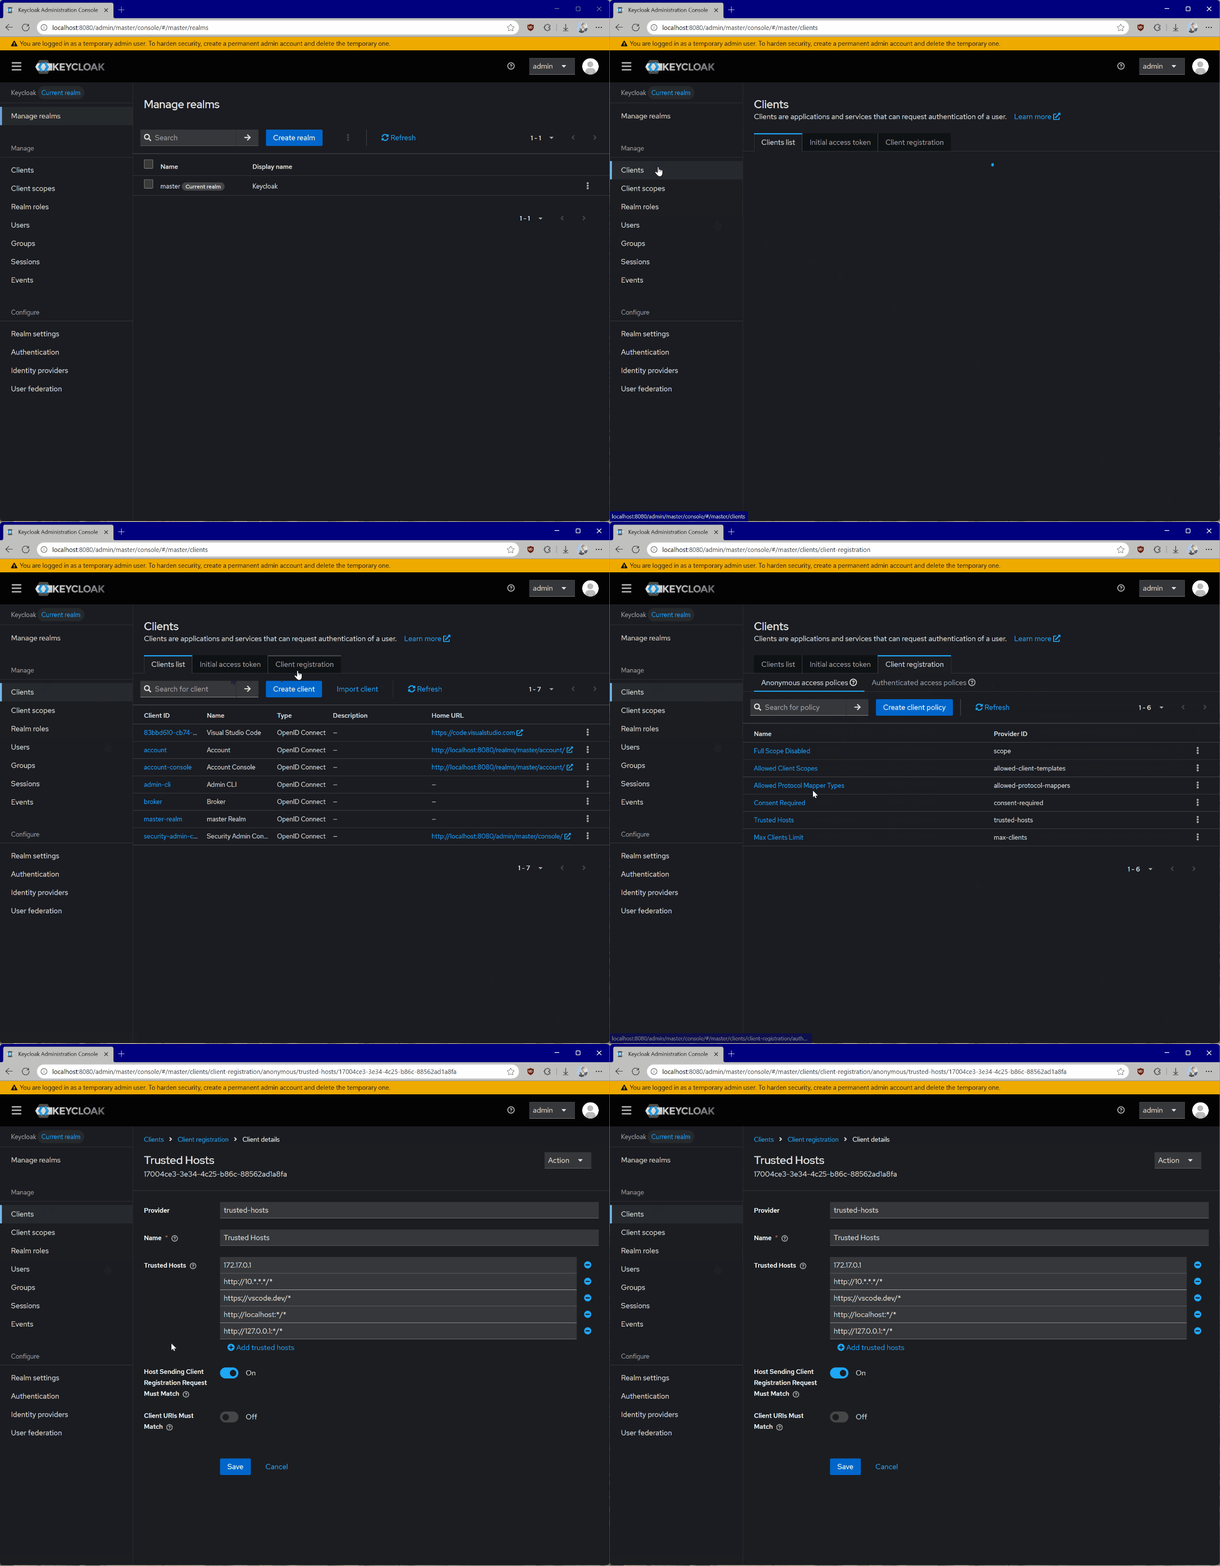 **获取 Host**
如果你从 container 运行 Keycloak,也可以在终端的 container 日志中看到 host IP。
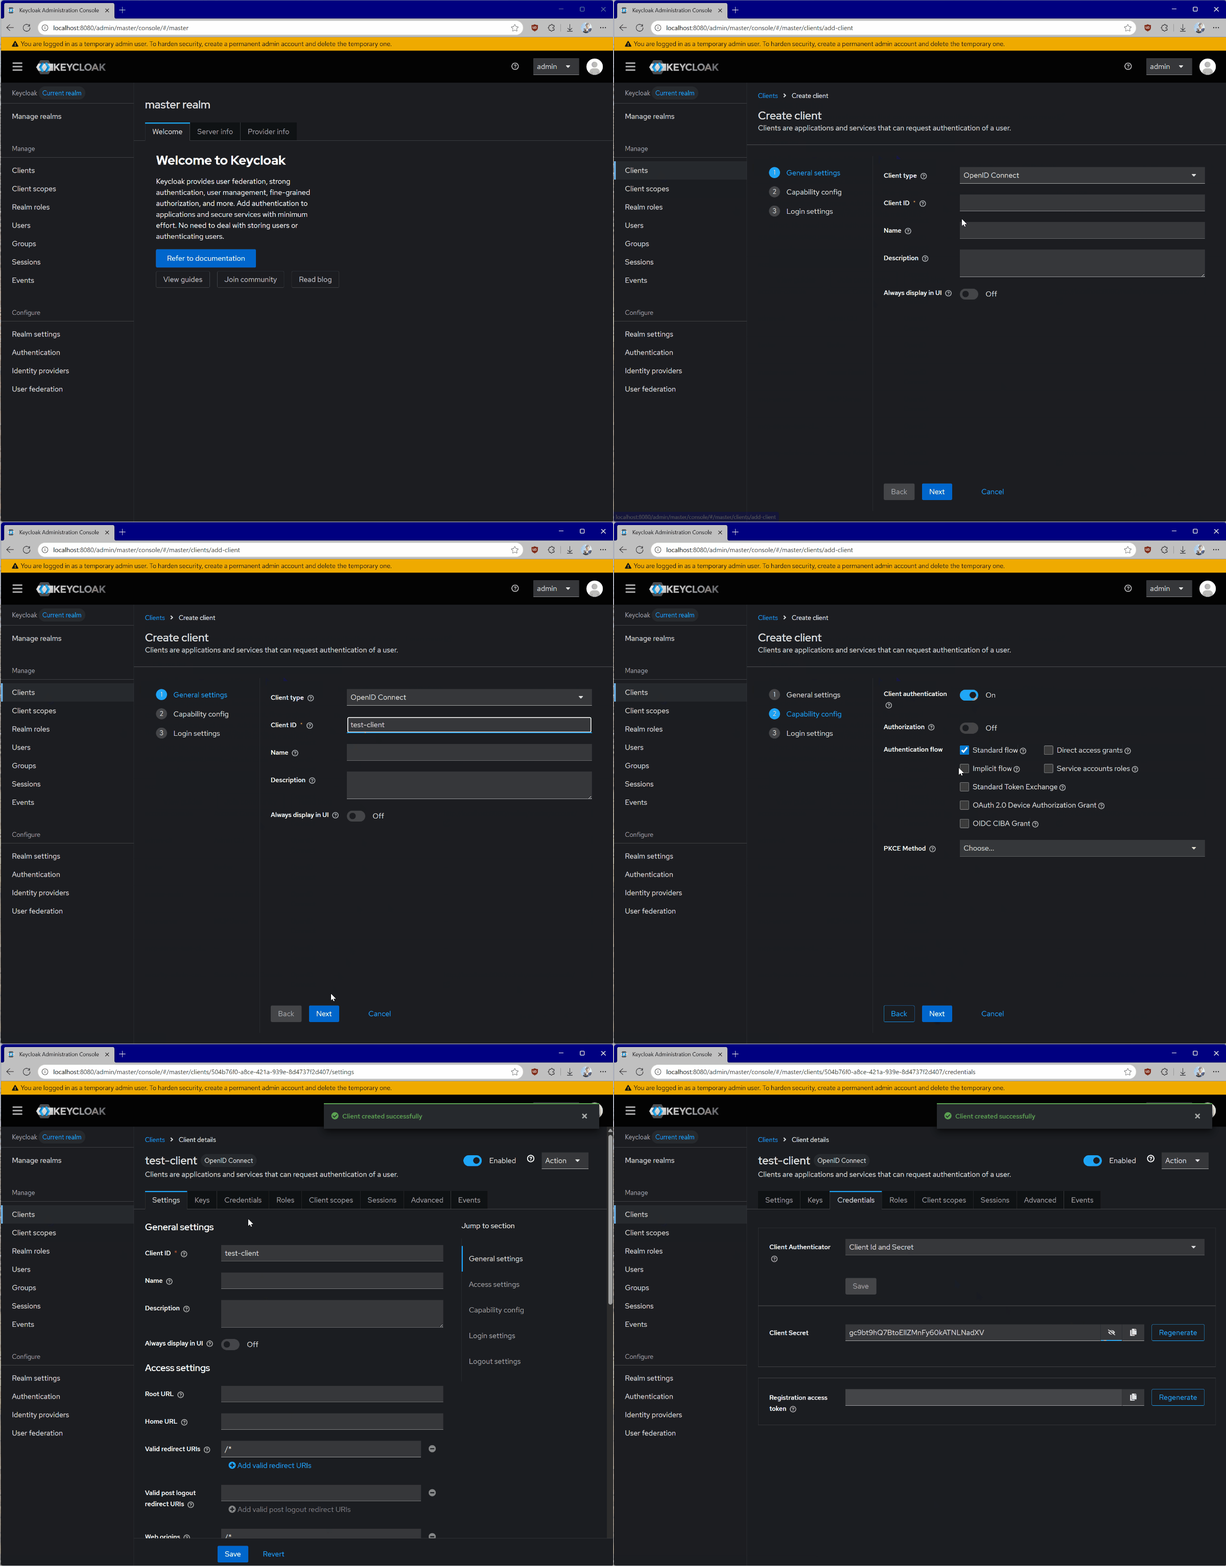
最后,需要注册一个新的 client,供 **MCP server 自身**与 Keycloak 通信用于 [token introspection](https://oauth.net/2/token-introspection/) 等场景。步骤如下:
1. 进入 **Clients**。
2. 点击 **Create client**。
3. 为 client 设置唯一的 **Client ID**,然后点击 **Next**。
4. 启用 **Client authentication**,然后点击 **Next**。
5. 点击 **Save**。
需要注意,token introspection 只是校验 tokens 的可用方法\_之一\_。也可以借助特定语言和平台的独立库来完成校验。
打开 client 详情后,进入 **Credentials**,记下 **Client Secret**。
**获取 Host**
如果你从 container 运行 Keycloak,也可以在终端的 container 日志中看到 host IP。
最后,需要注册一个新的 client,供 **MCP server 自身**与 Keycloak 通信用于 [token introspection](https://oauth.net/2/token-introspection/) 等场景。步骤如下:
1. 进入 **Clients**。
2. 点击 **Create client**。
3. 为 client 设置唯一的 **Client ID**,然后点击 **Next**。
4. 启用 **Client authentication**,然后点击 **Next**。
5. 点击 **Save**。
需要注意,token introspection 只是校验 tokens 的可用方法\_之一\_。也可以借助特定语言和平台的独立库来完成校验。
打开 client 详情后,进入 **Credentials**,记下 **Client Secret**。
 **处理 Secrets**
绝不要将 client credentials 直接嵌入代码。建议使用环境变量或专门的 secret 存储方案。
Keycloak 配置完成后,每次触发授权流程时,MCP server 都会收到类似下面的 token:
```text theme={null}
eyJhbGciOiJSUzI1NiIsInR5cCIgOiAiSldUIiwia2lkIiA6ICI1TjcxMGw1WW5MWk13WGZ1VlJKWGtCS3ZZMzZzb3JnRG5scmlyZ2tlTHlzIn0.eyJleHAiOjE3NTU1NDA4MTcsImlhdCI6MTc1NTU0MDc1NywiYXV0aF90aW1lIjoxNzU1NTM4ODg4LCJqdGkiOiJvbnJ0YWM6YjM0MDgwZmYtODQwNC02ODY3LTgxYmUtMTIzMWI1MDU5M2E4IiwiaXNzIjoiaHR0cDovL2xvY2FsaG9zdDo4MDgwL3JlYWxtcy9tYXN0ZXIiLCJhdWQiOiJodHRwOi8vbG9jYWxob3N0OjMwMDAiLCJzdWIiOiIzM2VkNmM2Yi1jNmUwLTQ5MjgtYTE2MS1mMmY2OWM3YTAzYjkiLCJ0eXAiOiJCZWFyZXIiLCJhenAiOiI3OTc1YTViNi04YjU5LTRhODUtOWNiYS04ZmFlYmRhYjg5NzQiLCJzaWQiOiI4ZjdlYzI3Ni0zNThmLTRjY2MtYjMxMy1kYjA4MjkwZjM3NmYiLCJzY29wZSI6Im1jcDp0b29scyJ9.P5xCRtXORly0R0EXjyqRCUx-z3J4uAOWNAvYtLPXroykZuVCCJ-K1haiQSwbURqfsVOMbL7jiV-sD6miuPzI1tmKOkN_Yct0Vp-azvj7U5rEj7U6tvPfMkg2Uj_jrIX0KOskyU2pVvGZ-5BgqaSvwTEdsGu_V3_E0xDuSBq2uj_wmhqiyTFm5lJ1WkM3Hnxxx1_AAnTj7iOKMFZ4VCwMmk8hhSC7clnDauORc0sutxiJuYUZzxNiNPkmNeQtMCGqWdP1igcbWbrfnNXhJ6NswBOuRbh97_QraET3hl-CNmyS6C72Xc0aOwR_uJ7xVSBTD02OaQ1JA6kjCATz30kGYg
```
解码后,它看起来像这样:
```json theme={null}
{
"alg": "RS256",
"typ": "JWT",
"kid": "5N710l5YnLZMwXfuVRJXkBKvY36sorgDnlrirgkeLys"
}.{
"exp": 1755540817,
"iat": 1755540757,
"auth_time": 1755538888,
"jti": "onrtac:b34080ff-8404-6867-81be-1231b50593a8",
"iss": "http://localhost:8080/realms/master",
"aud": "http://localhost:3000",
"sub": "33ed6c6b-c6e0-4928-a161-f2f69c7a03b9",
"typ": "Bearer",
"azp": "7975a5b6-8b59-4a85-9cba-8faebdab8974",
"sid": "8f7ec276-358f-4ccc-b313-db08290f376f",
"scope": "mcp:tools"
}.[Signature]
```
**嵌入的 Audience**
注意 token 中嵌入的 `aud` claim:它当前被设置为测试 MCP server 的 URI,并且是从我们之前配置的 scope 推导出来的。后续实现中需要校验这一点。
### MCP Server 设置
现在将 MCP server 设置为使用本地运行的 Keycloak authorization server。你可以根据偏好的编程语言,选择一个受支持的 [MCP SDKs](/docs/sdk)。
出于测试目的,我们会创建一个极其简单的 MCP server,暴露两个 tools:一个用于加法,另一个用于乘法。访问这些 tools 需要授权。
完整 TypeScript 项目见[示例仓库](https://github.com/localden/min-ts-mcp-auth)。
运行下面的代码前,请确保有一个包含以下内容的 `.env` 文件:
```env theme={null}
# Server host/port
HOST=localhost
PORT=3000
# Auth server location
AUTH_HOST=localhost
AUTH_PORT=8080
AUTH_REALM=master
# Keycloak OAuth client credentials
OAUTH_CLIENT_ID=
OAUTH_CLIENT_SECRET=
```
`OAUTH_CLIENT_ID` 和 `OAUTH_CLIENT_SECRET` 对应前面创建的 MCP server client。
除实现 MCP 授权规范外,下面的 server 还会通过 Keycloak 执行 token introspection,确保它从 client 收到的 token 有效。它还实现了基础日志,便于诊断问题。
```typescript theme={null}
import "dotenv/config";
import express from "express";
import { randomUUID } from "node:crypto";
import { McpServer } from "@modelcontextprotocol/sdk/server/mcp.js";
import { StreamableHTTPServerTransport } from "@modelcontextprotocol/sdk/server/streamableHttp.js";
import { isInitializeRequest } from "@modelcontextprotocol/sdk/types.js";
import { z } from "zod";
import cors from "cors";
import {
mcpAuthMetadataRouter,
getOAuthProtectedResourceMetadataUrl,
} from "@modelcontextprotocol/sdk/server/auth/router.js";
import { requireBearerAuth } from "@modelcontextprotocol/sdk/server/auth/middleware/bearerAuth.js";
import { OAuthMetadata } from "@modelcontextprotocol/sdk/shared/auth.js";
import { checkResourceAllowed } from "@modelcontextprotocol/sdk/shared/auth-utils.js";
const CONFIG = {
host: process.env.HOST || "localhost",
port: Number(process.env.PORT) || 3000,
auth: {
host: process.env.AUTH_HOST || process.env.HOST || "localhost",
port: Number(process.env.AUTH_PORT) || 8080,
realm: process.env.AUTH_REALM || "master",
clientId: process.env.OAUTH_CLIENT_ID || "mcp-server",
clientSecret: process.env.OAUTH_CLIENT_SECRET || "",
},
};
function createOAuthUrls() {
const authBaseUrl = new URL(
`http://${CONFIG.auth.host}:${CONFIG.auth.port}/realms/${CONFIG.auth.realm}/`,
);
return {
issuer: authBaseUrl.toString(),
introspection_endpoint: new URL(
"protocol/openid-connect/token/introspect",
authBaseUrl,
).toString(),
authorization_endpoint: new URL(
"protocol/openid-connect/auth",
authBaseUrl,
).toString(),
token_endpoint: new URL(
"protocol/openid-connect/token",
authBaseUrl,
).toString(),
};
}
function createRequestLogger() {
return (req: any, res: any, next: any) => {
const start = Date.now();
res.on("finish", () => {
const ms = Date.now() - start;
console.log(
`${req.method} ${req.originalUrl} -> ${res.statusCode} ${ms}ms`,
);
});
next();
};
}
const app = express();
app.use(
express.json({
verify: (req: any, _res, buf) => {
req.rawBody = buf?.toString() ?? "";
},
}),
);
app.use(
cors({
origin: "*",
exposedHeaders: ["Mcp-Session-Id"],
}),
);
app.use(createRequestLogger());
const mcpServerUrl = new URL(`http://${CONFIG.host}:${CONFIG.port}`);
const oauthUrls = createOAuthUrls();
const oauthMetadata: OAuthMetadata = {
...oauthUrls,
response_types_supported: ["code"],
};
const tokenVerifier = {
verifyAccessToken: async (token: string) => {
const endpoint = oauthMetadata.introspection_endpoint;
if (!endpoint) {
console.error("[auth] no introspection endpoint in metadata");
throw new Error("No token verification endpoint available in metadata");
}
const params = new URLSearchParams({
token: token,
client_id: CONFIG.auth.clientId,
});
if (CONFIG.auth.clientSecret) {
params.set("client_secret", CONFIG.auth.clientSecret);
}
let response: Response;
try {
response = await fetch(endpoint, {
method: "POST",
headers: {
"Content-Type": "application/x-www-form-urlencoded",
},
body: params.toString(),
});
} catch (e) {
console.error("[auth] introspection fetch threw", e);
throw e;
}
if (!response.ok) {
const txt = await response.text();
console.error("[auth] introspection non-OK", { status: response.status });
try {
const obj = JSON.parse(txt);
console.log(JSON.stringify(obj, null, 2));
} catch {
console.error(txt);
}
throw new Error(`Invalid or expired token: ${txt}`);
}
let data: any;
try {
data = await response.json();
} catch (e) {
const txt = await response.text();
console.error("[auth] failed to parse introspection JSON", {
error: String(e),
body: txt,
});
throw e;
}
if (data.active === false) {
throw new Error("Inactive token");
}
if (!data.aud) {
throw new Error("Resource indicator (aud) missing");
}
const audiences: string[] = Array.isArray(data.aud) ? data.aud : [data.aud];
const allowed = audiences.some((a) =>
checkResourceAllowed({
requestedResource: a,
configuredResource: mcpServerUrl,
}),
);
if (!allowed) {
throw new Error(
`None of the provided audiences are allowed. Expected ${mcpServerUrl}, got: ${audiences.join(", ")}`,
);
}
return {
token,
clientId: data.client_id,
scopes: data.scope ? data.scope.split(" ") : [],
expiresAt: data.exp,
};
},
};
app.use(
mcpAuthMetadataRouter({
oauthMetadata,
resourceServerUrl: mcpServerUrl,
scopesSupported: ["mcp:tools"],
resourceName: "MCP Demo Server",
}),
);
const authMiddleware = requireBearerAuth({
verifier: tokenVerifier,
requiredScopes: [],
resourceMetadataUrl: getOAuthProtectedResourceMetadataUrl(mcpServerUrl),
});
const transports: { [sessionId: string]: StreamableHTTPServerTransport } = {};
function createMcpServer() {
const server = new McpServer({
name: "example-server",
version: "1.0.0",
});
server.registerTool(
"add",
{
title: "Addition Tool",
description: "Add two numbers together",
inputSchema: {
a: z.number().describe("First number to add"),
b: z.number().describe("Second number to add"),
},
},
async ({ a, b }) => ({
content: [{ type: "text", text: `${a} + ${b} = ${a + b}` }],
}),
);
server.registerTool(
"multiply",
{
title: "Multiplication Tool",
description: "Multiply two numbers together",
inputSchema: {
x: z.number().describe("First number to multiply"),
y: z.number().describe("Second number to multiply"),
},
},
async ({ x, y }) => ({
content: [{ type: "text", text: `${x} × ${y} = ${x * y}` }],
}),
);
return server;
}
const mcpPostHandler = async (req: express.Request, res: express.Response) => {
const sessionId = req.headers["mcp-session-id"] as string | undefined;
let transport: StreamableHTTPServerTransport;
if (sessionId && transports[sessionId]) {
transport = transports[sessionId];
} else if (!sessionId && isInitializeRequest(req.body)) {
transport = new StreamableHTTPServerTransport({
sessionIdGenerator: () => randomUUID(),
onsessioninitialized: (sessionId) => {
transports[sessionId] = transport;
},
});
transport.onclose = () => {
if (transport.sessionId) {
delete transports[transport.sessionId];
}
};
const server = createMcpServer();
await server.connect(transport);
} else {
res.status(400).json({
jsonrpc: "2.0",
error: {
code: -32000,
message: "Bad Request: No valid session ID provided",
},
id: null,
});
return;
}
await transport.handleRequest(req, res, req.body);
};
const handleSessionRequest = async (
req: express.Request,
res: express.Response,
) => {
const sessionId = req.headers["mcp-session-id"] as string | undefined;
if (!sessionId || !transports[sessionId]) {
res.status(400).send("Invalid or missing session ID");
return;
}
const transport = transports[sessionId];
await transport.handleRequest(req, res);
};
app.post("/", authMiddleware, mcpPostHandler);
app.get("/", authMiddleware, handleSessionRequest);
app.delete("/", authMiddleware, handleSessionRequest);
app.listen(CONFIG.port, CONFIG.host, () => {
console.log(`🚀 MCP Server running on ${mcpServerUrl.origin}`);
console.log(`📡 MCP endpoint available at ${mcpServerUrl.origin}`);
console.log(
`🔐 OAuth metadata available at ${getOAuthProtectedResourceMetadataUrl(mcpServerUrl)}`,
);
});
```
运行 server 后,可以通过提供 MCP server endpoint,将它添加到 MCP client(例如 Visual Studio Code)中。
关于使用 TypeScript 实现 MCP servers 的更多细节,请参考 [TypeScript SDK documentation](https://github.com/modelcontextprotocol/typescript-sdk)。
完整 Python 项目见[示例仓库](https://github.com/modelcontextprotocol/python-sdk/tree/main/examples/servers/simple-auth)。
为了简化授权交互,在 Python 场景中我们依赖 [FastMCP](https://gofastmcp.com/getting-started/welcome)。围绕授权的许多约定(例如端点和 token 校验逻辑)在不同语言中是一致的,但某些语言/框架在生产场景中提供了更简单的集成方式。
在编写真正的 server 前,需要先在 `config.py` 中设置配置,内容完全基于你的本地 server 设置:
```python theme={null}
"""Configuration settings for the MCP auth server."""
import os
from typing import Optional
class Config:
"""Configuration class that loads from environment variables with sensible defaults."""
# Server settings
HOST: str = os.getenv("HOST", "localhost")
PORT: int = int(os.getenv("PORT", "3000"))
# Auth server settings
AUTH_HOST: str = os.getenv("AUTH_HOST", "localhost")
AUTH_PORT: int = int(os.getenv("AUTH_PORT", "8080"))
AUTH_REALM: str = os.getenv("AUTH_REALM", "master")
# OAuth client settings
OAUTH_CLIENT_ID: str = os.getenv("OAUTH_CLIENT_ID", "mcp-server")
OAUTH_CLIENT_SECRET: str = os.getenv("OAUTH_CLIENT_SECRET", "UO3rmozkFFkXr0QxPTkzZ0LMXDidIikB")
# Server settings
MCP_SCOPE: str = os.getenv("MCP_SCOPE", "mcp:tools")
OAUTH_STRICT: bool = os.getenv("OAUTH_STRICT", "false").lower() in ("true", "1", "yes")
TRANSPORT: str = os.getenv("TRANSPORT", "streamable-http")
@property
def server_url(self) -> str:
"""Build the server URL."""
return f"http://{self.HOST}:{self.PORT}"
@property
def auth_base_url(self) -> str:
"""Build the auth server base URL."""
return f"http://{self.AUTH_HOST}:{self.AUTH_PORT}/realms/{self.AUTH_REALM}/"
def validate(self) -> None:
"""Validate configuration."""
if self.TRANSPORT not in ["sse", "streamable-http"]:
raise ValueError(f"Invalid transport: {self.TRANSPORT}. Must be 'sse' or 'streamable-http'")
# Global configuration instance
config = Config()
```
server 实现如下:
```python theme={null}
import datetime
import logging
from typing import Any
from pydantic import AnyHttpUrl
from mcp.server.auth.settings import AuthSettings
from mcp.server.fastmcp.server import FastMCP
from .config import config
from .token_verifier import IntrospectionTokenVerifier
logger = logging.getLogger(__name__)
def create_oauth_urls() -> dict[str, str]:
"""Create OAuth URLs based on configuration (Keycloak-style)."""
from urllib.parse import urljoin
auth_base_url = config.auth_base_url
return {
"issuer": auth_base_url,
"introspection_endpoint": urljoin(auth_base_url, "protocol/openid-connect/token/introspect"),
"authorization_endpoint": urljoin(auth_base_url, "protocol/openid-connect/auth"),
"token_endpoint": urljoin(auth_base_url, "protocol/openid-connect/token"),
}
def create_server() -> FastMCP:
"""Create and configure the FastMCP server."""
config.validate()
oauth_urls = create_oauth_urls()
token_verifier = IntrospectionTokenVerifier(
introspection_endpoint=oauth_urls["introspection_endpoint"],
server_url=config.server_url,
client_id=config.OAUTH_CLIENT_ID,
client_secret=config.OAUTH_CLIENT_SECRET,
)
app = FastMCP(
name="MCP Resource Server",
instructions="Resource Server that validates tokens via Authorization Server introspection",
host=config.HOST,
port=config.PORT,
debug=True,
streamable_http_path="/",
token_verifier=token_verifier,
auth=AuthSettings(
issuer_url=AnyHttpUrl(oauth_urls["issuer"]),
required_scopes=[config.MCP_SCOPE],
resource_server_url=AnyHttpUrl(config.server_url),
),
)
@app.tool()
async def add_numbers(a: float, b: float) -> dict[str, Any]:
"""
Add two numbers together.
This tool demonstrates basic arithmetic operations with OAuth authentication.
Args:
a: The first number to add
b: The second number to add
"""
result = a + b
return {
"operation": "addition",
"operand_a": a,
"operand_b": b,
"result": result,
"timestamp": datetime.datetime.now().isoformat()
}
@app.tool()
async def multiply_numbers(x: float, y: float) -> dict[str, Any]:
"""
Multiply two numbers together.
This tool demonstrates basic arithmetic operations with OAuth authentication.
Args:
x: The first number to multiply
y: The second number to multiply
"""
result = x * y
return {
"operation": "multiplication",
"operand_x": x,
"operand_y": y,
"result": result,
"timestamp": datetime.datetime.now().isoformat()
}
return app
def main() -> int:
"""
Run the MCP Resource Server.
This server:
- Provides RFC 9728 Protected Resource Metadata
- Validates tokens via Authorization Server introspection
- Serves MCP tools requiring authentication
Configuration is loaded from config.py and environment variables.
"""
logging.basicConfig(level=logging.INFO)
try:
config.validate()
oauth_urls = create_oauth_urls()
except ValueError as e:
logger.error("Configuration error: %s", e)
return 1
try:
mcp_server = create_server()
logger.info("Starting MCP Server on %s:%s", config.HOST, config.PORT)
logger.info("Authorization Server: %s", oauth_urls["issuer"])
logger.info("Transport: %s", config.TRANSPORT)
mcp_server.run(transport=config.TRANSPORT)
return 0
except Exception:
logger.exception("Server error")
return 1
if __name__ == "__main__":
exit(main())
```
最后,token 校验逻辑完全委托给 `token_verifier.py`,确保我们可以使用 Keycloak introspection endpoint 校验任何凭据产物的有效性。
```python theme={null}
"""Token verifier implementation using OAuth 2.0 Token Introspection (RFC 7662)."""
import logging
from typing import Any
from mcp.server.auth.provider import AccessToken, TokenVerifier
from mcp.shared.auth_utils import check_resource_allowed, resource_url_from_server_url
logger = logging.getLogger(__name__)
class IntrospectionTokenVerifier(TokenVerifier):
"""Token verifier that uses OAuth 2.0 Token Introspection (RFC 7662).
"""
def __init__(
self,
introspection_endpoint: str,
server_url: str,
client_id: str,
client_secret: str,
):
self.introspection_endpoint = introspection_endpoint
self.server_url = server_url
self.client_id = client_id
self.client_secret = client_secret
self.resource_url = resource_url_from_server_url(server_url)
async def verify_token(self, token: str) -> AccessToken | None:
"""Verify token via introspection endpoint."""
import httpx
if not self.introspection_endpoint.startswith(("https://", "http://localhost", "http://127.0.0.1")):
return None
timeout = httpx.Timeout(10.0, connect=5.0)
limits = httpx.Limits(max_connections=10, max_keepalive_connections=5)
async with httpx.AsyncClient(
timeout=timeout,
limits=limits,
verify=True,
) as client:
try:
form_data = {
"token": token,
"client_id": self.client_id,
"client_secret": self.client_secret,
}
headers = {"Content-Type": "application/x-www-form-urlencoded"}
response = await client.post(
self.introspection_endpoint,
data=form_data,
headers=headers,
)
if response.status_code != 200:
return None
data = response.json()
if not data.get("active", False):
return None
if not self._validate_resource(data):
return None
return AccessToken(
token=token,
client_id=data.get("client_id", "unknown"),
scopes=data.get("scope", "").split() if data.get("scope") else [],
expires_at=data.get("exp"),
resource=data.get("aud"), # Include resource in token
)
except Exception as e:
return None
def _validate_resource(self, token_data: dict[str, Any]) -> bool:
"""Validate token was issued for this resource server.
Rules:
- Reject if 'aud' missing.
- Accept if any audience entry matches the derived resource URL.
- Supports string or list forms per JWT spec.
"""
if not self.server_url or not self.resource_url:
return False
aud: list[str] | str | None = token_data.get("aud")
if isinstance(aud, list):
return any(self._is_valid_resource(a) for a in aud)
if isinstance(aud, str):
return self._is_valid_resource(aud)
return False
def _is_valid_resource(self, resource: str) -> bool:
"""Check if the given resource matches our server."""
return check_resource_allowed(self.resource_url, resource)
```
更多细节见 [Python SDK documentation](https://github.com/modelcontextprotocol/python-sdk)。
完整 C# 项目见[示例仓库](https://github.com/localden/min-cs-mcp-auth)。
使用 MCP C# SDK 为 MCP server 设置授权时,可以依赖标准 ASP.NET Core builder pattern。这里不使用 Keycloak 提供的 introspection endpoint,而是使用 ASP.NET Core 内置能力进行 token 校验。
```csharp theme={null}
using Microsoft.AspNetCore.Authentication.JwtBearer;
using Microsoft.IdentityModel.Tokens;
using ModelContextProtocol.AspNetCore.Authentication;
using ProtectedMcpServer.Tools;
using System.Security.Claims;
var builder = WebApplication.CreateBuilder(args);
var serverUrl = "http://localhost:3000/";
var authorizationServerUrl = "http://localhost:8080/realms/master/";
builder.Services.AddAuthentication(options =>
{
options.DefaultChallengeScheme = McpAuthenticationDefaults.AuthenticationScheme;
options.DefaultAuthenticateScheme = JwtBearerDefaults.AuthenticationScheme;
})
.AddJwtBearer(options =>
{
options.Authority = authorizationServerUrl;
var normalizedServerAudience = serverUrl.TrimEnd('/');
options.TokenValidationParameters = new TokenValidationParameters
{
ValidIssuer = authorizationServerUrl,
ValidAudiences = new[] { normalizedServerAudience, serverUrl },
AudienceValidator = (audiences, securityToken, validationParameters) =>
{
if (audiences == null) return false;
foreach (var aud in audiences)
{
if (string.Equals(aud.TrimEnd('/'), normalizedServerAudience, StringComparison.OrdinalIgnoreCase))
{
return true;
}
}
return false;
}
};
options.RequireHttpsMetadata = false; // Set to true in production
options.Events = new JwtBearerEvents
{
OnTokenValidated = context =>
{
var name = context.Principal?.Identity?.Name ?? "unknown";
var email = context.Principal?.FindFirstValue("preferred_username") ?? "unknown";
Console.WriteLine($"Token validated for: {name} ({email})");
return Task.CompletedTask;
},
OnAuthenticationFailed = context =>
{
Console.WriteLine($"Authentication failed: {context.Exception.Message}");
return Task.CompletedTask;
},
};
})
.AddMcp(options =>
{
options.ResourceMetadata = new()
{
Resource = new Uri(serverUrl),
ResourceDocumentation = new Uri("https://docs.example.com/api/math"),
AuthorizationServers = { new Uri(authorizationServerUrl) },
ScopesSupported = ["mcp:tools"]
};
});
builder.Services.AddAuthorization();
builder.Services.AddHttpContextAccessor();
builder.Services.AddMcpServer()
.WithTools()
.WithHttpTransport();
var app = builder.Build();
app.UseAuthentication();
app.UseAuthorization();
app.MapMcp().RequireAuthorization();
Console.WriteLine($"Starting MCP server with authorization at {serverUrl}");
Console.WriteLine($"Using Keycloak server at {authorizationServerUrl}");
Console.WriteLine($"Protected Resource Metadata URL: {serverUrl}.well-known/oauth-protected-resource");
Console.WriteLine("Exposed Math tools: Add, Multiply");
Console.WriteLine("Press Ctrl+C to stop the server");
app.Run(serverUrl);
```
更多细节见 [C# SDK documentation](https://github.com/modelcontextprotocol/csharp-sdk)。
## 测试 MCP Server
为了测试,我们会使用 [Visual Studio Code](https://code.visualstudio.com),但任何支持 MCP 和新版授权规范的 client 都可以。
按 Cmd + Shift + P,选择 **MCP: Add server...**。选择 **HTTP** 并输入 `http://localhost:3000`。为 server 指定一个在 Visual Studio Code 中使用的唯一名称。现在你应该能在 `mcp.json` 中看到类似条目:
```json theme={null}
"my-mcp-server-18676652": {
"url": "http://localhost:3000",
"type": "http"
}
```
连接时,系统会打开浏览器,提示你同意 Visual Studio Code 访问 `mcp:tools` scope。
**处理 Secrets**
绝不要将 client credentials 直接嵌入代码。建议使用环境变量或专门的 secret 存储方案。
Keycloak 配置完成后,每次触发授权流程时,MCP server 都会收到类似下面的 token:
```text theme={null}
eyJhbGciOiJSUzI1NiIsInR5cCIgOiAiSldUIiwia2lkIiA6ICI1TjcxMGw1WW5MWk13WGZ1VlJKWGtCS3ZZMzZzb3JnRG5scmlyZ2tlTHlzIn0.eyJleHAiOjE3NTU1NDA4MTcsImlhdCI6MTc1NTU0MDc1NywiYXV0aF90aW1lIjoxNzU1NTM4ODg4LCJqdGkiOiJvbnJ0YWM6YjM0MDgwZmYtODQwNC02ODY3LTgxYmUtMTIzMWI1MDU5M2E4IiwiaXNzIjoiaHR0cDovL2xvY2FsaG9zdDo4MDgwL3JlYWxtcy9tYXN0ZXIiLCJhdWQiOiJodHRwOi8vbG9jYWxob3N0OjMwMDAiLCJzdWIiOiIzM2VkNmM2Yi1jNmUwLTQ5MjgtYTE2MS1mMmY2OWM3YTAzYjkiLCJ0eXAiOiJCZWFyZXIiLCJhenAiOiI3OTc1YTViNi04YjU5LTRhODUtOWNiYS04ZmFlYmRhYjg5NzQiLCJzaWQiOiI4ZjdlYzI3Ni0zNThmLTRjY2MtYjMxMy1kYjA4MjkwZjM3NmYiLCJzY29wZSI6Im1jcDp0b29scyJ9.P5xCRtXORly0R0EXjyqRCUx-z3J4uAOWNAvYtLPXroykZuVCCJ-K1haiQSwbURqfsVOMbL7jiV-sD6miuPzI1tmKOkN_Yct0Vp-azvj7U5rEj7U6tvPfMkg2Uj_jrIX0KOskyU2pVvGZ-5BgqaSvwTEdsGu_V3_E0xDuSBq2uj_wmhqiyTFm5lJ1WkM3Hnxxx1_AAnTj7iOKMFZ4VCwMmk8hhSC7clnDauORc0sutxiJuYUZzxNiNPkmNeQtMCGqWdP1igcbWbrfnNXhJ6NswBOuRbh97_QraET3hl-CNmyS6C72Xc0aOwR_uJ7xVSBTD02OaQ1JA6kjCATz30kGYg
```
解码后,它看起来像这样:
```json theme={null}
{
"alg": "RS256",
"typ": "JWT",
"kid": "5N710l5YnLZMwXfuVRJXkBKvY36sorgDnlrirgkeLys"
}.{
"exp": 1755540817,
"iat": 1755540757,
"auth_time": 1755538888,
"jti": "onrtac:b34080ff-8404-6867-81be-1231b50593a8",
"iss": "http://localhost:8080/realms/master",
"aud": "http://localhost:3000",
"sub": "33ed6c6b-c6e0-4928-a161-f2f69c7a03b9",
"typ": "Bearer",
"azp": "7975a5b6-8b59-4a85-9cba-8faebdab8974",
"sid": "8f7ec276-358f-4ccc-b313-db08290f376f",
"scope": "mcp:tools"
}.[Signature]
```
**嵌入的 Audience**
注意 token 中嵌入的 `aud` claim:它当前被设置为测试 MCP server 的 URI,并且是从我们之前配置的 scope 推导出来的。后续实现中需要校验这一点。
### MCP Server 设置
现在将 MCP server 设置为使用本地运行的 Keycloak authorization server。你可以根据偏好的编程语言,选择一个受支持的 [MCP SDKs](/docs/sdk)。
出于测试目的,我们会创建一个极其简单的 MCP server,暴露两个 tools:一个用于加法,另一个用于乘法。访问这些 tools 需要授权。
完整 TypeScript 项目见[示例仓库](https://github.com/localden/min-ts-mcp-auth)。
运行下面的代码前,请确保有一个包含以下内容的 `.env` 文件:
```env theme={null}
# Server host/port
HOST=localhost
PORT=3000
# Auth server location
AUTH_HOST=localhost
AUTH_PORT=8080
AUTH_REALM=master
# Keycloak OAuth client credentials
OAUTH_CLIENT_ID=
OAUTH_CLIENT_SECRET=
```
`OAUTH_CLIENT_ID` 和 `OAUTH_CLIENT_SECRET` 对应前面创建的 MCP server client。
除实现 MCP 授权规范外,下面的 server 还会通过 Keycloak 执行 token introspection,确保它从 client 收到的 token 有效。它还实现了基础日志,便于诊断问题。
```typescript theme={null}
import "dotenv/config";
import express from "express";
import { randomUUID } from "node:crypto";
import { McpServer } from "@modelcontextprotocol/sdk/server/mcp.js";
import { StreamableHTTPServerTransport } from "@modelcontextprotocol/sdk/server/streamableHttp.js";
import { isInitializeRequest } from "@modelcontextprotocol/sdk/types.js";
import { z } from "zod";
import cors from "cors";
import {
mcpAuthMetadataRouter,
getOAuthProtectedResourceMetadataUrl,
} from "@modelcontextprotocol/sdk/server/auth/router.js";
import { requireBearerAuth } from "@modelcontextprotocol/sdk/server/auth/middleware/bearerAuth.js";
import { OAuthMetadata } from "@modelcontextprotocol/sdk/shared/auth.js";
import { checkResourceAllowed } from "@modelcontextprotocol/sdk/shared/auth-utils.js";
const CONFIG = {
host: process.env.HOST || "localhost",
port: Number(process.env.PORT) || 3000,
auth: {
host: process.env.AUTH_HOST || process.env.HOST || "localhost",
port: Number(process.env.AUTH_PORT) || 8080,
realm: process.env.AUTH_REALM || "master",
clientId: process.env.OAUTH_CLIENT_ID || "mcp-server",
clientSecret: process.env.OAUTH_CLIENT_SECRET || "",
},
};
function createOAuthUrls() {
const authBaseUrl = new URL(
`http://${CONFIG.auth.host}:${CONFIG.auth.port}/realms/${CONFIG.auth.realm}/`,
);
return {
issuer: authBaseUrl.toString(),
introspection_endpoint: new URL(
"protocol/openid-connect/token/introspect",
authBaseUrl,
).toString(),
authorization_endpoint: new URL(
"protocol/openid-connect/auth",
authBaseUrl,
).toString(),
token_endpoint: new URL(
"protocol/openid-connect/token",
authBaseUrl,
).toString(),
};
}
function createRequestLogger() {
return (req: any, res: any, next: any) => {
const start = Date.now();
res.on("finish", () => {
const ms = Date.now() - start;
console.log(
`${req.method} ${req.originalUrl} -> ${res.statusCode} ${ms}ms`,
);
});
next();
};
}
const app = express();
app.use(
express.json({
verify: (req: any, _res, buf) => {
req.rawBody = buf?.toString() ?? "";
},
}),
);
app.use(
cors({
origin: "*",
exposedHeaders: ["Mcp-Session-Id"],
}),
);
app.use(createRequestLogger());
const mcpServerUrl = new URL(`http://${CONFIG.host}:${CONFIG.port}`);
const oauthUrls = createOAuthUrls();
const oauthMetadata: OAuthMetadata = {
...oauthUrls,
response_types_supported: ["code"],
};
const tokenVerifier = {
verifyAccessToken: async (token: string) => {
const endpoint = oauthMetadata.introspection_endpoint;
if (!endpoint) {
console.error("[auth] no introspection endpoint in metadata");
throw new Error("No token verification endpoint available in metadata");
}
const params = new URLSearchParams({
token: token,
client_id: CONFIG.auth.clientId,
});
if (CONFIG.auth.clientSecret) {
params.set("client_secret", CONFIG.auth.clientSecret);
}
let response: Response;
try {
response = await fetch(endpoint, {
method: "POST",
headers: {
"Content-Type": "application/x-www-form-urlencoded",
},
body: params.toString(),
});
} catch (e) {
console.error("[auth] introspection fetch threw", e);
throw e;
}
if (!response.ok) {
const txt = await response.text();
console.error("[auth] introspection non-OK", { status: response.status });
try {
const obj = JSON.parse(txt);
console.log(JSON.stringify(obj, null, 2));
} catch {
console.error(txt);
}
throw new Error(`Invalid or expired token: ${txt}`);
}
let data: any;
try {
data = await response.json();
} catch (e) {
const txt = await response.text();
console.error("[auth] failed to parse introspection JSON", {
error: String(e),
body: txt,
});
throw e;
}
if (data.active === false) {
throw new Error("Inactive token");
}
if (!data.aud) {
throw new Error("Resource indicator (aud) missing");
}
const audiences: string[] = Array.isArray(data.aud) ? data.aud : [data.aud];
const allowed = audiences.some((a) =>
checkResourceAllowed({
requestedResource: a,
configuredResource: mcpServerUrl,
}),
);
if (!allowed) {
throw new Error(
`None of the provided audiences are allowed. Expected ${mcpServerUrl}, got: ${audiences.join(", ")}`,
);
}
return {
token,
clientId: data.client_id,
scopes: data.scope ? data.scope.split(" ") : [],
expiresAt: data.exp,
};
},
};
app.use(
mcpAuthMetadataRouter({
oauthMetadata,
resourceServerUrl: mcpServerUrl,
scopesSupported: ["mcp:tools"],
resourceName: "MCP Demo Server",
}),
);
const authMiddleware = requireBearerAuth({
verifier: tokenVerifier,
requiredScopes: [],
resourceMetadataUrl: getOAuthProtectedResourceMetadataUrl(mcpServerUrl),
});
const transports: { [sessionId: string]: StreamableHTTPServerTransport } = {};
function createMcpServer() {
const server = new McpServer({
name: "example-server",
version: "1.0.0",
});
server.registerTool(
"add",
{
title: "Addition Tool",
description: "Add two numbers together",
inputSchema: {
a: z.number().describe("First number to add"),
b: z.number().describe("Second number to add"),
},
},
async ({ a, b }) => ({
content: [{ type: "text", text: `${a} + ${b} = ${a + b}` }],
}),
);
server.registerTool(
"multiply",
{
title: "Multiplication Tool",
description: "Multiply two numbers together",
inputSchema: {
x: z.number().describe("First number to multiply"),
y: z.number().describe("Second number to multiply"),
},
},
async ({ x, y }) => ({
content: [{ type: "text", text: `${x} × ${y} = ${x * y}` }],
}),
);
return server;
}
const mcpPostHandler = async (req: express.Request, res: express.Response) => {
const sessionId = req.headers["mcp-session-id"] as string | undefined;
let transport: StreamableHTTPServerTransport;
if (sessionId && transports[sessionId]) {
transport = transports[sessionId];
} else if (!sessionId && isInitializeRequest(req.body)) {
transport = new StreamableHTTPServerTransport({
sessionIdGenerator: () => randomUUID(),
onsessioninitialized: (sessionId) => {
transports[sessionId] = transport;
},
});
transport.onclose = () => {
if (transport.sessionId) {
delete transports[transport.sessionId];
}
};
const server = createMcpServer();
await server.connect(transport);
} else {
res.status(400).json({
jsonrpc: "2.0",
error: {
code: -32000,
message: "Bad Request: No valid session ID provided",
},
id: null,
});
return;
}
await transport.handleRequest(req, res, req.body);
};
const handleSessionRequest = async (
req: express.Request,
res: express.Response,
) => {
const sessionId = req.headers["mcp-session-id"] as string | undefined;
if (!sessionId || !transports[sessionId]) {
res.status(400).send("Invalid or missing session ID");
return;
}
const transport = transports[sessionId];
await transport.handleRequest(req, res);
};
app.post("/", authMiddleware, mcpPostHandler);
app.get("/", authMiddleware, handleSessionRequest);
app.delete("/", authMiddleware, handleSessionRequest);
app.listen(CONFIG.port, CONFIG.host, () => {
console.log(`🚀 MCP Server running on ${mcpServerUrl.origin}`);
console.log(`📡 MCP endpoint available at ${mcpServerUrl.origin}`);
console.log(
`🔐 OAuth metadata available at ${getOAuthProtectedResourceMetadataUrl(mcpServerUrl)}`,
);
});
```
运行 server 后,可以通过提供 MCP server endpoint,将它添加到 MCP client(例如 Visual Studio Code)中。
关于使用 TypeScript 实现 MCP servers 的更多细节,请参考 [TypeScript SDK documentation](https://github.com/modelcontextprotocol/typescript-sdk)。
完整 Python 项目见[示例仓库](https://github.com/modelcontextprotocol/python-sdk/tree/main/examples/servers/simple-auth)。
为了简化授权交互,在 Python 场景中我们依赖 [FastMCP](https://gofastmcp.com/getting-started/welcome)。围绕授权的许多约定(例如端点和 token 校验逻辑)在不同语言中是一致的,但某些语言/框架在生产场景中提供了更简单的集成方式。
在编写真正的 server 前,需要先在 `config.py` 中设置配置,内容完全基于你的本地 server 设置:
```python theme={null}
"""Configuration settings for the MCP auth server."""
import os
from typing import Optional
class Config:
"""Configuration class that loads from environment variables with sensible defaults."""
# Server settings
HOST: str = os.getenv("HOST", "localhost")
PORT: int = int(os.getenv("PORT", "3000"))
# Auth server settings
AUTH_HOST: str = os.getenv("AUTH_HOST", "localhost")
AUTH_PORT: int = int(os.getenv("AUTH_PORT", "8080"))
AUTH_REALM: str = os.getenv("AUTH_REALM", "master")
# OAuth client settings
OAUTH_CLIENT_ID: str = os.getenv("OAUTH_CLIENT_ID", "mcp-server")
OAUTH_CLIENT_SECRET: str = os.getenv("OAUTH_CLIENT_SECRET", "UO3rmozkFFkXr0QxPTkzZ0LMXDidIikB")
# Server settings
MCP_SCOPE: str = os.getenv("MCP_SCOPE", "mcp:tools")
OAUTH_STRICT: bool = os.getenv("OAUTH_STRICT", "false").lower() in ("true", "1", "yes")
TRANSPORT: str = os.getenv("TRANSPORT", "streamable-http")
@property
def server_url(self) -> str:
"""Build the server URL."""
return f"http://{self.HOST}:{self.PORT}"
@property
def auth_base_url(self) -> str:
"""Build the auth server base URL."""
return f"http://{self.AUTH_HOST}:{self.AUTH_PORT}/realms/{self.AUTH_REALM}/"
def validate(self) -> None:
"""Validate configuration."""
if self.TRANSPORT not in ["sse", "streamable-http"]:
raise ValueError(f"Invalid transport: {self.TRANSPORT}. Must be 'sse' or 'streamable-http'")
# Global configuration instance
config = Config()
```
server 实现如下:
```python theme={null}
import datetime
import logging
from typing import Any
from pydantic import AnyHttpUrl
from mcp.server.auth.settings import AuthSettings
from mcp.server.fastmcp.server import FastMCP
from .config import config
from .token_verifier import IntrospectionTokenVerifier
logger = logging.getLogger(__name__)
def create_oauth_urls() -> dict[str, str]:
"""Create OAuth URLs based on configuration (Keycloak-style)."""
from urllib.parse import urljoin
auth_base_url = config.auth_base_url
return {
"issuer": auth_base_url,
"introspection_endpoint": urljoin(auth_base_url, "protocol/openid-connect/token/introspect"),
"authorization_endpoint": urljoin(auth_base_url, "protocol/openid-connect/auth"),
"token_endpoint": urljoin(auth_base_url, "protocol/openid-connect/token"),
}
def create_server() -> FastMCP:
"""Create and configure the FastMCP server."""
config.validate()
oauth_urls = create_oauth_urls()
token_verifier = IntrospectionTokenVerifier(
introspection_endpoint=oauth_urls["introspection_endpoint"],
server_url=config.server_url,
client_id=config.OAUTH_CLIENT_ID,
client_secret=config.OAUTH_CLIENT_SECRET,
)
app = FastMCP(
name="MCP Resource Server",
instructions="Resource Server that validates tokens via Authorization Server introspection",
host=config.HOST,
port=config.PORT,
debug=True,
streamable_http_path="/",
token_verifier=token_verifier,
auth=AuthSettings(
issuer_url=AnyHttpUrl(oauth_urls["issuer"]),
required_scopes=[config.MCP_SCOPE],
resource_server_url=AnyHttpUrl(config.server_url),
),
)
@app.tool()
async def add_numbers(a: float, b: float) -> dict[str, Any]:
"""
Add two numbers together.
This tool demonstrates basic arithmetic operations with OAuth authentication.
Args:
a: The first number to add
b: The second number to add
"""
result = a + b
return {
"operation": "addition",
"operand_a": a,
"operand_b": b,
"result": result,
"timestamp": datetime.datetime.now().isoformat()
}
@app.tool()
async def multiply_numbers(x: float, y: float) -> dict[str, Any]:
"""
Multiply two numbers together.
This tool demonstrates basic arithmetic operations with OAuth authentication.
Args:
x: The first number to multiply
y: The second number to multiply
"""
result = x * y
return {
"operation": "multiplication",
"operand_x": x,
"operand_y": y,
"result": result,
"timestamp": datetime.datetime.now().isoformat()
}
return app
def main() -> int:
"""
Run the MCP Resource Server.
This server:
- Provides RFC 9728 Protected Resource Metadata
- Validates tokens via Authorization Server introspection
- Serves MCP tools requiring authentication
Configuration is loaded from config.py and environment variables.
"""
logging.basicConfig(level=logging.INFO)
try:
config.validate()
oauth_urls = create_oauth_urls()
except ValueError as e:
logger.error("Configuration error: %s", e)
return 1
try:
mcp_server = create_server()
logger.info("Starting MCP Server on %s:%s", config.HOST, config.PORT)
logger.info("Authorization Server: %s", oauth_urls["issuer"])
logger.info("Transport: %s", config.TRANSPORT)
mcp_server.run(transport=config.TRANSPORT)
return 0
except Exception:
logger.exception("Server error")
return 1
if __name__ == "__main__":
exit(main())
```
最后,token 校验逻辑完全委托给 `token_verifier.py`,确保我们可以使用 Keycloak introspection endpoint 校验任何凭据产物的有效性。
```python theme={null}
"""Token verifier implementation using OAuth 2.0 Token Introspection (RFC 7662)."""
import logging
from typing import Any
from mcp.server.auth.provider import AccessToken, TokenVerifier
from mcp.shared.auth_utils import check_resource_allowed, resource_url_from_server_url
logger = logging.getLogger(__name__)
class IntrospectionTokenVerifier(TokenVerifier):
"""Token verifier that uses OAuth 2.0 Token Introspection (RFC 7662).
"""
def __init__(
self,
introspection_endpoint: str,
server_url: str,
client_id: str,
client_secret: str,
):
self.introspection_endpoint = introspection_endpoint
self.server_url = server_url
self.client_id = client_id
self.client_secret = client_secret
self.resource_url = resource_url_from_server_url(server_url)
async def verify_token(self, token: str) -> AccessToken | None:
"""Verify token via introspection endpoint."""
import httpx
if not self.introspection_endpoint.startswith(("https://", "http://localhost", "http://127.0.0.1")):
return None
timeout = httpx.Timeout(10.0, connect=5.0)
limits = httpx.Limits(max_connections=10, max_keepalive_connections=5)
async with httpx.AsyncClient(
timeout=timeout,
limits=limits,
verify=True,
) as client:
try:
form_data = {
"token": token,
"client_id": self.client_id,
"client_secret": self.client_secret,
}
headers = {"Content-Type": "application/x-www-form-urlencoded"}
response = await client.post(
self.introspection_endpoint,
data=form_data,
headers=headers,
)
if response.status_code != 200:
return None
data = response.json()
if not data.get("active", False):
return None
if not self._validate_resource(data):
return None
return AccessToken(
token=token,
client_id=data.get("client_id", "unknown"),
scopes=data.get("scope", "").split() if data.get("scope") else [],
expires_at=data.get("exp"),
resource=data.get("aud"), # Include resource in token
)
except Exception as e:
return None
def _validate_resource(self, token_data: dict[str, Any]) -> bool:
"""Validate token was issued for this resource server.
Rules:
- Reject if 'aud' missing.
- Accept if any audience entry matches the derived resource URL.
- Supports string or list forms per JWT spec.
"""
if not self.server_url or not self.resource_url:
return False
aud: list[str] | str | None = token_data.get("aud")
if isinstance(aud, list):
return any(self._is_valid_resource(a) for a in aud)
if isinstance(aud, str):
return self._is_valid_resource(aud)
return False
def _is_valid_resource(self, resource: str) -> bool:
"""Check if the given resource matches our server."""
return check_resource_allowed(self.resource_url, resource)
```
更多细节见 [Python SDK documentation](https://github.com/modelcontextprotocol/python-sdk)。
完整 C# 项目见[示例仓库](https://github.com/localden/min-cs-mcp-auth)。
使用 MCP C# SDK 为 MCP server 设置授权时,可以依赖标准 ASP.NET Core builder pattern。这里不使用 Keycloak 提供的 introspection endpoint,而是使用 ASP.NET Core 内置能力进行 token 校验。
```csharp theme={null}
using Microsoft.AspNetCore.Authentication.JwtBearer;
using Microsoft.IdentityModel.Tokens;
using ModelContextProtocol.AspNetCore.Authentication;
using ProtectedMcpServer.Tools;
using System.Security.Claims;
var builder = WebApplication.CreateBuilder(args);
var serverUrl = "http://localhost:3000/";
var authorizationServerUrl = "http://localhost:8080/realms/master/";
builder.Services.AddAuthentication(options =>
{
options.DefaultChallengeScheme = McpAuthenticationDefaults.AuthenticationScheme;
options.DefaultAuthenticateScheme = JwtBearerDefaults.AuthenticationScheme;
})
.AddJwtBearer(options =>
{
options.Authority = authorizationServerUrl;
var normalizedServerAudience = serverUrl.TrimEnd('/');
options.TokenValidationParameters = new TokenValidationParameters
{
ValidIssuer = authorizationServerUrl,
ValidAudiences = new[] { normalizedServerAudience, serverUrl },
AudienceValidator = (audiences, securityToken, validationParameters) =>
{
if (audiences == null) return false;
foreach (var aud in audiences)
{
if (string.Equals(aud.TrimEnd('/'), normalizedServerAudience, StringComparison.OrdinalIgnoreCase))
{
return true;
}
}
return false;
}
};
options.RequireHttpsMetadata = false; // Set to true in production
options.Events = new JwtBearerEvents
{
OnTokenValidated = context =>
{
var name = context.Principal?.Identity?.Name ?? "unknown";
var email = context.Principal?.FindFirstValue("preferred_username") ?? "unknown";
Console.WriteLine($"Token validated for: {name} ({email})");
return Task.CompletedTask;
},
OnAuthenticationFailed = context =>
{
Console.WriteLine($"Authentication failed: {context.Exception.Message}");
return Task.CompletedTask;
},
};
})
.AddMcp(options =>
{
options.ResourceMetadata = new()
{
Resource = new Uri(serverUrl),
ResourceDocumentation = new Uri("https://docs.example.com/api/math"),
AuthorizationServers = { new Uri(authorizationServerUrl) },
ScopesSupported = ["mcp:tools"]
};
});
builder.Services.AddAuthorization();
builder.Services.AddHttpContextAccessor();
builder.Services.AddMcpServer()
.WithTools()
.WithHttpTransport();
var app = builder.Build();
app.UseAuthentication();
app.UseAuthorization();
app.MapMcp().RequireAuthorization();
Console.WriteLine($"Starting MCP server with authorization at {serverUrl}");
Console.WriteLine($"Using Keycloak server at {authorizationServerUrl}");
Console.WriteLine($"Protected Resource Metadata URL: {serverUrl}.well-known/oauth-protected-resource");
Console.WriteLine("Exposed Math tools: Add, Multiply");
Console.WriteLine("Press Ctrl+C to stop the server");
app.Run(serverUrl);
```
更多细节见 [C# SDK documentation](https://github.com/modelcontextprotocol/csharp-sdk)。
## 测试 MCP Server
为了测试,我们会使用 [Visual Studio Code](https://code.visualstudio.com),但任何支持 MCP 和新版授权规范的 client 都可以。
按 Cmd + Shift + P,选择 **MCP: Add server...**。选择 **HTTP** 并输入 `http://localhost:3000`。为 server 指定一个在 Visual Studio Code 中使用的唯一名称。现在你应该能在 `mcp.json` 中看到类似条目:
```json theme={null}
"my-mcp-server-18676652": {
"url": "http://localhost:3000",
"type": "http"
}
```
连接时,系统会打开浏览器,提示你同意 Visual Studio Code 访问 `mcp:tools` scope。
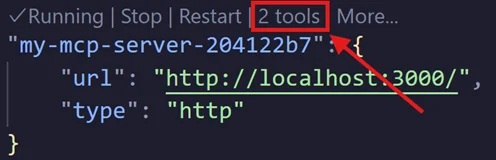
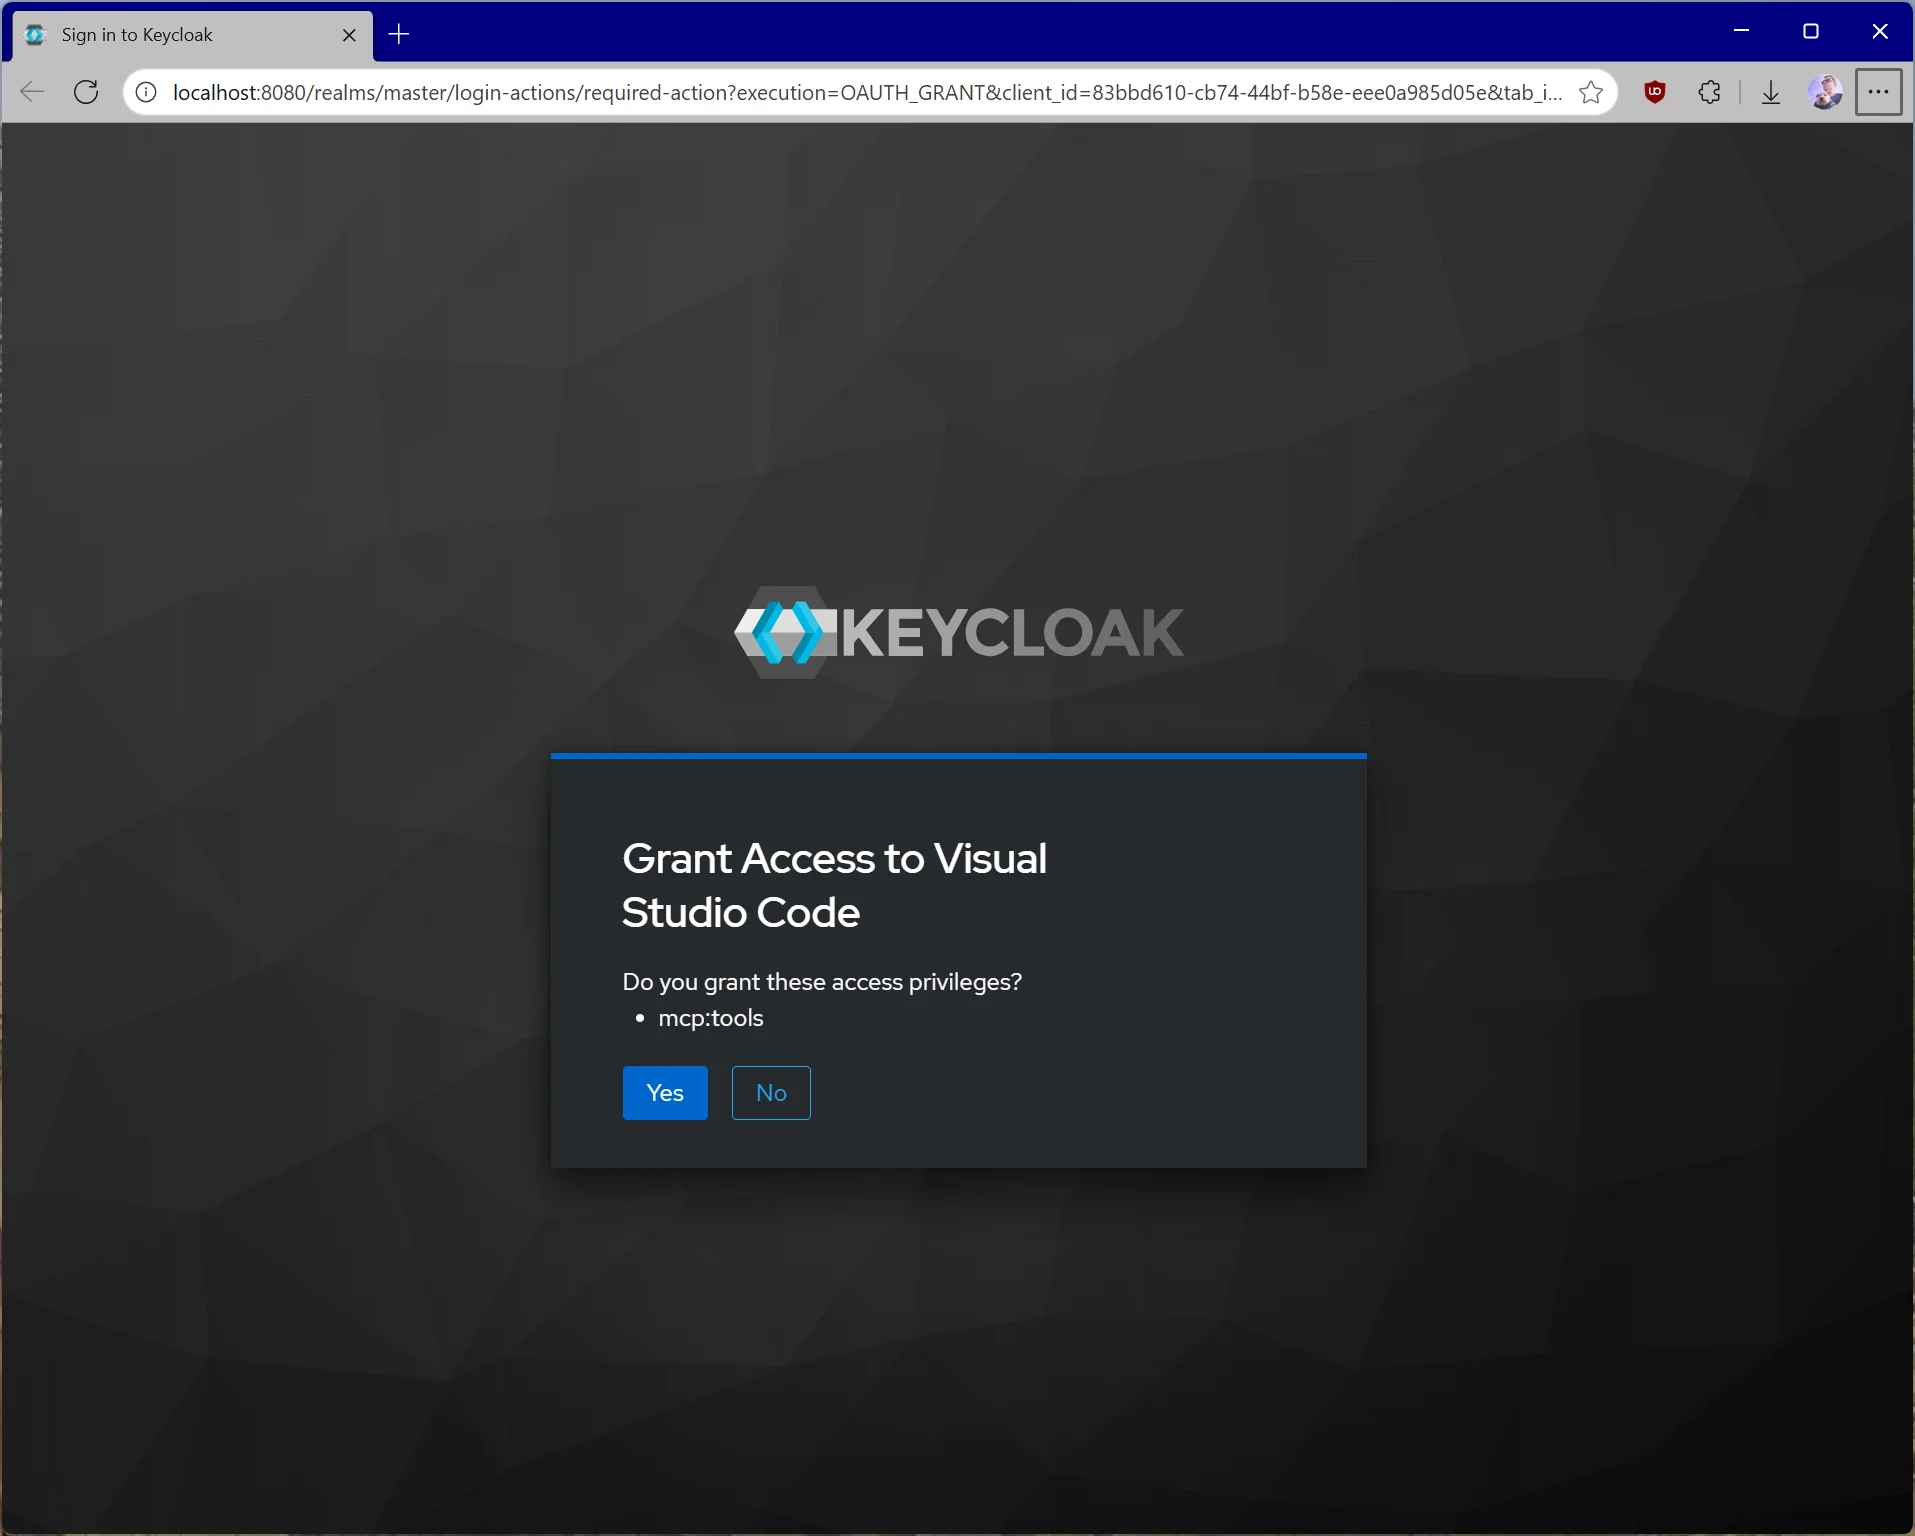 同意后,你会看到 tools 列在 `mcp.json` 中 server 条目上方。
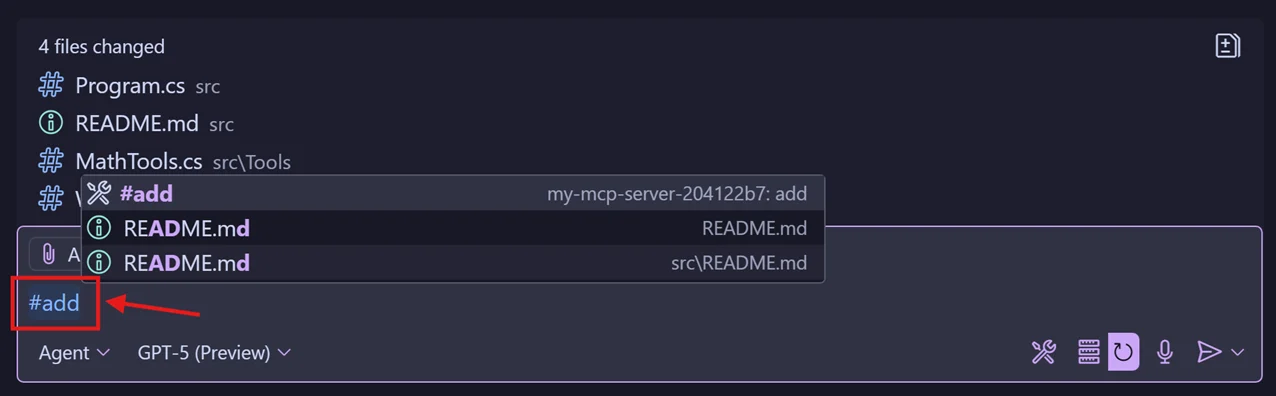
 你可以在聊天视图中借助 `#` 符号调用单个 tools。
 ## 常见问题和避免方法
关于攻击向量、缓解策略和实现最佳实践等完整安全指导,请务必阅读 [Security Best Practices](/specification/draft/basic/security_best_practices)。下面列出几个关键问题。
* **不要自行实现 token 校验或授权逻辑**。对于 token 校验或授权决策等事项,请使用现成、经过充分测试且安全的库。除非你是安全专家,否则从零实现更容易出错。
* **使用短生命周期 access tokens**。根据所用 authorization server,这项设置可能可以自定义。建议不要使用长期 tokens;如果恶意行为者窃取它们,就能维持更长时间的访问权限。
* **始终校验 tokens**。server 收到 token 并不意味着该 token 有效,也不意味着它是发给你的 server 的。始终验证 MCP server 从 client 收到的内容是否满足所需约束。
* **将 tokens 存储在安全、加密的存储中**。某些场景下,你可能需要在服务器端缓存 tokens。如果这样做,请确保存储具备正确访问控制,且不能被有权访问 server 的恶意方轻易外泄。还应实现健壮的缓存驱逐策略,确保 MCP server 不会复用过期或无效 tokens。
* **生产环境强制 HTTPS**。开发期间除 `localhost` 外,不要通过明文 HTTP 接受 tokens 或 redirect callbacks。
* **最小权限 scopes**。不要使用 catch-all scopes。尽可能按 tool 或 capability 拆分访问权限,并在 resource server 上按 route/tool 校验所需 scopes。
* **不要记录凭据**。绝不要记录 `Authorization` headers、tokens、codes 或 secrets。清理 query strings 和 headers。在结构化日志中遮蔽敏感字段。
* **区分 app 与 resource server 凭据**。不要将 MCP server 的 client secret 复用于最终用户 flows。将所有 secrets 存储在合适的 secret manager 中,不要放在源代码控制中。
* **返回正确 challenges**。401 时包含带 `Bearer`、`realm` 和 `resource_metadata` 的 `WWW-Authenticate`,让 clients 能发现如何认证。
* **DCR (Dynamic Client Registration) 控制**。如果启用 DCR,请注意组织特定约束,例如 trusted hosts、必要审查和可审计注册。未认证 DCR 意味着任何人都可以在你的 authorization server 中注册任何 client。
* **多租户/realm 混淆**。除非明确支持多租户,否则固定到单个 issuer/tenant。即使由同一个 authorization server 签名,也要拒绝其他 realms 的 tokens。
* **Audience/resource indicator 误用**。不要配置或接受通用 audiences(例如 `api`)或无关 resources。要求 audience/resource 与已配置 server 匹配。
* **错误详情泄露**。向 clients 返回通用消息,但在内部日志中用 correlation IDs 记录详细原因,以便排障且不暴露内部细节。
* **Session identifier 加固**。将 `Mcp-Session-Id` 视为不可信输入;绝不要将授权绑定到它。认证变化时重新生成,并在服务器端校验生命周期。
## 相关标准和文档
MCP 授权建立在以下成熟标准之上:
* **[OAuth 2.1](https://datatracker.ietf.org/doc/html/draft-ietf-oauth-v2-1-13)**:核心授权框架
* **[RFC 8414](https://datatracker.ietf.org/doc/html/rfc8414)**:Authorization Server Metadata 发现
* **[RFC 7591](https://datatracker.ietf.org/doc/html/rfc7591)**:Dynamic Client Registration
* **[RFC 9728](https://datatracker.ietf.org/doc/html/rfc9728)**:Protected Resource Metadata
* **[RFC 8707](https://datatracker.ietf.org/doc/html/rfc8707)**:Resource Indicators
更多细节请参考:
* [授权规范](/specification/draft/basic/authorization)
* [安全最佳实践](/specification/draft/basic/security_best_practices)
* [可用 MCP SDKs](/docs/sdk)
理解这些标准有助于你正确实现授权,并在问题出现时进行排障。
## 常见问题和避免方法
关于攻击向量、缓解策略和实现最佳实践等完整安全指导,请务必阅读 [Security Best Practices](/specification/draft/basic/security_best_practices)。下面列出几个关键问题。
* **不要自行实现 token 校验或授权逻辑**。对于 token 校验或授权决策等事项,请使用现成、经过充分测试且安全的库。除非你是安全专家,否则从零实现更容易出错。
* **使用短生命周期 access tokens**。根据所用 authorization server,这项设置可能可以自定义。建议不要使用长期 tokens;如果恶意行为者窃取它们,就能维持更长时间的访问权限。
* **始终校验 tokens**。server 收到 token 并不意味着该 token 有效,也不意味着它是发给你的 server 的。始终验证 MCP server 从 client 收到的内容是否满足所需约束。
* **将 tokens 存储在安全、加密的存储中**。某些场景下,你可能需要在服务器端缓存 tokens。如果这样做,请确保存储具备正确访问控制,且不能被有权访问 server 的恶意方轻易外泄。还应实现健壮的缓存驱逐策略,确保 MCP server 不会复用过期或无效 tokens。
* **生产环境强制 HTTPS**。开发期间除 `localhost` 外,不要通过明文 HTTP 接受 tokens 或 redirect callbacks。
* **最小权限 scopes**。不要使用 catch-all scopes。尽可能按 tool 或 capability 拆分访问权限,并在 resource server 上按 route/tool 校验所需 scopes。
* **不要记录凭据**。绝不要记录 `Authorization` headers、tokens、codes 或 secrets。清理 query strings 和 headers。在结构化日志中遮蔽敏感字段。
* **区分 app 与 resource server 凭据**。不要将 MCP server 的 client secret 复用于最终用户 flows。将所有 secrets 存储在合适的 secret manager 中,不要放在源代码控制中。
* **返回正确 challenges**。401 时包含带 `Bearer`、`realm` 和 `resource_metadata` 的 `WWW-Authenticate`,让 clients 能发现如何认证。
* **DCR (Dynamic Client Registration) 控制**。如果启用 DCR,请注意组织特定约束,例如 trusted hosts、必要审查和可审计注册。未认证 DCR 意味着任何人都可以在你的 authorization server 中注册任何 client。
* **多租户/realm 混淆**。除非明确支持多租户,否则固定到单个 issuer/tenant。即使由同一个 authorization server 签名,也要拒绝其他 realms 的 tokens。
* **Audience/resource indicator 误用**。不要配置或接受通用 audiences(例如 `api`)或无关 resources。要求 audience/resource 与已配置 server 匹配。
* **错误详情泄露**。向 clients 返回通用消息,但在内部日志中用 correlation IDs 记录详细原因,以便排障且不暴露内部细节。
* **Session identifier 加固**。将 `Mcp-Session-Id` 视为不可信输入;绝不要将授权绑定到它。认证变化时重新生成,并在服务器端校验生命周期。
## 相关标准和文档
MCP 授权建立在以下成熟标准之上:
* **[OAuth 2.1](https://datatracker.ietf.org/doc/html/draft-ietf-oauth-v2-1-13)**:核心授权框架
* **[RFC 8414](https://datatracker.ietf.org/doc/html/rfc8414)**:Authorization Server Metadata 发现
* **[RFC 7591](https://datatracker.ietf.org/doc/html/rfc7591)**:Dynamic Client Registration
* **[RFC 9728](https://datatracker.ietf.org/doc/html/rfc9728)**:Protected Resource Metadata
* **[RFC 8707](https://datatracker.ietf.org/doc/html/rfc8707)**:Resource Indicators
更多细节请参考:
* [授权规范](/specification/draft/basic/authorization)
* [安全最佳实践](/specification/draft/basic/security_best_practices)
* [可用 MCP SDKs](/docs/sdk)
理解这些标准有助于你正确实现授权,并在问题出现时进行排障。