> ## Documentation Index
> Fetch the complete documentation index at: https://mcp.developerdoc.cn/llms.txt
> Use this file to discover all available pages before exploring further.
# 构建 MCP 服务器
> 开始构建自己的服务器,并在 Claude for Desktop 和其他客户端中使用。
在本教程中,我们会构建一个简单的 MCP 天气服务器,并将它连接到一个 host:Claude for Desktop。
### 我们将构建什么
我们将构建一个暴露两个 tools 的服务器:`get_alerts` 和 `get_forecast`。然后把该服务器连接到 MCP host(本例中是 Claude for Desktop):
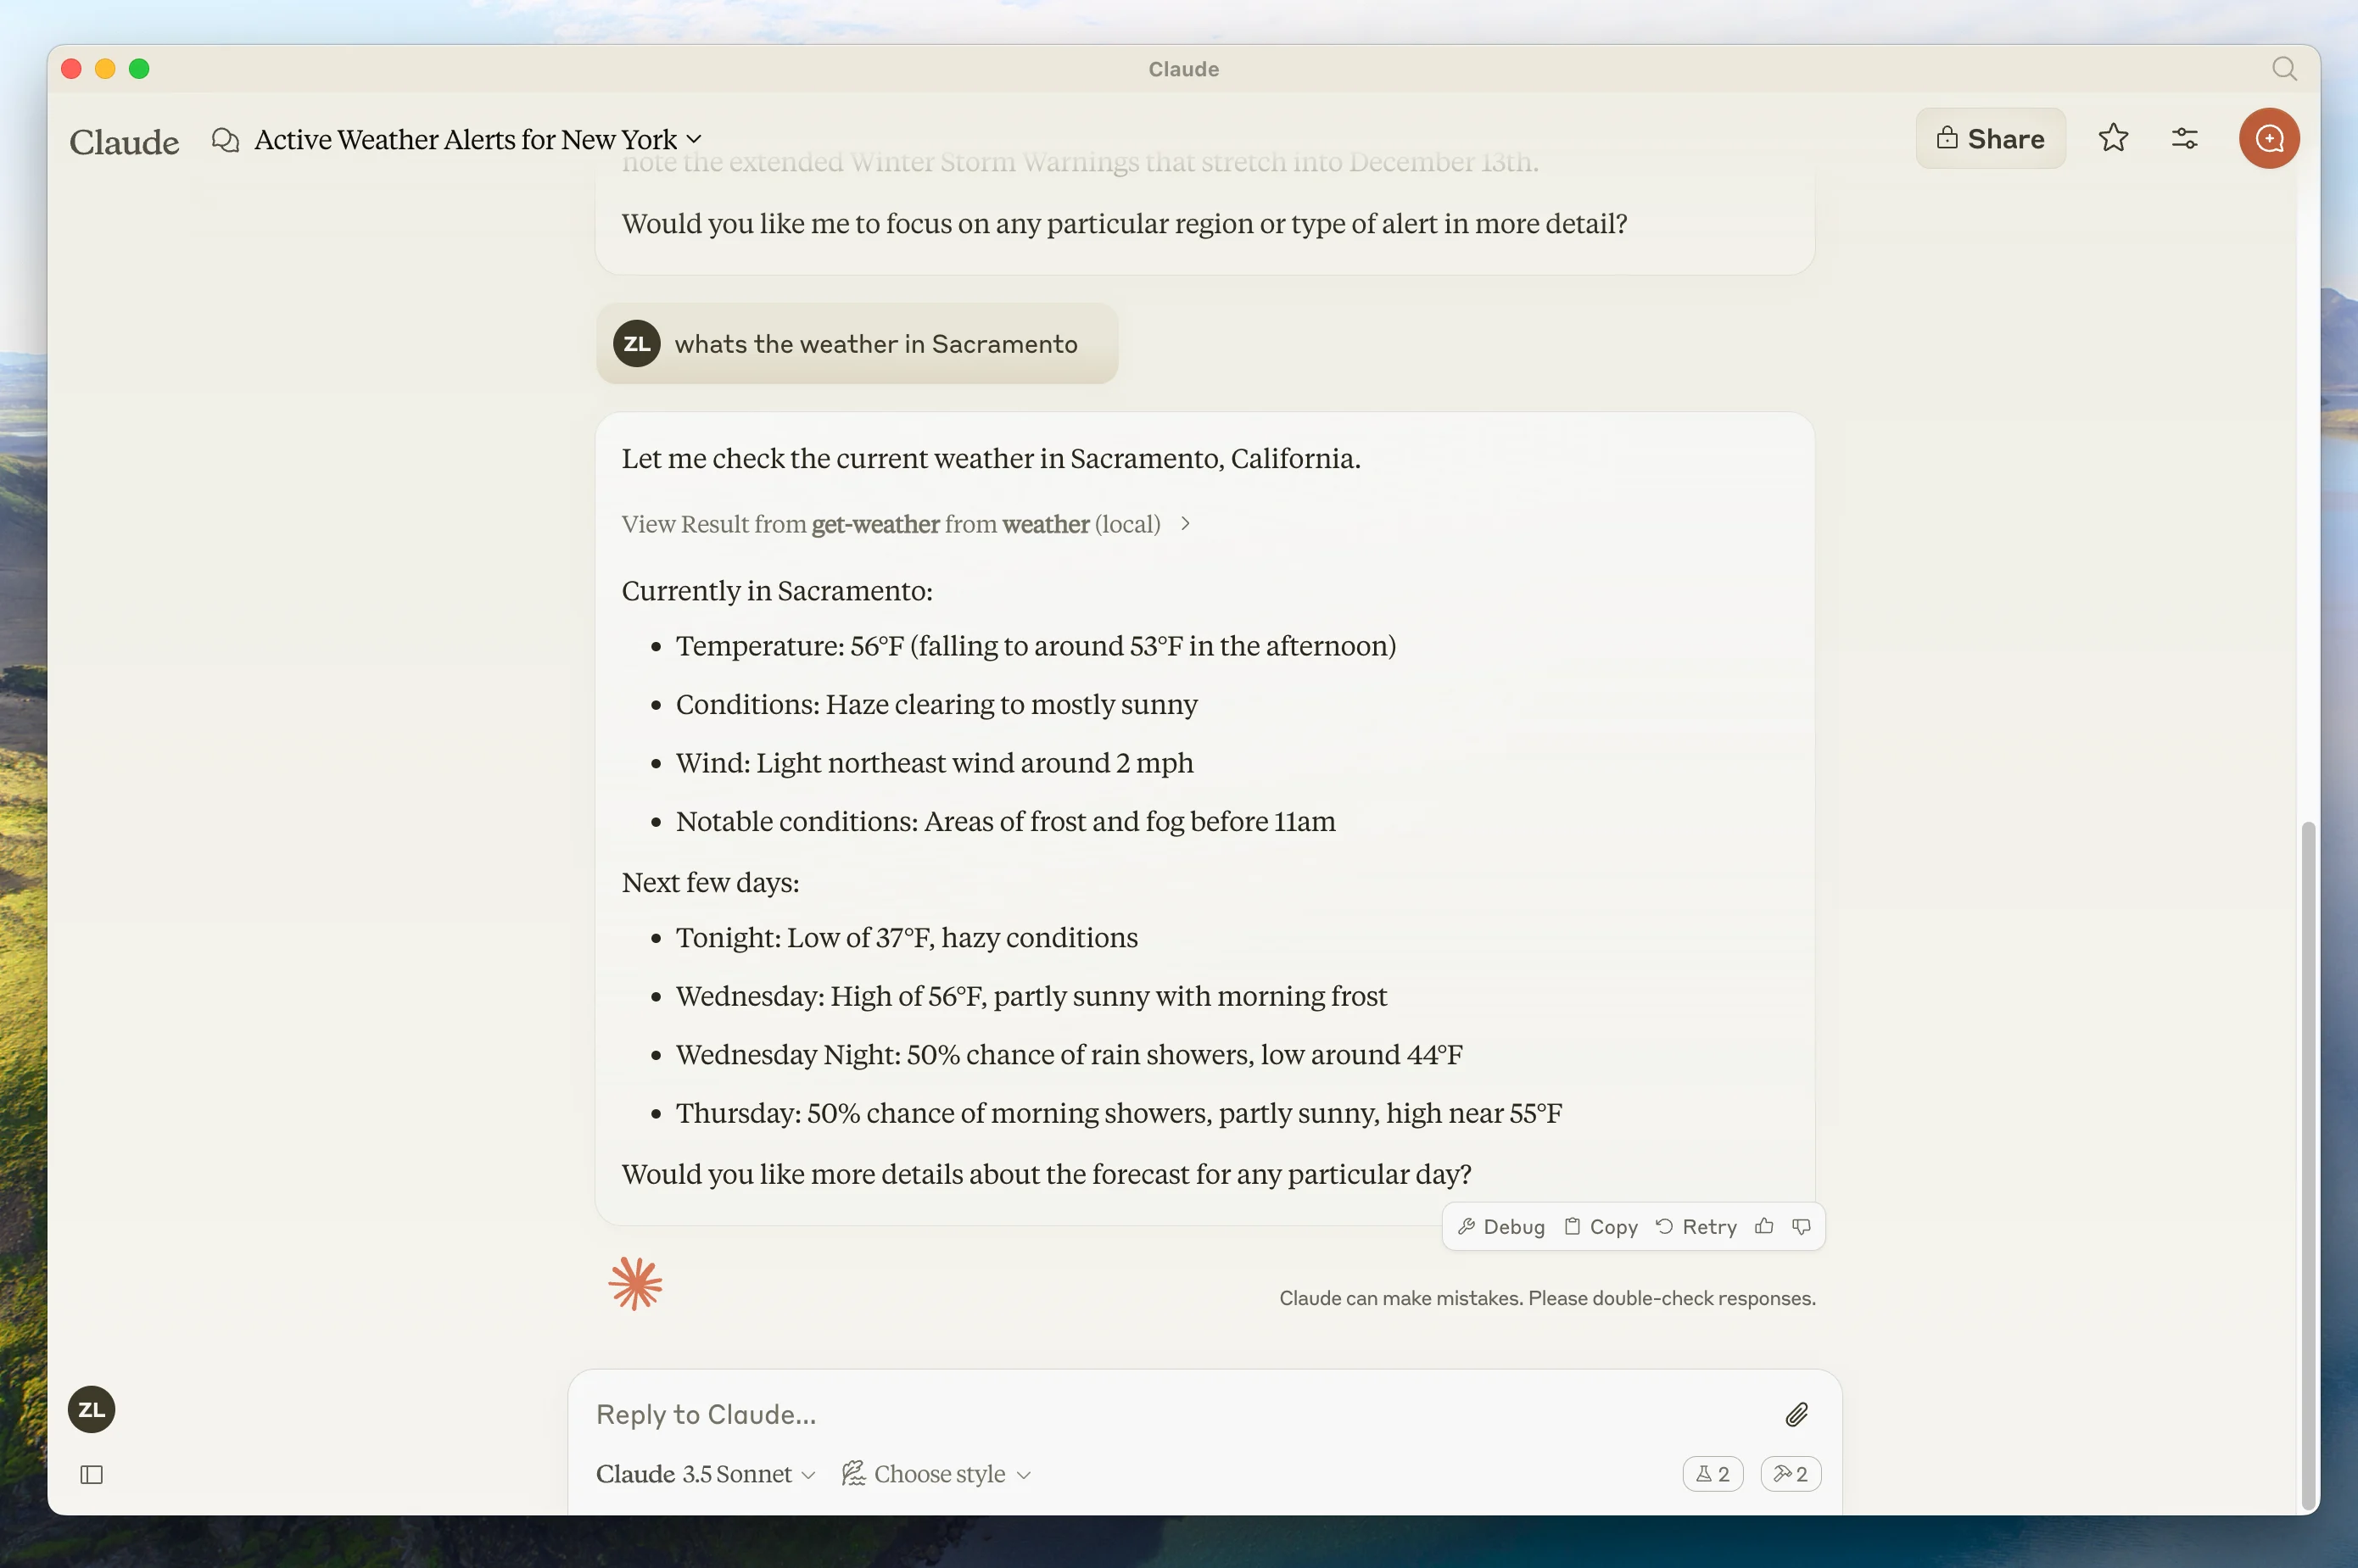 服务器可以连接到任何客户端。为了简化说明,这里选择 Claude for Desktop;你也可以参考[构建自己的客户端](/docs/develop/build-client)指南。
### MCP 核心概念
MCP 服务器可以提供三类主要能力:
1. **[Resources](/docs/learn/server-concepts#resources)**:可由客户端读取的类文件数据,例如 API 响应或文件内容。
2. **[Tools](/docs/learn/server-concepts#tools)**:可由 LLM 调用的函数,通常需要用户批准。
3. **[Prompts](/docs/learn/server-concepts#prompts)**:帮助用户完成特定任务的预写模板。
本教程主要关注 tools。
开始构建天气服务器。[这里可以找到本教程将构建内容的完整代码。](https://github.com/modelcontextprotocol/quickstart-resources/tree/main/weather-server-python)
### 前置知识
本快速开始假设你熟悉:
* Python
* LLMs like Claude
### MCP 服务器中的日志
实现 MCP 服务器时,请谨慎处理日志:
**对于基于 STDIO 的服务器:** 永远不要写入 stdout。写入 stdout 会破坏 JSON-RPC 消息并导致服务器异常。`print()` 默认写入 stdout,但配合 `file=sys.stderr` 可以安全使用。
**对于基于 HTTP 的服务器:** 标准输出日志是可以的,因为它不会干扰 HTTP 响应。
### 最佳实践
* 使用写入 stderr 或文件的日志库。
### 快速示例
```python theme={null}
import sys
import logging
# ❌ Bad (STDIO)
print("Processing request")
# ✅ Good (STDIO)
print("Processing request", file=sys.stderr)
# ✅ Good (STDIO)
logging.info("Processing request")
```
### 系统要求
* 已安装 Python 3.10 或更高版本。
* 必须使用 Python MCP SDK 1.2.0 或更高版本。
### 设置环境
首先安装 `uv`,并设置 Python 项目和环境:
```bash macOS/Linux theme={null}
curl -LsSf https://astral.sh/uv/install.sh | sh
```
```powershell Windows theme={null}
powershell -ExecutionPolicy ByPass -c "irm https://astral.sh/uv/install.ps1 | iex"
```
安装后请重启终端,确保可以识别 `uv` 命令。
现在创建并设置项目:
```bash macOS/Linux theme={null}
# Create a new directory for our project
uv init weather
cd weather
# Create virtual environment and activate it
uv venv
source .venv/bin/activate
# Install dependencies
uv add "mcp[cli]" httpx
# Create our server file
touch weather.py
```
```powershell Windows theme={null}
# Create a new directory for our project
uv init weather
cd weather
# Create virtual environment and activate it
uv venv
.venv\Scripts\activate
# Install dependencies
uv add mcp[cli] httpx
# Create our server file
new-item weather.py
```
现在开始构建服务器。
## 构建服务器
### 导入包并设置实例
将以下内容添加到 `weather.py` 顶部:
```python theme={null}
from typing import Any
import httpx
from mcp.server.fastmcp import FastMCP
# Initialize FastMCP server
mcp = FastMCP("weather")
# Constants
NWS_API_BASE = "https://api.weather.gov"
USER_AGENT = "weather-app/1.0"
```
FastMCP 类会使用 Python 类型提示和 docstring 自动生成 tool 定义,使 MCP tools 的创建和维护更简单。
### 辅助函数
接下来添加辅助函数,用于查询并格式化 National Weather Service API 的数据:
```python theme={null}
async def make_nws_request(url: str) -> dict[str, Any] | None:
"""Make a request to the NWS API with proper error handling."""
headers = {"User-Agent": USER_AGENT, "Accept": "application/geo+json"}
async with httpx.AsyncClient() as client:
try:
response = await client.get(url, headers=headers, timeout=30.0)
response.raise_for_status()
return response.json()
except Exception:
return None
def format_alert(feature: dict) -> str:
"""Format an alert feature into a readable string."""
props = feature["properties"]
return f"""
Event: {props.get("event", "Unknown")}
Area: {props.get("areaDesc", "Unknown")}
Severity: {props.get("severity", "Unknown")}
Description: {props.get("description", "No description available")}
Instructions: {props.get("instruction", "No specific instructions provided")}
"""
```
### 实现工具执行
工具执行处理器负责真正执行每个 tool 的逻辑。添加如下代码:
```python theme={null}
@mcp.tool()
async def get_alerts(state: str) -> str:
"""Get weather alerts for a US state.
Args:
state: Two-letter US state code (e.g. CA, NY)
"""
url = f"{NWS_API_BASE}/alerts/active/area/{state}"
data = await make_nws_request(url)
if not data or "features" not in data:
return "Unable to fetch alerts or no alerts found."
if not data["features"]:
return "No active alerts for this state."
alerts = [format_alert(feature) for feature in data["features"]]
return "\n---\n".join(alerts)
@mcp.tool()
async def get_forecast(latitude: float, longitude: float) -> str:
"""Get weather forecast for a location.
Args:
latitude: Latitude of the location
longitude: Longitude of the location
"""
# First get the forecast grid endpoint
points_url = f"{NWS_API_BASE}/points/{latitude},{longitude}"
points_data = await make_nws_request(points_url)
if not points_data:
return "Unable to fetch forecast data for this location."
# Get the forecast URL from the points response
forecast_url = points_data["properties"]["forecast"]
forecast_data = await make_nws_request(forecast_url)
if not forecast_data:
return "Unable to fetch detailed forecast."
# Format the periods into a readable forecast
periods = forecast_data["properties"]["periods"]
forecasts = []
for period in periods[:5]: # Only show next 5 periods
forecast = f"""
{period["name"]}:
Temperature: {period["temperature"]}°{period["temperatureUnit"]}
Wind: {period["windSpeed"]} {period["windDirection"]}
Forecast: {period["detailedForecast"]}
"""
forecasts.append(forecast)
return "\n---\n".join(forecasts)
```
### 运行服务器
最后,初始化并运行服务器:
```python theme={null}
def main():
# Initialize and run the server
mcp.run(transport="stdio")
if __name__ == "__main__":
main()
```
服务器已经完成。运行 `uv run weather.py` 启动 MCP 服务器,它会监听来自 MCP hosts 的消息。
现在从现有 MCP host Claude for Desktop 测试服务器。
## 使用 Claude for Desktop 测试服务器
Claude for Desktop 目前尚不支持 Linux。Linux 用户可以继续阅读[构建客户端](/docs/develop/build-client)教程,构建一个连接到刚才服务器的 MCP client。
首先,确保已经安装 Claude for Desktop。[你可以在这里安装最新版本。](https://claude.ai/download) 如果已经安装 Claude for Desktop,**请确保它已更新到最新版本。**
你需要在 Claude for Desktop 中配置想要使用的 MCP 服务器。为此,请用文本编辑器打开 Claude for Desktop 应用配置文件 `~/Library/Application Support/Claude/claude_desktop_config.json`。如果文件不存在,请先创建它。
例如,如果已安装 [VS Code](https://code.visualstudio.com/):
```bash macOS/Linux theme={null}
code ~/Library/Application\ Support/Claude/claude_desktop_config.json
```
```powershell Windows theme={null}
code $env:AppData\Claude\claude_desktop_config.json
```
接着在 `mcpServers` 键中添加服务器。只有至少正确配置了一个服务器,MCP UI 元素才会出现在 Claude for Desktop 中。
本例中,我们按如下方式添加单个天气服务器:
```json macOS/Linux theme={null}
{
"mcpServers": {
"weather": {
"command": "uv",
"args": [
"--directory",
"/ABSOLUTE/PATH/TO/PARENT/FOLDER/weather",
"run",
"weather.py"
]
}
}
}
```
```json Windows theme={null}
{
"mcpServers": {
"weather": {
"command": "uv",
"args": [
"--directory",
"C:\\ABSOLUTE\\PATH\\TO\\PARENT\\FOLDER\\weather",
"run",
"weather.py"
]
}
}
}
```
你可能需要在 `command` 字段中填入 `uv` 可执行文件的完整路径。可在 macOS/Linux 上运行 `which uv`,或在 Windows 上运行 `where uv` 获取。
请确保传入服务器的绝对路径。可在 macOS/Linux 上运行 `pwd`,或在 Windows Command Prompt 中运行 `cd` 获取。Windows 上请记得在 JSON 路径中使用双反斜杠(`\\`)或正斜杠(`/`)。
这会告诉 Claude for Desktop:
1. 有一个名为 `"weather"` 的 MCP server。
2. 通过运行 `uv --directory /ABSOLUTE/PATH/TO/PARENT/FOLDER/weather run weather.py` 启动它。
保存文件并重启 **Claude for Desktop**。
开始构建天气服务器。[这里可以找到本教程将构建内容的完整代码。](https://github.com/modelcontextprotocol/quickstart-resources/tree/main/weather-server-typescript)
### 前置知识
本快速开始假设你熟悉:
* TypeScript
* Claude 等 LLM
### MCP 服务器中的日志
实现 MCP servers 时,请谨慎处理日志:
**对于基于 STDIO 的 servers:** 绝不要使用 `console.log()`,因为它默认写入 standard output (stdout)。写入 stdout 会破坏 JSON-RPC 消息并导致 server 失效。
**对于基于 HTTP 的 servers:** standard output 日志可以使用,因为它不会干扰 HTTP responses。
### 最佳实践
* 使用会写入 stderr 的 `console.error()`,或使用写入 stderr / 文件的日志库。
### 快速示例
```javascript theme={null}
// ❌ Bad (STDIO)
console.log("Server started");
// ✅ Good (STDIO)
console.error("Server started"); // stderr is safe
```
### 系统要求
对于 TypeScript,请确保已安装最新版 Node。
### 设置环境
如果尚未安装,请先安装 Node.js 和 npm。可以从 [nodejs.org](https://nodejs.org/) 下载。
验证 Node.js 安装:
```bash theme={null}
node --version
npm --version
```
本教程需要 Node.js 16 或更高版本。
现在创建并设置项目:
```bash macOS/Linux theme={null}
# Create a new directory for our project
mkdir weather
cd weather
# Initialize a new npm project
npm init -y
# Install dependencies
npm install @modelcontextprotocol/sdk zod@3
npm install -D @types/node typescript
# Create our files
mkdir src
touch src/index.ts
```
```powershell Windows theme={null}
# Create a new directory for our project
md weather
cd weather
# Initialize a new npm project
npm init -y
# Install dependencies
npm install @modelcontextprotocol/sdk zod@3
npm install -D @types/node typescript
# Create our files
md src
new-item src\index.ts
```
更新 package.json,添加 type: "module" 和 build script:
```json package.json theme={null}
{
"type": "module",
"bin": {
"weather": "./build/index.js"
},
"scripts": {
"build": "tsc && chmod 755 build/index.js"
},
"files": ["build"]
}
```
在项目根目录创建 `tsconfig.json`:
```json tsconfig.json theme={null}
{
"compilerOptions": {
"target": "ES2022",
"module": "Node16",
"moduleResolution": "Node16",
"outDir": "./build",
"rootDir": "./src",
"strict": true,
"esModuleInterop": true,
"skipLibCheck": true,
"forceConsistentCasingInFileNames": true
},
"include": ["src/**/*"],
"exclude": ["node_modules"]
}
```
现在开始构建 server。
## 构建服务器
### 导入包并设置实例
将以下内容添加到 `src/index.ts` 顶部:
```typescript theme={null}
import { McpServer } from "@modelcontextprotocol/sdk/server/mcp.js";
import { StdioServerTransport } from "@modelcontextprotocol/sdk/server/stdio.js";
import { z } from "zod";
const NWS_API_BASE = "https://api.weather.gov";
const USER_AGENT = "weather-app/1.0";
// Create server instance
const server = new McpServer({
name: "weather",
version: "1.0.0",
});
```
### 辅助函数
接下来添加 helper functions,用于查询并格式化 National Weather Service API 的数据:
```typescript theme={null}
// Helper function for making NWS API requests
async function makeNWSRequest(url: string): Promise {
const headers = {
"User-Agent": USER_AGENT,
Accept: "application/geo+json",
};
try {
const response = await fetch(url, { headers });
if (!response.ok) {
throw new Error(`HTTP error! status: ${response.status}`);
}
return (await response.json()) as T;
} catch (error) {
console.error("Error making NWS request:", error);
return null;
}
}
interface AlertFeature {
properties: {
event?: string;
areaDesc?: string;
severity?: string;
status?: string;
headline?: string;
};
}
// Format alert data
function formatAlert(feature: AlertFeature): string {
const props = feature.properties;
return [
`Event: ${props.event || "Unknown"}`,
`Area: ${props.areaDesc || "Unknown"}`,
`Severity: ${props.severity || "Unknown"}`,
`Status: ${props.status || "Unknown"}`,
`Headline: ${props.headline || "No headline"}`,
"---",
].join("\n");
}
interface ForecastPeriod {
name?: string;
temperature?: number;
temperatureUnit?: string;
windSpeed?: string;
windDirection?: string;
shortForecast?: string;
}
interface AlertsResponse {
features: AlertFeature[];
}
interface PointsResponse {
properties: {
forecast?: string;
};
}
interface ForecastResponse {
properties: {
periods: ForecastPeriod[];
};
}
```
### 实现工具执行
tool execution handler 负责实际执行每个 tool 的逻辑。添加如下内容:
```typescript theme={null}
// Register weather tools
server.registerTool(
"get_alerts",
{
description: "Get weather alerts for a state",
inputSchema: {
state: z
.string()
.length(2)
.describe("Two-letter state code (e.g. CA, NY)"),
},
},
async ({ state }) => {
const stateCode = state.toUpperCase();
const alertsUrl = `${NWS_API_BASE}/alerts?area=${stateCode}`;
const alertsData = await makeNWSRequest(alertsUrl);
if (!alertsData) {
return {
content: [
{
type: "text",
text: "Failed to retrieve alerts data",
},
],
};
}
const features = alertsData.features || [];
if (!features.length) {
return {
content: [
{
type: "text",
text: `No active alerts for ${stateCode}`,
},
],
};
}
const formattedAlerts = features.map(formatAlert);
const alertsText = `Active alerts for ${stateCode}:\n\n${formattedAlerts.join("\n")}`;
return {
content: [
{
type: "text",
text: alertsText,
},
],
};
},
);
server.registerTool(
"get_forecast",
{
description: "Get weather forecast for a location",
inputSchema: {
latitude: z
.number()
.min(-90)
.max(90)
.describe("Latitude of the location"),
longitude: z
.number()
.min(-180)
.max(180)
.describe("Longitude of the location"),
},
},
async ({ latitude, longitude }) => {
// Get grid point data
const pointsUrl = `${NWS_API_BASE}/points/${latitude.toFixed(4)},${longitude.toFixed(4)}`;
const pointsData = await makeNWSRequest(pointsUrl);
if (!pointsData) {
return {
content: [
{
type: "text",
text: `Failed to retrieve grid point data for coordinates: ${latitude}, ${longitude}. This location may not be supported by the NWS API (only US locations are supported).`,
},
],
};
}
const forecastUrl = pointsData.properties?.forecast;
if (!forecastUrl) {
return {
content: [
{
type: "text",
text: "Failed to get forecast URL from grid point data",
},
],
};
}
// Get forecast data
const forecastData = await makeNWSRequest(forecastUrl);
if (!forecastData) {
return {
content: [
{
type: "text",
text: "Failed to retrieve forecast data",
},
],
};
}
const periods = forecastData.properties?.periods || [];
if (periods.length === 0) {
return {
content: [
{
type: "text",
text: "No forecast periods available",
},
],
};
}
// Format forecast periods
const formattedForecast = periods.map((period: ForecastPeriod) =>
[
`${period.name || "Unknown"}:`,
`Temperature: ${period.temperature || "Unknown"}°${period.temperatureUnit || "F"}`,
`Wind: ${period.windSpeed || "Unknown"} ${period.windDirection || ""}`,
`${period.shortForecast || "No forecast available"}`,
"---",
].join("\n"),
);
const forecastText = `Forecast for ${latitude}, ${longitude}:\n\n${formattedForecast.join("\n")}`;
return {
content: [
{
type: "text",
text: forecastText,
},
],
};
},
);
```
### 运行服务器
最后,实现用于运行 server 的 main 函数:
```typescript theme={null}
async function main() {
const transport = new StdioServerTransport();
await server.connect(transport);
console.error("Weather MCP Server running on stdio");
}
main().catch((error) => {
console.error("Fatal error in main():", error);
process.exit(1);
});
```
请务必运行 `npm run build` 构建 server。这是让 server 能够连接的重要步骤。
现在从已有 MCP host Claude for Desktop 测试 server。
## 使用 Claude for Desktop 测试服务器
Claude for Desktop 尚不支持 Linux。Linux 用户可以继续阅读[构建 client](/docs/develop/build-client)教程,构建一个连接刚才 server 的 MCP client。
首先,确保已安装 Claude for Desktop。[可以在这里安装最新版](https://claude.ai/download)。如果已经安装 Claude for Desktop,**请确保它已更新到最新版本。**
需要为你想使用的 MCP servers 配置 Claude for Desktop。为此,请用文本编辑器打开 Claude for Desktop App 配置文件 `~/Library/Application Support/Claude/claude_desktop_config.json`。如果文件不存在,请创建它。
例如,如果你安装了 [VS Code](https://code.visualstudio.com/):
```bash macOS/Linux theme={null}
code ~/Library/Application\ Support/Claude/claude_desktop_config.json
```
```powershell Windows theme={null}
code $env:AppData\Claude\claude_desktop_config.json
```
然后在 `mcpServers` key 中添加 servers。只有至少正确配置了一个 server,MCP UI 元素才会出现在 Claude for Desktop 中。
在本例中,我们按如下方式添加单个 weather server:
```json macOS/Linux theme={null}
{
"mcpServers": {
"weather": {
"command": "node",
"args": ["/ABSOLUTE/PATH/TO/PARENT/FOLDER/weather/build/index.js"]
}
}
}
```
```json Windows theme={null}
{
"mcpServers": {
"weather": {
"command": "node",
"args": ["C:\\PATH\\TO\\PARENT\\FOLDER\\weather\\build\\index.js"]
}
}
}
```
这会告诉 Claude for Desktop:
1. 有一个名为 "weather" 的 MCP server
2. 通过运行 `node /ABSOLUTE/PATH/TO/PARENT/FOLDER/weather/build/index.js` 启动它
保存文件并重启 **Claude for Desktop**。
这是一个基于 Spring AI MCP auto-configuration 和 boot starters 的 quickstart demo。
如需了解如何手动创建同步和异步 MCP Servers,请参考 [Java SDK Server](https://java.sdk.modelcontextprotocol.io/) 文档。
开始构建 weather server。
[本教程将构建内容的完整代码见这里。](https://github.com/spring-projects/spring-ai-examples/tree/main/model-context-protocol/weather/starter-stdio-server)
更多信息请参阅 [MCP Server Boot Starter](https://docs.spring.io/spring-ai/reference/api/mcp/mcp-server-boot-starter-docs.html) 参考文档。
手动实现 MCP Server 请参考 [MCP Server Java SDK documentation](https://java.sdk.modelcontextprotocol.io/)。
### MCP 服务器中的日志
实现 MCP servers 时,请谨慎处理日志:
**对于基于 STDIO 的 servers:** 绝不要使用 `System.out.println()` 或 `System.out.print()`,因为它们会写入 standard output (stdout)。写入 stdout 会破坏 JSON-RPC 消息并导致 server 失效。
**对于基于 HTTP 的 servers:** standard output 日志可以使用,因为它不会干扰 HTTP responses。
### 最佳实践
* 使用写入 stderr 或文件的日志库。
* 确保任何已配置日志库都不会写入 stdout。
### 系统要求
* 已安装 Java 17 或更高版本。
* [Spring Boot 3.3.x](https://docs.spring.io/spring-boot/installing.html) or higher
### 设置环境
使用 [Spring Initializer](https://start.spring.io/) 引导项目。
需要添加以下依赖:
```xml Maven theme={null}
org.springframework.ai
spring-ai-starter-mcp-server
org.springframework
spring-web
```
```groovy Gradle theme={null}
dependencies {
implementation platform("org.springframework.ai:spring-ai-starter-mcp-server")
implementation platform("org.springframework:spring-web")
}
```
然后通过设置 application properties 配置应用:
```bash application.properties theme={null}
spring.main.bannerMode=off
logging.pattern.console=
```
```yaml application.yml theme={null}
logging:
pattern:
console:
spring:
main:
banner-mode: off
```
所有可用属性记录在 [Server Configuration Properties](https://docs.spring.io/spring-ai/reference/api/mcp/mcp-server-boot-starter-docs.html#_configuration_properties) 中。
现在开始构建 server。
## 构建服务器
### 天气服务
实现一个 [WeatherService.java](https://github.com/spring-projects/spring-ai-examples/blob/main/model-context-protocol/weather/starter-stdio-server/src/main/java/org/springframework/ai/mcp/sample/server/WeatherService.java),使用 REST client 查询 National Weather Service API 的数据:
```java theme={null}
@Service
public class WeatherService {
private final RestClient restClient;
public WeatherService() {
this.restClient = RestClient.builder()
.baseUrl("https://api.weather.gov")
.defaultHeader("Accept", "application/geo+json")
.defaultHeader("User-Agent", "WeatherApiClient/1.0 (your@email.com)")
.build();
}
@Tool(description = "Get weather forecast for a specific latitude/longitude")
public String getWeatherForecastByLocation(
double latitude, // Latitude coordinate
double longitude // Longitude coordinate
) {
// Returns detailed forecast including:
// - Temperature and unit
// - Wind speed and direction
// - Detailed forecast description
}
@Tool(description = "Get weather alerts for a US state")
public String getAlerts(
@ToolParam(description = "Two-letter US state code (e.g. CA, NY)") String state
) {
// Returns active alerts including:
// - Event type
// - Affected area
// - Severity
// - Description
// - Safety instructions
}
// ......
}
```
`@Service` annotation 会在应用上下文中自动注册该 service。
Spring AI `@Tool` annotation 让创建和维护 MCP tools 更简单。
auto-configuration 会自动将这些 tools 注册到 MCP server。
### 创建 Boot 应用
```java theme={null}
@SpringBootApplication
public class McpServerApplication {
public static void main(String[] args) {
SpringApplication.run(McpServerApplication.class, args);
}
@Bean
public ToolCallbackProvider weatherTools(WeatherService weatherService) {
return MethodToolCallbackProvider.builder().toolObjects(weatherService).build();
}
}
```
使用 `MethodToolCallbackProvider` utils 将 `@Tools` 转换为 MCP server 使用的可执行 callbacks。
### 运行服务器
最后,构建 server:
```bash theme={null}
./mvnw clean install
```
这会在 `target` 文件夹中生成 `mcp-weather-stdio-server-0.0.1-SNAPSHOT.jar` 文件。
现在从已有 MCP host Claude for Desktop 测试 server。
## 使用 Claude for Desktop 测试服务器
Claude for Desktop 尚不支持 Linux。
首先,确保已安装 Claude for Desktop。[可以在这里安装最新版](https://claude.ai/download)。如果已经安装 Claude for Desktop,**请确保它已更新到最新版本。**
需要为你想使用的 MCP servers 配置 Claude for Desktop。
为此,请用文本编辑器打开 Claude for Desktop App 配置文件 `~/Library/Application Support/Claude/claude_desktop_config.json`。
如果文件不存在,请创建它。
例如,如果你安装了 [VS Code](https://code.visualstudio.com/):
```bash macOS/Linux theme={null}
code ~/Library/Application\ Support/Claude/claude_desktop_config.json
```
```powershell Windows theme={null}
code $env:AppData\Claude\claude_desktop_config.json
```
然后在 `mcpServers` key 中添加 servers。
只有至少正确配置了一个 server,MCP UI 元素才会出现在 Claude for Desktop 中。
在本例中,我们按如下方式添加单个 weather server:
```json macOS/Linux theme={null}
{
"mcpServers": {
"spring-ai-mcp-weather": {
"command": "java",
"args": [
"-Dspring.ai.mcp.server.stdio=true",
"-jar",
"/ABSOLUTE/PATH/TO/PARENT/FOLDER/mcp-weather-stdio-server-0.0.1-SNAPSHOT.jar"
]
}
}
}
```
```json Windows theme={null}
{
"mcpServers": {
"spring-ai-mcp-weather": {
"command": "java",
"args": [
"-Dspring.ai.mcp.server.transport=STDIO",
"-jar",
"C:\\ABSOLUTE\\PATH\\TO\\PARENT\\FOLDER\\weather\\mcp-weather-stdio-server-0.0.1-SNAPSHOT.jar"
]
}
}
}
```
请确保传入 server 的绝对路径。
这会告诉 Claude for Desktop:
1. 有一个名为 "my-weather-server" 的 MCP server
2. 通过运行 `java -jar /ABSOLUTE/PATH/TO/PARENT/FOLDER/mcp-weather-stdio-server-0.0.1-SNAPSHOT.jar` 启动它
保存文件并重启 **Claude for Desktop**。
## 使用 Java 客户端测试服务器
### 手动创建 MCP 客户端
使用 `McpClient` 连接到 server:
```java theme={null}
var stdioParams = ServerParameters.builder("java")
.args("-jar", "/ABSOLUTE/PATH/TO/PARENT/FOLDER/mcp-weather-stdio-server-0.0.1-SNAPSHOT.jar")
.build();
var stdioTransport = new StdioClientTransport(stdioParams);
var mcpClient = McpClient.sync(stdioTransport).build();
mcpClient.initialize();
ListToolsResult toolsList = mcpClient.listTools();
CallToolResult weather = mcpClient.callTool(
new CallToolRequest("getWeatherForecastByLocation",
Map.of("latitude", "47.6062", "longitude", "-122.3321")));
CallToolResult alert = mcpClient.callTool(
new CallToolRequest("getAlerts", Map.of("state", "NY")));
mcpClient.closeGracefully();
```
### 使用 MCP Client Boot Starter
使用 `spring-ai-starter-mcp-client` 依赖创建新的 boot starter 应用:
```xml theme={null}
org.springframework.ai
spring-ai-starter-mcp-client
```
并将 `spring.ai.mcp.client.stdio.servers-configuration` 属性指向你的 `claude_desktop_config.json`。
可以复用现有 Anthropic Desktop 配置:
```properties theme={null}
spring.ai.mcp.client.stdio.servers-configuration=file:PATH/TO/claude_desktop_config.json
```
启动 client application 后,auto-configuration 会自动从 claude\_desktop\_config.json 创建 MCP clients。
更多信息见 [MCP Client Boot Starters](https://docs.spring.io/spring-ai/reference/api/mcp/mcp-server-boot-client-docs.html) 参考文档。
## 更多 Java MCP 服务器示例
[starter-webflux-server](https://github.com/spring-projects/spring-ai-examples/tree/main/model-context-protocol/weather/starter-webflux-server) 演示了如何使用 SSE transport 创建 MCP server。
它展示了如何利用 Spring Boot 的 auto-configuration 能力定义并注册 MCP Tools、Resources 和 Prompts。
开始构建 weather server。[本教程将构建内容的完整代码见这里。](https://github.com/modelcontextprotocol/kotlin-sdk/tree/main/samples/weather-stdio-server)
### 前置知识
本快速开始假设你熟悉:
* Kotlin
* Claude 等 LLM
### MCP 服务器中的日志
实现 MCP servers 时,请谨慎处理日志:
**对于基于 STDIO 的 servers:** 绝不要使用 `println()`,因为它默认写入 standard output (stdout)。写入 stdout 会破坏 JSON-RPC 消息并导致 server 失效。
**对于基于 HTTP 的 servers:** standard output 日志可以使用,因为它不会干扰 HTTP responses。
### 最佳实践
* 使用写入 stderr 或文件的日志库。
### 系统要求
* 已安装 JDK 11 或更高版本。
### 设置环境
如果尚未安装,请先安装 `java` 和 `gradle`。
你可以从 [official Oracle JDK website](https://www.oracle.com/java/technologies/downloads/) 下载 `java`。
验证 `java` 安装:
```bash theme={null}
java --version
```
现在创建并设置项目:
```bash macOS/Linux theme={null}
# Create a new directory for our project
mkdir weather
cd weather
# Initialize a new kotlin project
gradle init
```
```powershell Windows theme={null}
# Create a new directory for our project
md weather
cd weather
# Initialize a new kotlin project
gradle init
```
运行 `gradle init` 后,选择 **Application** 作为项目类型,选择 **Kotlin** 作为编程语言。
或者,也可以使用 [IntelliJ IDEA project wizard](https://kotlinlang.org/docs/jvm-get-started.html) 创建 Kotlin 应用。
创建项目后,用以下内容替换 `build.gradle.kts`:
```kotlin build.gradle.kts theme={null}
// Check latest versions at https://github.com/modelcontextprotocol/kotlin-sdk/releases
val mcpVersion = "0.9.0"
val ktorVersion = "3.2.3"
val slf4jVersion = "2.0.17"
plugins {
kotlin("jvm") version "2.3.20"
kotlin("plugin.serialization") version "2.3.20"
id("com.gradleup.shadow") version "8.3.9"
application
}
application {
mainClass.set("MainKt")
}
dependencies {
implementation("io.modelcontextprotocol:kotlin-sdk:$mcpVersion")
implementation("io.ktor:ktor-client-content-negotiation:$ktorVersion")
implementation("io.ktor:ktor-serialization-kotlinx-json:$ktorVersion")
implementation("io.ktor:ktor-client-cio:$ktorVersion")
implementation("org.slf4j:slf4j-simple:$slf4jVersion")
}
```
验证所有内容已正确设置:
```bash theme={null}
./gradlew build
```
现在开始构建 server。
## 构建服务器
### 设置实例
添加 server 初始化函数:
```kotlin theme={null}
fun runMcpServer() {
val server = Server(
Implementation(
name = "weather",
version = "1.0.0",
),
ServerOptions(
capabilities = ServerCapabilities(tools = ServerCapabilities.Tools(listChanged = true)),
),
)
// register tools on server here
val transport = StdioServerTransport(
System.`in`.asInput(),
System.out.asSink().buffered(),
)
runBlocking {
val session = server.createSession(transport)
val done = Job()
session.onClose {
done.complete()
}
done.join()
}
}
```
### Weather API 辅助函数
接下来添加用于查询 National Weather Service API 并转换响应的函数和 data classes:
```kotlin theme={null}
val httpClient = HttpClient(CIO) {
defaultRequest {
url("https://api.weather.gov")
headers {
append("Accept", "application/geo+json")
append("User-Agent", "WeatherApiClient/1.0")
}
contentType(ContentType.Application.Json)
}
install(ContentNegotiation) {
json(Json { ignoreUnknownKeys = true })
}
}
// Extension function to fetch weather alerts for a given state
suspend fun HttpClient.getAlerts(state: String): List {
val alerts = this.get("/alerts/active/area/$state").body()
return alerts.features.map { feature ->
"""
Event: ${feature.properties.event}
Area: ${feature.properties.areaDesc}
Severity: ${feature.properties.severity}
Status: ${feature.properties.status}
Headline: ${feature.properties.headline}
""".trimIndent()
}
}
// Extension function to fetch forecast information for given latitude and longitude
suspend fun HttpClient.getForecast(latitude: Double, longitude: Double): List {
val points = this.get("/points/$latitude,$longitude").body()
val forecastUrl = points.properties.forecast ?: error("No forecast URL available")
val forecast = this.get(forecastUrl).body()
return forecast.properties.periods.map { period ->
"""
${period.name}:
Temperature: ${period.temperature}°${period.temperatureUnit}
Wind: ${period.windSpeed} ${period.windDirection}
${period.shortForecast}
""".trimIndent()
}
}
@Serializable
data class PointsResponse(val properties: PointsProperties)
@Serializable
data class PointsProperties(val forecast: String? = null)
@Serializable
data class ForecastResponse(val properties: ForecastProperties)
@Serializable
data class ForecastProperties(val periods: List = emptyList())
@Serializable
data class ForecastPeriod(
val name: String? = null,
val temperature: Int? = null,
val temperatureUnit: String? = null,
val windSpeed: String? = null,
val windDirection: String? = null,
val shortForecast: String? = null,
)
@Serializable
data class AlertsResponse(val features: List = emptyList())
@Serializable
data class AlertFeature(val properties: AlertProperties)
@Serializable
data class AlertProperties(
val event: String? = null,
val areaDesc: String? = null,
val severity: String? = null,
val status: String? = null,
val headline: String? = null,
)
```
### 实现工具执行
tool execution handler 负责实际执行每个 tool 的逻辑。添加如下内容:
```kotlin theme={null}
// Register weather tools
server.addTool(
name = "get_alerts",
description = "Get weather alerts for a US state. Input is a two-letter US state code (e.g. CA, NY)",
inputSchema = ToolSchema(
properties = buildJsonObject {
putJsonObject("state") {
put("type", "string")
put("description", "Two-letter US state code (e.g. CA, NY)")
}
},
required = listOf("state"),
),
) { request ->
val state = request.arguments?.get("state")?.jsonPrimitive?.content
?: return@addTool CallToolResult(
content = listOf(TextContent("The 'state' parameter is required.")),
)
val alerts = httpClient.getAlerts(state)
CallToolResult(content = alerts.map { TextContent(it) })
}
server.addTool(
name = "get_forecast",
description = "Get weather forecast for a location. Note: only US locations are supported by the NWS API.",
inputSchema = ToolSchema(
properties = buildJsonObject {
putJsonObject("latitude") {
put("type", "number")
put("description", "Latitude of the location")
}
putJsonObject("longitude") {
put("type", "number")
put("description", "Longitude of the location")
}
},
required = listOf("latitude", "longitude"),
),
) { request ->
val latitude = request.arguments?.get("latitude")?.jsonPrimitive?.doubleOrNull
val longitude = request.arguments?.get("longitude")?.jsonPrimitive?.doubleOrNull
if (latitude == null || longitude == null) {
return@addTool CallToolResult(
content = listOf(TextContent("The 'latitude' and 'longitude' parameters are required.")),
)
}
val forecast = httpClient.getForecast(latitude, longitude)
CallToolResult(content = forecast.map { TextContent(it) })
}
```
### 运行服务器
最后,实现用于运行 server 的 main 函数:
```kotlin theme={null}
fun main() = runMcpServer()
```
开发期间可以直接运行 server:
```bash theme={null}
./gradlew run
```
生产使用时,构建 shadow JAR:
```bash theme={null}
./gradlew build
java -jar build/libs/weather-0.1.0-all.jar
```
现在从已有 MCP host Claude for Desktop 测试 server。
## 使用 Claude for Desktop 测试服务器
Claude for Desktop 尚不支持 Linux。Linux 用户可以继续阅读[构建 client](/docs/develop/build-client)教程,构建一个连接刚才 server 的 MCP client。
首先,确保已安装 Claude for Desktop。[可以在这里安装最新版](https://claude.ai/download)。如果已经安装 Claude for Desktop,**请确保它已更新到最新版本。**
需要为你想使用的 MCP servers 配置 Claude for Desktop。
为此,请用文本编辑器打开 Claude for Desktop App 配置文件 `~/Library/Application Support/Claude/claude_desktop_config.json`。
如果文件不存在,请创建它。
例如,如果你安装了 [VS Code](https://code.visualstudio.com/):
```bash macOS/Linux theme={null}
code ~/Library/Application\ Support/Claude/claude_desktop_config.json
```
```powershell Windows theme={null}
code $env:AppData\Claude\claude_desktop_config.json
```
然后在 `mcpServers` key 中添加 servers。
只有至少正确配置了一个 server,MCP UI 元素才会出现在 Claude for Desktop 中。
在本例中,我们按如下方式添加单个 weather server:
```json macOS/Linux theme={null}
{
"mcpServers": {
"weather": {
"command": "java",
"args": [
"-jar",
"/ABSOLUTE/PATH/TO/PARENT/FOLDER/weather/build/libs/weather-0.1.0-all.jar"
]
}
}
}
```
```json Windows theme={null}
{
"mcpServers": {
"weather": {
"command": "java",
"args": [
"-jar",
"C:\\PATH\\TO\\PARENT\\FOLDER\\weather\\build\\libs\\weather-0.1.0-all.jar"
]
}
}
}
```
这会告诉 Claude for Desktop:
1. 有一个名为 "weather" 的 MCP server
2. 通过运行 `java -jar /ABSOLUTE/PATH/TO/PARENT/FOLDER/weather/build/libs/weather-0.1.0-all.jar` 启动它
保存文件并重启 **Claude for Desktop**。
开始构建 weather server。[本教程将构建内容的完整代码见这里。](https://github.com/modelcontextprotocol/csharp-sdk/tree/main/samples/QuickstartWeatherServer)
### 前置知识
本快速开始假设你熟悉:
* C#
* Claude 等 LLM
* .NET 8 or higher
### MCP 服务器中的日志
实现 MCP servers 时,请谨慎处理日志:
**对于基于 STDIO 的 servers:** 绝不要使用 `Console.WriteLine()` 或 `Console.Write()`,因为它们会写入 standard output (stdout)。写入 stdout 会破坏 JSON-RPC 消息并导致 server 失效。
**对于基于 HTTP 的 servers:** standard output 日志可以使用,因为它不会干扰 HTTP responses。
### 最佳实践
* 使用写入 stderr 或文件的日志库。
### 系统要求
* 已安装 [.NET 8 SDK](https://dotnet.microsoft.com/download/dotnet/8.0) 或更高版本。
### 设置环境
如果尚未安装,请先安装 `dotnet`。可以从 [official Microsoft .NET website](https://dotnet.microsoft.com/download/) 下载 `dotnet`。验证 `dotnet` 安装:
```bash theme={null}
dotnet --version
```
现在创建并设置项目:
```bash macOS/Linux theme={null}
# Create a new directory for our project
mkdir weather
cd weather
# Initialize a new C# project
dotnet new console
```
```powershell Windows theme={null}
# Create a new directory for our project
mkdir weather
cd weather
# Initialize a new C# project
dotnet new console
```
运行 `dotnet new console` 后,你会得到一个新的 C# 项目。
可以在偏好的 IDE 中打开项目,例如 [Visual Studio](https://visualstudio.microsoft.com/) 或 [Rider](https://www.jetbrains.com/rider/)。
也可以使用 [Visual Studio project wizard](https://learn.microsoft.com/en-us/visualstudio/get-started/csharp/tutorial-console?view=vs-2022) 创建 C# 应用。
创建项目后,添加 Model Context Protocol SDK 和 hosting 的 NuGet package:
```bash theme={null}
# Add the Model Context Protocol SDK NuGet package
dotnet add package ModelContextProtocol --prerelease
# Add the .NET Hosting NuGet package
dotnet add package Microsoft.Extensions.Hosting
```
现在开始构建 server。
## 构建服务器
打开项目中的 `Program.cs` 文件,并用以下代码替换其内容:
```csharp theme={null}
using Microsoft.Extensions.DependencyInjection;
using Microsoft.Extensions.Hosting;
using ModelContextProtocol;
using System.Net.Http.Headers;
var builder = Host.CreateEmptyApplicationBuilder(settings: null);
builder.Services.AddMcpServer()
.WithStdioServerTransport()
.WithToolsFromAssembly();
builder.Services.AddSingleton(_ =>
{
var client = new HttpClient() { BaseAddress = new Uri("https://api.weather.gov") };
client.DefaultRequestHeaders.UserAgent.Add(new ProductInfoHeaderValue("weather-tool", "1.0"));
return client;
});
var app = builder.Build();
await app.RunAsync();
```
创建 `ApplicationHostBuilder` 时,请确保使用 `CreateEmptyApplicationBuilder` 而不是 `CreateDefaultBuilder`。这可以确保 server 不会向 console 写入额外消息。只有使用 STDIO transport 的 servers 才需要这样做。
这段代码会设置一个基础 console application,使用 Model Context Protocol SDK 创建带 standard I/O transport 的 MCP server。
### Weather API 辅助函数
创建一个 `HttpClient` 扩展类,用于简化 JSON request 处理:
```csharp theme={null}
using System.Text.Json;
internal static class HttpClientExt
{
public static async Task ReadJsonDocumentAsync(this HttpClient client, string requestUri)
{
using var response = await client.GetAsync(requestUri);
response.EnsureSuccessStatusCode();
return await JsonDocument.ParseAsync(await response.Content.ReadAsStreamAsync());
}
}
```
接下来,定义一个包含 tool execution handlers 的类,用于查询 National Weather Service API 并转换响应:
```csharp theme={null}
using ModelContextProtocol.Server;
using System.ComponentModel;
using System.Globalization;
using System.Text.Json;
namespace QuickstartWeatherServer.Tools;
[McpServerToolType]
public static class WeatherTools
{
[McpServerTool, Description("Get weather alerts for a US state code.")]
public static async Task GetAlerts(
HttpClient client,
[Description("The US state code to get alerts for.")] string state)
{
using var jsonDocument = await client.ReadJsonDocumentAsync($"/alerts/active/area/{state}");
var jsonElement = jsonDocument.RootElement;
var alerts = jsonElement.GetProperty("features").EnumerateArray();
if (!alerts.Any())
{
return "No active alerts for this state.";
}
return string.Join("\n--\n", alerts.Select(alert =>
{
JsonElement properties = alert.GetProperty("properties");
return $"""
Event: {properties.GetProperty("event").GetString()}
Area: {properties.GetProperty("areaDesc").GetString()}
Severity: {properties.GetProperty("severity").GetString()}
Description: {properties.GetProperty("description").GetString()}
Instruction: {properties.GetProperty("instruction").GetString()}
""";
}));
}
[McpServerTool, Description("Get weather forecast for a location.")]
public static async Task GetForecast(
HttpClient client,
[Description("Latitude of the location.")] double latitude,
[Description("Longitude of the location.")] double longitude)
{
var pointUrl = string.Create(CultureInfo.InvariantCulture, $"/points/{latitude},{longitude}");
using var jsonDocument = await client.ReadJsonDocumentAsync(pointUrl);
var forecastUrl = jsonDocument.RootElement.GetProperty("properties").GetProperty("forecast").GetString()
?? throw new Exception($"No forecast URL provided by {client.BaseAddress}points/{latitude},{longitude}");
using var forecastDocument = await client.ReadJsonDocumentAsync(forecastUrl);
var periods = forecastDocument.RootElement.GetProperty("properties").GetProperty("periods").EnumerateArray();
return string.Join("\n---\n", periods.Select(period => $"""
{period.GetProperty("name").GetString()}
Temperature: {period.GetProperty("temperature").GetInt32()}°F
Wind: {period.GetProperty("windSpeed").GetString()} {period.GetProperty("windDirection").GetString()}
Forecast: {period.GetProperty("detailedForecast").GetString()}
"""));
}
}
```
### 运行服务器
最后,使用以下命令运行 server:
```bash theme={null}
dotnet run
```
这会启动 server,并在 standard input/output 上监听传入请求。
## 使用 Claude for Desktop 测试服务器
Claude for Desktop 尚不支持 Linux。Linux 用户可以继续阅读[构建 client](/docs/develop/build-client)教程,构建一个连接刚才 server 的 MCP client。
首先,确保已安装 Claude for Desktop。[可以在这里安装最新版](https://claude.ai/download)。如果已经安装 Claude for Desktop,**请确保它已更新到最新版本。**
需要为你想使用的 MCP servers 配置 Claude for Desktop。为此,请用文本编辑器打开 Claude for Desktop App 配置文件 `~/Library/Application Support/Claude/claude_desktop_config.json`。如果文件不存在,请创建它。
例如,如果你安装了 [VS Code](https://code.visualstudio.com/):
```bash macOS/Linux theme={null}
code ~/Library/Application\ Support/Claude/claude_desktop_config.json
```
```powershell Windows theme={null}
code $env:AppData\Claude\claude_desktop_config.json
```
然后在 `mcpServers` key 中添加 servers。只有至少正确配置了一个 server,MCP UI 元素才会出现在 Claude for Desktop 中。
在本例中,我们按如下方式添加单个 weather server:
```json macOS/Linux theme={null}
{
"mcpServers": {
"weather": {
"command": "dotnet",
"args": ["run", "--project", "/ABSOLUTE/PATH/TO/PROJECT", "--no-build"]
}
}
}
```
```json Windows theme={null}
{
"mcpServers": {
"weather": {
"command": "dotnet",
"args": [
"run",
"--project",
"C:\\ABSOLUTE\\PATH\\TO\\PROJECT",
"--no-build"
]
}
}
}
```
这会告诉 Claude for Desktop:
1. 有一个名为 "weather" 的 MCP server
2. 通过运行 `dotnet run /ABSOLUTE/PATH/TO/PROJECT` 启动它
保存文件并重启 **Claude for Desktop**。
开始构建 weather server。[本教程将构建内容的完整代码见这里。](https://github.com/modelcontextprotocol/quickstart-resources/tree/main/weather-server-ruby)
### 前置知识
本快速开始假设你熟悉:
* Ruby
* Claude 等 LLM
### MCP 服务器中的日志
实现 MCP servers 时,请谨慎处理日志:
**对于基于 STDIO 的 servers:** 绝不要使用 `puts` 或 `print`,因为它们默认写入 standard output (stdout)。写入 stdout 会破坏 JSON-RPC 消息并导致 server 失效。
**对于基于 HTTP 的 servers:** standard output 日志可以使用,因为它不会干扰 HTTP responses。
### 最佳实践
* 使用写入 stderr 或文件的日志库。
### 快速示例
```ruby theme={null}
# ❌ Bad (STDIO)
puts "Processing request"
# ✅ Good (STDIO)
require "logger"
logger = Logger.new($stderr)
logger.info("Processing request")
```
### 系统要求
* 已安装 Ruby 2.7 或更高版本。
### 设置环境
首先,确认已安装 Ruby。可以运行以下命令检查:
```bash theme={null}
ruby --version
```
现在创建并设置项目:
```bash macOS/Linux theme={null}
# Create a new directory for our project
mkdir weather
cd weather
# Create a Gemfile
bundle init
# Add the MCP SDK dependency
bundle add mcp
# Create our server file
touch weather.rb
```
```powershell Windows theme={null}
# Create a new directory for our project
mkdir weather
cd weather
# Create a Gemfile
bundle init
# Add the MCP SDK dependency
bundle add mcp
# Create our server file
new-item weather.rb
```
现在开始构建 server。
## 构建服务器
### 导入包并设置常量
打开 `weather.rb`,在顶部添加这些 requires 和 constants:
```ruby theme={null}
require "json"
require "mcp"
require "net/http"
require "uri"
NWS_API_BASE = "https://api.weather.gov"
USER_AGENT = "weather-app/1.0"
```
`mcp` gem 提供 Ruby 版 Model Context Protocol SDK,包含 server 实现和 stdio transport 所需类。
### 辅助方法
接下来添加 helper methods,用于查询并格式化 National Weather Service API 的数据:
```ruby theme={null}
module HelperMethods
def make_nws_request(url)
uri = URI(url)
request = Net::HTTP::Get.new(uri)
request["User-Agent"] = USER_AGENT
request["Accept"] = "application/geo+json"
response = Net::HTTP.start(uri.hostname, uri.port, use_ssl: true) do |http|
http.request(request)
end
raise "HTTP #{response.code}: #{response.message}" unless response.is_a?(Net::HTTPSuccess)
JSON.parse(response.body)
end
def format_alert(feature)
properties = feature["properties"]
<<~ALERT
Event: #{properties["event"] || "Unknown"}
Area: #{properties["areaDesc"] || "Unknown"}
Severity: #{properties["severity"] || "Unknown"}
Description: #{properties["description"] || "No description available"}
Instructions: #{properties["instruction"] || "No specific instructions provided"}
ALERT
end
end
```
### 实现工具执行
现在定义 tool classes。每个 tool 都继承 `MCP::Tool` 并实现 tool 逻辑:
```ruby theme={null}
class GetAlerts < MCP::Tool
extend HelperMethods
tool_name "get_alerts"
description "Get weather alerts for a US state"
input_schema(
properties: {
state: {
type: "string",
description: "Two-letter US state code (e.g. CA, NY)"
}
},
required: ["state"]
)
def self.call(state:)
url = "#{NWS_API_BASE}/alerts/active/area/#{state.upcase}"
data = make_nws_request(url)
if data["features"].empty?
return MCP::Tool::Response.new([{
type: "text",
text: "No active alerts for this state."
}])
end
alerts = data["features"].map { |feature| format_alert(feature) }
MCP::Tool::Response.new([{
type: "text",
text: alerts.join("\n---\n")
}])
end
end
class GetForecast < MCP::Tool
extend HelperMethods
tool_name "get_forecast"
description "Get weather forecast for a location"
input_schema(
properties: {
latitude: {
type: "number",
description: "Latitude of the location"
},
longitude: {
type: "number",
description: "Longitude of the location"
}
},
required: ["latitude", "longitude"]
)
def self.call(latitude:, longitude:)
# First get the forecast grid endpoint.
points_url = "#{NWS_API_BASE}/points/#{latitude},#{longitude}"
points_data = make_nws_request(points_url)
# Get the forecast URL from the points response.
forecast_url = points_data["properties"]["forecast"]
forecast_data = make_nws_request(forecast_url)
# Format the periods into a readable forecast.
periods = forecast_data["properties"]["periods"]
forecasts = periods.first(5).map do |period|
<<~FORECAST
#{period["name"]}:
Temperature: #{period["temperature"]}°#{period["temperatureUnit"]}
Wind: #{period["windSpeed"]} #{period["windDirection"]}
Forecast: #{period["detailedForecast"]}
FORECAST
end
MCP::Tool::Response.new([{
type: "text",
text: forecasts.join("\n---\n")
}])
end
end
```
### 运行服务器
最后,初始化并运行 server:
```ruby theme={null}
server = MCP::Server.new(
name: "weather",
version: "1.0.0",
tools: [GetAlerts, GetForecast]
)
transport = MCP::Server::Transports::StdioTransport.new(server)
transport.open
```
server 已完成。运行 `bundle exec ruby weather.rb` 启动 MCP server,它会监听来自 MCP hosts 的消息。
现在从已有 MCP host Claude for Desktop 测试 server。
## 使用 Claude for Desktop 测试服务器
Claude for Desktop 尚不支持 Linux。Linux 用户可以继续阅读[构建 client](/docs/develop/build-client)教程,构建一个连接刚才 server 的 MCP client。
首先,确保已安装 Claude for Desktop。[可以在这里安装最新版](https://claude.ai/download)。如果已经安装 Claude for Desktop,**请确保它已更新到最新版本。**
需要为你想使用的 MCP servers 配置 Claude for Desktop。为此,请用文本编辑器打开 Claude for Desktop App 配置文件 `~/Library/Application Support/Claude/claude_desktop_config.json`。如果文件不存在,请创建它。
例如,如果你安装了 [VS Code](https://code.visualstudio.com/):
```bash macOS/Linux theme={null}
code ~/Library/Application\ Support/Claude/claude_desktop_config.json
```
```powershell Windows theme={null}
code $env:AppData\Claude\claude_desktop_config.json
```
然后在 `mcpServers` key 中添加 servers。只有至少正确配置了一个 server,MCP UI 元素才会出现在 Claude for Desktop 中。
在本例中,我们按如下方式添加单个 weather server:
```json macOS/Linux theme={null}
{
"mcpServers": {
"weather": {
"command": "bundle",
"args": ["exec", "ruby", "weather.rb"],
"cwd": "/ABSOLUTE/PATH/TO/PARENT/FOLDER/weather"
}
}
}
```
```json Windows theme={null}
{
"mcpServers": {
"weather": {
"command": "bundle",
"args": ["exec", "ruby", "weather.rb"],
"cwd": "C:\\ABSOLUTE\\PATH\\TO\\PARENT\\FOLDER\\weather"
}
}
}
```
请确保在 `cwd` 字段中传入项目目录的绝对路径。可以在 macOS/Linux 上运行 `pwd`,或在 Windows Command Prompt 中从项目目录运行 `cd` 获取。Windows 上请记得在 JSON 路径中使用双反斜杠(`\\`)或正斜杠(`/`)。
这会告诉 Claude for Desktop:
1. 有一个名为 "weather" 的 MCP server
2. 在指定目录中运行 `bundle exec ruby weather.rb` 启动它
保存文件并重启 **Claude for Desktop**。
开始构建 weather server。[本教程将构建内容的完整代码见这里。](https://github.com/modelcontextprotocol/quickstart-resources/tree/main/weather-server-rust)
### 前置知识
本快速开始假设你熟悉:
* Rust 编程语言
* Rust 中的 async/await
* Claude 等 LLM
### MCP 服务器中的日志
实现 MCP servers 时,请谨慎处理日志:
**对于基于 STDIO 的 servers:** 绝不要使用 `println!()` 或 `print!()`,因为它们会写入 standard output (stdout)。写入 stdout 会破坏 JSON-RPC 消息并导致 server 失效。
**对于基于 HTTP 的 servers:** standard output 日志可以使用,因为它不会干扰 HTTP responses。
### 最佳实践
* 使用写入 stderr 或文件的日志库,例如 Rust 中的 `tracing` 或 `log`。
* 配置日志框架以避免 stdout 输出。
### 快速示例
```rust theme={null}
// ❌ Bad (STDIO)
println!("Processing request");
// ✅ Good (STDIO)
eprintln!("Processing request"); // writes to stderr
```
### 系统要求
* 已安装 Rust 1.70 或更高版本。
* Cargo(随 Rust 安装提供)。
### 设置环境
如果尚未安装,请先安装 Rust。可以从 [rust-lang.org](https://www.rust-lang.org/tools/install) 安装 Rust:
```bash macOS/Linux theme={null}
curl --proto '=https' --tlsv1.2 -sSf https://sh.rustup.rs | sh
```
```powershell Windows theme={null}
# Download and run rustup-init.exe from https://rustup.rs/
```
验证 Rust 安装:
```bash theme={null}
rustc --version
cargo --version
```
现在创建并设置项目:
```bash macOS/Linux theme={null}
# Create a new Rust project
cargo new weather
cd weather
```
```powershell Windows theme={null}
# Create a new Rust project
cargo new weather
cd weather
```
更新 `Cargo.toml`,添加所需依赖:
```toml Cargo.toml theme={null}
[package]
name = "weather"
version = "0.1.0"
edition = "2024"
[dependencies]
rmcp = { version = "0.3", features = ["server", "macros", "transport-io"] }
tokio = { version = "1.46", features = ["full"] }
reqwest = { version = "0.12", features = ["json"] }
serde = { version = "1.0", features = ["derive"] }
serde_json = "1.0"
anyhow = "1.0"
tracing = "0.1"
tracing-subscriber = { version = "0.3", features = ["env-filter", "std", "fmt"] }
```
现在开始构建 server。
## 构建服务器
### 导入包和常量
打开 `src/main.rs`,在顶部添加这些 imports 和 constants:
```rust theme={null}
use anyhow::Result;
use rmcp::{
ServerHandler, ServiceExt,
handler::server::{router::tool::ToolRouter, tool::Parameters},
model::*,
schemars, tool, tool_handler, tool_router,
};
use serde::Deserialize;
use serde::de::DeserializeOwned;
const NWS_API_BASE: &str = "https://api.weather.gov";
const USER_AGENT: &str = "weather-app/1.0";
```
`rmcp` crate 提供 Rust 版 Model Context Protocol SDK,包含 server 实现、procedural macros 和 stdio transport 等功能。
### 数据结构
接下来,定义用于反序列化 National Weather Service API 响应的数据结构:
```rust theme={null}
#[derive(Debug, Deserialize)]
struct AlertsResponse {
features: Vec,
}
#[derive(Debug, Deserialize)]
struct AlertFeature {
properties: AlertProperties,
}
#[derive(Debug, Deserialize)]
struct AlertProperties {
event: Option,
#[serde(rename = "areaDesc")]
area_desc: Option,
severity: Option,
description: Option,
instruction: Option,
}
#[derive(Debug, Deserialize)]
struct PointsResponse {
properties: PointsProperties,
}
#[derive(Debug, Deserialize)]
struct PointsProperties {
forecast: String,
}
#[derive(Debug, Deserialize)]
struct ForecastResponse {
properties: ForecastProperties,
}
#[derive(Debug, Deserialize)]
struct ForecastProperties {
periods: Vec,
}
#[derive(Debug, Deserialize)]
struct ForecastPeriod {
name: String,
temperature: i32,
#[serde(rename = "temperatureUnit")]
temperature_unit: String,
#[serde(rename = "windSpeed")]
wind_speed: String,
#[serde(rename = "windDirection")]
wind_direction: String,
#[serde(rename = "detailedForecast")]
detailed_forecast: String,
}
```
现在定义 MCP clients 将发送的请求类型:
```rust theme={null}
#[derive(serde::Deserialize, schemars::JsonSchema)]
pub struct MCPForecastRequest {
latitude: f32,
longitude: f32,
}
#[derive(serde::Deserialize, schemars::JsonSchema)]
pub struct MCPAlertRequest {
state: String,
}
```
### 辅助函数
添加 helper functions,用于发起 API requests 并格式化 responses:
```rust theme={null}
async fn make_nws_request(url: &str) -> Result {
let client = reqwest::Client::new();
let rsp = client
.get(url)
.header(reqwest::header::USER_AGENT, USER_AGENT)
.header(reqwest::header::ACCEPT, "application/geo+json")
.send()
.await?
.error_for_status()?;
Ok(rsp.json::().await?)
}
fn format_alert(feature: &AlertFeature) -> String {
let props = &feature.properties;
format!(
"Event: {}\nArea: {}\nSeverity: {}\nDescription: {}\nInstructions: {}",
props.event.as_deref().unwrap_or("Unknown"),
props.area_desc.as_deref().unwrap_or("Unknown"),
props.severity.as_deref().unwrap_or("Unknown"),
props
.description
.as_deref()
.unwrap_or("No description available"),
props
.instruction
.as_deref()
.unwrap_or("No specific instructions provided")
)
}
fn format_period(period: &ForecastPeriod) -> String {
format!(
"{}:\nTemperature: {}°{}\nWind: {} {}\nForecast: {}",
period.name,
period.temperature,
period.temperature_unit,
period.wind_speed,
period.wind_direction,
period.detailed_forecast
)
}
```
### 实现天气服务器和工具
现在实现带 tool handlers 的主 Weather server struct:
```rust theme={null}
pub struct Weather {
tool_router: ToolRouter,
}
#[tool_router]
impl Weather {
fn new() -> Self {
Self {
tool_router: Self::tool_router(),
}
}
#[tool(description = "Get weather alerts for a US state.")]
async fn get_alerts(
&self,
Parameters(MCPAlertRequest { state }): Parameters,
) -> String {
let url = format!(
"{}/alerts/active/area/{}",
NWS_API_BASE,
state.to_uppercase()
);
match make_nws_request::(&url).await {
Ok(data) => {
if data.features.is_empty() {
"No active alerts for this state.".to_string()
} else {
data.features
.iter()
.map(format_alert)
.collect::>()
.join("\n---\n")
}
}
Err(_) => "Unable to fetch alerts or no alerts found.".to_string(),
}
}
#[tool(description = "Get weather forecast for a location.")]
async fn get_forecast(
&self,
Parameters(MCPForecastRequest {
latitude,
longitude,
}): Parameters,
) -> String {
let points_url = format!("{NWS_API_BASE}/points/{latitude},{longitude}");
let Ok(points_data) = make_nws_request::(&points_url).await else {
return "Unable to fetch forecast data for this location.".to_string();
};
let forecast_url = points_data.properties.forecast;
let Ok(forecast_data) = make_nws_request::(&forecast_url).await else {
return "Unable to fetch forecast data for this location.".to_string();
};
let periods = &forecast_data.properties.periods;
let forecast_summary: String = periods
.iter()
.take(5) // Next 5 periods only
.map(format_period)
.collect::>()
.join("\n---\n");
forecast_summary
}
}
```
`#[tool_router]` macro 会自动生成路由逻辑,`#[tool]` attribute 会将方法标记为 MCP tools。
### 实现 ServerHandler
Implement the `ServerHandler` trait to define server capabilities:
```rust theme={null}
#[tool_handler]
impl ServerHandler for Weather {
fn get_info(&self) -> ServerInfo {
ServerInfo {
capabilities: ServerCapabilities::builder().enable_tools().build(),
..Default::default()
}
}
}
```
### 运行服务器
Finally, implement the main function to run the server with stdio transport:
```rust theme={null}
#[tokio::main]
async fn main() -> Result<()> {
let transport = (tokio::io::stdin(), tokio::io::stdout());
let service = Weather::new().serve(transport).await?;
service.waiting().await?;
Ok(())
}
```
使用以下命令构建 server:
```bash theme={null}
cargo build --release
```
编译后的 binary 位于 `target/release/weather`。
现在从已有 MCP host Claude for Desktop 测试 server。
## 使用 Claude for Desktop 测试服务器
Claude for Desktop is not yet available on Linux. Linux users can proceed to the [Building a client](/docs/develop/build-client) tutorial to build an MCP client that connects to the server we just built.
首先,确保已安装 Claude for Desktop。[可以在这里安装最新版](https://claude.ai/download)。如果已经安装 Claude for Desktop,**请确保它已更新到最新版本。**
需要为你想使用的 MCP servers 配置 Claude for Desktop。为此,请用文本编辑器打开 Claude for Desktop App 配置文件 `~/Library/Application Support/Claude/claude_desktop_config.json`。如果文件不存在,请创建它。
例如,如果你安装了 [VS Code](https://code.visualstudio.com/):
```bash macOS/Linux theme={null}
code ~/Library/Application\ Support/Claude/claude_desktop_config.json
```
```powershell Windows theme={null}
code $env:AppData\Claude\claude_desktop_config.json
```
然后在 `mcpServers` key 中添加 servers。只有至少正确配置了一个 server,MCP UI 元素才会出现在 Claude for Desktop 中。
在本例中,我们按如下方式添加单个 weather server:
```json macOS/Linux theme={null}
{
"mcpServers": {
"weather": {
"command": "/ABSOLUTE/PATH/TO/PARENT/FOLDER/weather/target/release/weather"
}
}
}
```
```json Windows theme={null}
{
"mcpServers": {
"weather": {
"command": "C:\\ABSOLUTE\\PATH\\TO\\PARENT\\FOLDER\\weather\\target\\release\\weather.exe"
}
}
}
```
请确保传入已编译 binary 的绝对路径。可以在 macOS/Linux 上运行 `pwd`,或在 Windows Command Prompt 中从项目目录运行 `cd` 获取。Windows 上请记得在 JSON 路径中使用双反斜杠(`\\`)或正斜杠(`/`),并添加 `.exe` 扩展名。
这会告诉 Claude for Desktop:
1. There's an MCP server named "weather"
2. Launch it by running the compiled binary at the specified path
Save the file, and restart **Claude for Desktop**.
开始构建 weather server。[本教程将构建内容的完整代码见这里。](https://github.com/modelcontextprotocol/quickstart-resources/tree/main/weather-server-go)
### 前置知识
本快速开始假设你熟悉:
* Go
* LLMs like Claude
### MCP 服务器中的日志
实现 MCP servers 时,请谨慎处理日志:
**For STDIO-based servers:** Never use `fmt.Println()` or `fmt.Printf()`, as they write to standard output (stdout). Writing to stdout will corrupt the JSON-RPC messages and break your server.
**For HTTP-based servers:** Standard output logging is fine since it doesn't interfere with HTTP responses.
### 最佳实践
* Use `log.Println()` (which defaults to stderr) or a logging library that writes to stderr or files.
* Use `fmt.Fprintf(os.Stderr, ...)` to write to stderr explicitly.
### 快速示例
```go theme={null}
// ❌ Bad (STDIO)
fmt.Println("Processing request")
// ✅ Good (STDIO)
log.Println("Processing request") // defaults to stderr
// ✅ Good (STDIO)
fmt.Fprintln(os.Stderr, "Processing request")
```
### 系统要求
* Go 1.24 or higher installed.
### 设置环境
如果尚未安装,请先安装 Go。可以从 [go.dev](https://go.dev/dl/) 下载并安装 Go。
验证 Go 安装:
```bash theme={null}
go version
```
现在创建并设置项目:
```bash macOS/Linux theme={null}
# Create a new directory for our project
mkdir weather
cd weather
# Initialize Go module
go mod init weather
# Install dependencies
go get github.com/modelcontextprotocol/go-sdk/mcp
# Create our server file
touch main.go
```
```powershell Windows theme={null}
# Create a new directory for our project
md weather
cd weather
# Initialize Go module
go mod init weather
# Install dependencies
go get github.com/modelcontextprotocol/go-sdk/mcp
# Create our server file
new-item main.go
```
现在开始构建 server。
## 构建服务器
### 导入包和常量
将以下内容添加到 `main.go` 顶部:
```go theme={null}
package main
import (
"cmp"
"context"
"encoding/json"
"fmt"
"io"
"log"
"net/http"
"strings"
"github.com/modelcontextprotocol/go-sdk/mcp"
)
const (
NWSAPIBase = "https://api.weather.gov"
UserAgent = "weather-app/1.0"
)
```
### 数据结构
接下来,定义 tools 使用的数据结构:
```go theme={null}
type PointsResponse struct {
Properties struct {
Forecast string `json:"forecast"`
} `json:"properties"`
}
type ForecastResponse struct {
Properties struct {
Periods []ForecastPeriod `json:"periods"`
} `json:"properties"`
}
type ForecastPeriod struct {
Name string `json:"name"`
Temperature int `json:"temperature"`
TemperatureUnit string `json:"temperatureUnit"`
WindSpeed string `json:"windSpeed"`
WindDirection string `json:"windDirection"`
DetailedForecast string `json:"detailedForecast"`
}
type AlertsResponse struct {
Features []AlertFeature `json:"features"`
}
type AlertFeature struct {
Properties AlertProperties `json:"properties"`
}
type AlertProperties struct {
Event string `json:"event"`
AreaDesc string `json:"areaDesc"`
Severity string `json:"severity"`
Description string `json:"description"`
Instruction string `json:"instruction"`
}
type ForecastInput struct {
Latitude float64 `json:"latitude" jsonschema:"Latitude of the location"`
Longitude float64 `json:"longitude" jsonschema:"Longitude of the location"`
}
type AlertsInput struct {
State string `json:"state" jsonschema:"Two-letter US state code (e.g. CA, NY)"`
}
```
### 辅助函数
接下来添加 helper functions,用于查询并格式化 National Weather Service API 的数据:
```go theme={null}
func makeNWSRequest[T any](ctx context.Context, url string) (*T, error) {
req, err := http.NewRequestWithContext(ctx, http.MethodGet, url, nil)
if err != nil {
return nil, fmt.Errorf("failed to create request: %w", err)
}
req.Header.Set("User-Agent", UserAgent)
req.Header.Set("Accept", "application/geo+json")
client := http.DefaultClient
resp, err := client.Do(req)
if err != nil {
return nil, fmt.Errorf("failed to make request to %s: %w", url, err)
}
defer resp.Body.Close()
if resp.StatusCode != http.StatusOK {
body, _ := io.ReadAll(resp.Body)
return nil, fmt.Errorf("HTTP error %d: %s", resp.StatusCode, string(body))
}
var result T
if err := json.NewDecoder(resp.Body).Decode(&result); err != nil {
return nil, fmt.Errorf("failed to decode response: %w", err)
}
return &result, nil
}
func formatAlert(alert AlertFeature) string {
props := alert.Properties
event := cmp.Or(props.Event, "Unknown")
areaDesc := cmp.Or(props.AreaDesc, "Unknown")
severity := cmp.Or(props.Severity, "Unknown")
description := cmp.Or(props.Description, "No description available")
instruction := cmp.Or(props.Instruction, "No specific instructions provided")
return fmt.Sprintf(`
Event: %s
Area: %s
Severity: %s
Description: %s
Instructions: %s
`, event, areaDesc, severity, description, instruction)
}
func formatPeriod(period ForecastPeriod) string {
return fmt.Sprintf(`
%s:
Temperature: %d°%s
Wind: %s %s
Forecast: %s
`, period.Name, period.Temperature, period.TemperatureUnit,
period.WindSpeed, period.WindDirection, period.DetailedForecast)
}
```
### 实现工具执行
tool execution handler 负责实际执行每个 tool 的逻辑。添加如下内容:
```go theme={null}
func getForecast(ctx context.Context, req *mcp.CallToolRequest, input ForecastInput) (
*mcp.CallToolResult, any, error,
) {
// Get points data
pointsURL := fmt.Sprintf("%s/points/%f,%f", NWSAPIBase, input.Latitude, input.Longitude)
pointsData, err := makeNWSRequest[PointsResponse](ctx, pointsURL)
if err != nil {
return &mcp.CallToolResult{
Content: []mcp.Content{
&mcp.TextContent{Text: "Unable to fetch forecast data for this location."},
},
}, nil, nil
}
// Get forecast data
forecastURL := pointsData.Properties.Forecast
if forecastURL == "" {
return &mcp.CallToolResult{
Content: []mcp.Content{
&mcp.TextContent{Text: "Unable to fetch forecast URL."},
},
}, nil, nil
}
forecastData, err := makeNWSRequest[ForecastResponse](ctx, forecastURL)
if err != nil {
return &mcp.CallToolResult{
Content: []mcp.Content{
&mcp.TextContent{Text: "Unable to fetch detailed forecast."},
},
}, nil, nil
}
// Format the periods
periods := forecastData.Properties.Periods
if len(periods) == 0 {
return &mcp.CallToolResult{
Content: []mcp.Content{
&mcp.TextContent{Text: "No forecast periods available."},
},
}, nil, nil
}
// Show next 5 periods
var forecasts []string
for i := range min(5, len(periods)) {
forecasts = append(forecasts, formatPeriod(periods[i]))
}
result := strings.Join(forecasts, "\n---\n")
return &mcp.CallToolResult{
Content: []mcp.Content{
&mcp.TextContent{Text: result},
},
}, nil, nil
}
func getAlerts(ctx context.Context, req *mcp.CallToolRequest, input AlertsInput) (
*mcp.CallToolResult, any, error,
) {
// Build alerts URL
stateCode := strings.ToUpper(input.State)
alertsURL := fmt.Sprintf("%s/alerts/active/area/%s", NWSAPIBase, stateCode)
alertsData, err := makeNWSRequest[AlertsResponse](ctx, alertsURL)
if err != nil {
return &mcp.CallToolResult{
Content: []mcp.Content{
&mcp.TextContent{Text: "Unable to fetch alerts or no alerts found."},
},
}, nil, nil
}
// Check if there are any alerts
if len(alertsData.Features) == 0 {
return &mcp.CallToolResult{
Content: []mcp.Content{
&mcp.TextContent{Text: "No active alerts for this state."},
},
}, nil, nil
}
// Format alerts
var alerts []string
for _, feature := range alertsData.Features {
alerts = append(alerts, formatAlert(feature))
}
result := strings.Join(alerts, "\n---\n")
return &mcp.CallToolResult{
Content: []mcp.Content{
&mcp.TextContent{Text: result},
},
}, nil, nil
}
```
### 运行服务器
Finally, implement the main function to run the server:
```go theme={null}
func main() {
// Create MCP server
server := mcp.NewServer(&mcp.Implementation{
Name: "weather",
Version: "1.0.0",
}, nil)
// Add get_forecast tool
mcp.AddTool(server, &mcp.Tool{
Name: "get_forecast",
Description: "Get weather forecast for a location",
}, getForecast)
// Add get_alerts tool
mcp.AddTool(server, &mcp.Tool{
Name: "get_alerts",
Description: "Get weather alerts for a US state",
}, getAlerts)
// Run server on stdio transport
if err := server.Run(context.Background(), &mcp.StdioTransport{}); err != nil {
log.Fatal(err)
}
}
```
使用以下命令构建 server:
```bash theme={null}
go build -o weather .
```
编译后的 binary 位于 `./weather`。
现在从已有 MCP host Claude for Desktop 测试 server。
## 使用 Claude for Desktop 测试服务器
Claude for Desktop is not yet available on Linux. Linux users can proceed to the [Building a client](/docs/develop/build-client) tutorial to build an MCP client that connects to the server we just built.
首先,确保已安装 Claude for Desktop。[可以在这里安装最新版](https://claude.ai/download)。如果已经安装 Claude for Desktop,**请确保它已更新到最新版本。**
需要为你想使用的 MCP servers 配置 Claude for Desktop。为此,请用文本编辑器打开 Claude for Desktop App 配置文件 `~/Library/Application Support/Claude/claude_desktop_config.json`。如果文件不存在,请创建它。
例如,如果你安装了 [VS Code](https://code.visualstudio.com/):
```bash macOS/Linux theme={null}
code ~/Library/Application\ Support/Claude/claude_desktop_config.json
```
```powershell Windows theme={null}
code $env:AppData\Claude\claude_desktop_config.json
```
然后在 `mcpServers` key 中添加 servers。只有至少正确配置了一个 server,MCP UI 元素才会出现在 Claude for Desktop 中。
在本例中,我们按如下方式添加单个 weather server:
```json macOS/Linux theme={null}
{
"mcpServers": {
"weather": {
"command": "/ABSOLUTE/PATH/TO/PARENT/FOLDER/weather/weather"
}
}
}
```
```json Windows theme={null}
{
"mcpServers": {
"weather": {
"command": "C:\\ABSOLUTE\\PATH\\TO\\PARENT\\FOLDER\\weather\\weather.exe"
}
}
}
```
请确保传入已编译 binary 的绝对路径。可以在 macOS/Linux 上运行 `pwd`,或在 Windows Command Prompt 中从项目目录运行 `cd` 获取。Windows 上请记得在 JSON 路径中使用双反斜杠(`\\`)或正斜杠(`/`),并添加 `.exe` 扩展名。
这会告诉 Claude for Desktop:
1. There's an MCP server named "weather"
2. Launch it by running the compiled binary at the specified path
Save the file, and restart **Claude for Desktop**.
### 使用命令测试
确认 Claude for Desktop 能识别 `weather` server 暴露的两个 tools。可以查找 "Add files, connectors, and more /"
服务器可以连接到任何客户端。为了简化说明,这里选择 Claude for Desktop;你也可以参考[构建自己的客户端](/docs/develop/build-client)指南。
### MCP 核心概念
MCP 服务器可以提供三类主要能力:
1. **[Resources](/docs/learn/server-concepts#resources)**:可由客户端读取的类文件数据,例如 API 响应或文件内容。
2. **[Tools](/docs/learn/server-concepts#tools)**:可由 LLM 调用的函数,通常需要用户批准。
3. **[Prompts](/docs/learn/server-concepts#prompts)**:帮助用户完成特定任务的预写模板。
本教程主要关注 tools。
开始构建天气服务器。[这里可以找到本教程将构建内容的完整代码。](https://github.com/modelcontextprotocol/quickstart-resources/tree/main/weather-server-python)
### 前置知识
本快速开始假设你熟悉:
* Python
* LLMs like Claude
### MCP 服务器中的日志
实现 MCP 服务器时,请谨慎处理日志:
**对于基于 STDIO 的服务器:** 永远不要写入 stdout。写入 stdout 会破坏 JSON-RPC 消息并导致服务器异常。`print()` 默认写入 stdout,但配合 `file=sys.stderr` 可以安全使用。
**对于基于 HTTP 的服务器:** 标准输出日志是可以的,因为它不会干扰 HTTP 响应。
### 最佳实践
* 使用写入 stderr 或文件的日志库。
### 快速示例
```python theme={null}
import sys
import logging
# ❌ Bad (STDIO)
print("Processing request")
# ✅ Good (STDIO)
print("Processing request", file=sys.stderr)
# ✅ Good (STDIO)
logging.info("Processing request")
```
### 系统要求
* 已安装 Python 3.10 或更高版本。
* 必须使用 Python MCP SDK 1.2.0 或更高版本。
### 设置环境
首先安装 `uv`,并设置 Python 项目和环境:
```bash macOS/Linux theme={null}
curl -LsSf https://astral.sh/uv/install.sh | sh
```
```powershell Windows theme={null}
powershell -ExecutionPolicy ByPass -c "irm https://astral.sh/uv/install.ps1 | iex"
```
安装后请重启终端,确保可以识别 `uv` 命令。
现在创建并设置项目:
```bash macOS/Linux theme={null}
# Create a new directory for our project
uv init weather
cd weather
# Create virtual environment and activate it
uv venv
source .venv/bin/activate
# Install dependencies
uv add "mcp[cli]" httpx
# Create our server file
touch weather.py
```
```powershell Windows theme={null}
# Create a new directory for our project
uv init weather
cd weather
# Create virtual environment and activate it
uv venv
.venv\Scripts\activate
# Install dependencies
uv add mcp[cli] httpx
# Create our server file
new-item weather.py
```
现在开始构建服务器。
## 构建服务器
### 导入包并设置实例
将以下内容添加到 `weather.py` 顶部:
```python theme={null}
from typing import Any
import httpx
from mcp.server.fastmcp import FastMCP
# Initialize FastMCP server
mcp = FastMCP("weather")
# Constants
NWS_API_BASE = "https://api.weather.gov"
USER_AGENT = "weather-app/1.0"
```
FastMCP 类会使用 Python 类型提示和 docstring 自动生成 tool 定义,使 MCP tools 的创建和维护更简单。
### 辅助函数
接下来添加辅助函数,用于查询并格式化 National Weather Service API 的数据:
```python theme={null}
async def make_nws_request(url: str) -> dict[str, Any] | None:
"""Make a request to the NWS API with proper error handling."""
headers = {"User-Agent": USER_AGENT, "Accept": "application/geo+json"}
async with httpx.AsyncClient() as client:
try:
response = await client.get(url, headers=headers, timeout=30.0)
response.raise_for_status()
return response.json()
except Exception:
return None
def format_alert(feature: dict) -> str:
"""Format an alert feature into a readable string."""
props = feature["properties"]
return f"""
Event: {props.get("event", "Unknown")}
Area: {props.get("areaDesc", "Unknown")}
Severity: {props.get("severity", "Unknown")}
Description: {props.get("description", "No description available")}
Instructions: {props.get("instruction", "No specific instructions provided")}
"""
```
### 实现工具执行
工具执行处理器负责真正执行每个 tool 的逻辑。添加如下代码:
```python theme={null}
@mcp.tool()
async def get_alerts(state: str) -> str:
"""Get weather alerts for a US state.
Args:
state: Two-letter US state code (e.g. CA, NY)
"""
url = f"{NWS_API_BASE}/alerts/active/area/{state}"
data = await make_nws_request(url)
if not data or "features" not in data:
return "Unable to fetch alerts or no alerts found."
if not data["features"]:
return "No active alerts for this state."
alerts = [format_alert(feature) for feature in data["features"]]
return "\n---\n".join(alerts)
@mcp.tool()
async def get_forecast(latitude: float, longitude: float) -> str:
"""Get weather forecast for a location.
Args:
latitude: Latitude of the location
longitude: Longitude of the location
"""
# First get the forecast grid endpoint
points_url = f"{NWS_API_BASE}/points/{latitude},{longitude}"
points_data = await make_nws_request(points_url)
if not points_data:
return "Unable to fetch forecast data for this location."
# Get the forecast URL from the points response
forecast_url = points_data["properties"]["forecast"]
forecast_data = await make_nws_request(forecast_url)
if not forecast_data:
return "Unable to fetch detailed forecast."
# Format the periods into a readable forecast
periods = forecast_data["properties"]["periods"]
forecasts = []
for period in periods[:5]: # Only show next 5 periods
forecast = f"""
{period["name"]}:
Temperature: {period["temperature"]}°{period["temperatureUnit"]}
Wind: {period["windSpeed"]} {period["windDirection"]}
Forecast: {period["detailedForecast"]}
"""
forecasts.append(forecast)
return "\n---\n".join(forecasts)
```
### 运行服务器
最后,初始化并运行服务器:
```python theme={null}
def main():
# Initialize and run the server
mcp.run(transport="stdio")
if __name__ == "__main__":
main()
```
服务器已经完成。运行 `uv run weather.py` 启动 MCP 服务器,它会监听来自 MCP hosts 的消息。
现在从现有 MCP host Claude for Desktop 测试服务器。
## 使用 Claude for Desktop 测试服务器
Claude for Desktop 目前尚不支持 Linux。Linux 用户可以继续阅读[构建客户端](/docs/develop/build-client)教程,构建一个连接到刚才服务器的 MCP client。
首先,确保已经安装 Claude for Desktop。[你可以在这里安装最新版本。](https://claude.ai/download) 如果已经安装 Claude for Desktop,**请确保它已更新到最新版本。**
你需要在 Claude for Desktop 中配置想要使用的 MCP 服务器。为此,请用文本编辑器打开 Claude for Desktop 应用配置文件 `~/Library/Application Support/Claude/claude_desktop_config.json`。如果文件不存在,请先创建它。
例如,如果已安装 [VS Code](https://code.visualstudio.com/):
```bash macOS/Linux theme={null}
code ~/Library/Application\ Support/Claude/claude_desktop_config.json
```
```powershell Windows theme={null}
code $env:AppData\Claude\claude_desktop_config.json
```
接着在 `mcpServers` 键中添加服务器。只有至少正确配置了一个服务器,MCP UI 元素才会出现在 Claude for Desktop 中。
本例中,我们按如下方式添加单个天气服务器:
```json macOS/Linux theme={null}
{
"mcpServers": {
"weather": {
"command": "uv",
"args": [
"--directory",
"/ABSOLUTE/PATH/TO/PARENT/FOLDER/weather",
"run",
"weather.py"
]
}
}
}
```
```json Windows theme={null}
{
"mcpServers": {
"weather": {
"command": "uv",
"args": [
"--directory",
"C:\\ABSOLUTE\\PATH\\TO\\PARENT\\FOLDER\\weather",
"run",
"weather.py"
]
}
}
}
```
你可能需要在 `command` 字段中填入 `uv` 可执行文件的完整路径。可在 macOS/Linux 上运行 `which uv`,或在 Windows 上运行 `where uv` 获取。
请确保传入服务器的绝对路径。可在 macOS/Linux 上运行 `pwd`,或在 Windows Command Prompt 中运行 `cd` 获取。Windows 上请记得在 JSON 路径中使用双反斜杠(`\\`)或正斜杠(`/`)。
这会告诉 Claude for Desktop:
1. 有一个名为 `"weather"` 的 MCP server。
2. 通过运行 `uv --directory /ABSOLUTE/PATH/TO/PARENT/FOLDER/weather run weather.py` 启动它。
保存文件并重启 **Claude for Desktop**。
开始构建天气服务器。[这里可以找到本教程将构建内容的完整代码。](https://github.com/modelcontextprotocol/quickstart-resources/tree/main/weather-server-typescript)
### 前置知识
本快速开始假设你熟悉:
* TypeScript
* Claude 等 LLM
### MCP 服务器中的日志
实现 MCP servers 时,请谨慎处理日志:
**对于基于 STDIO 的 servers:** 绝不要使用 `console.log()`,因为它默认写入 standard output (stdout)。写入 stdout 会破坏 JSON-RPC 消息并导致 server 失效。
**对于基于 HTTP 的 servers:** standard output 日志可以使用,因为它不会干扰 HTTP responses。
### 最佳实践
* 使用会写入 stderr 的 `console.error()`,或使用写入 stderr / 文件的日志库。
### 快速示例
```javascript theme={null}
// ❌ Bad (STDIO)
console.log("Server started");
// ✅ Good (STDIO)
console.error("Server started"); // stderr is safe
```
### 系统要求
对于 TypeScript,请确保已安装最新版 Node。
### 设置环境
如果尚未安装,请先安装 Node.js 和 npm。可以从 [nodejs.org](https://nodejs.org/) 下载。
验证 Node.js 安装:
```bash theme={null}
node --version
npm --version
```
本教程需要 Node.js 16 或更高版本。
现在创建并设置项目:
```bash macOS/Linux theme={null}
# Create a new directory for our project
mkdir weather
cd weather
# Initialize a new npm project
npm init -y
# Install dependencies
npm install @modelcontextprotocol/sdk zod@3
npm install -D @types/node typescript
# Create our files
mkdir src
touch src/index.ts
```
```powershell Windows theme={null}
# Create a new directory for our project
md weather
cd weather
# Initialize a new npm project
npm init -y
# Install dependencies
npm install @modelcontextprotocol/sdk zod@3
npm install -D @types/node typescript
# Create our files
md src
new-item src\index.ts
```
更新 package.json,添加 type: "module" 和 build script:
```json package.json theme={null}
{
"type": "module",
"bin": {
"weather": "./build/index.js"
},
"scripts": {
"build": "tsc && chmod 755 build/index.js"
},
"files": ["build"]
}
```
在项目根目录创建 `tsconfig.json`:
```json tsconfig.json theme={null}
{
"compilerOptions": {
"target": "ES2022",
"module": "Node16",
"moduleResolution": "Node16",
"outDir": "./build",
"rootDir": "./src",
"strict": true,
"esModuleInterop": true,
"skipLibCheck": true,
"forceConsistentCasingInFileNames": true
},
"include": ["src/**/*"],
"exclude": ["node_modules"]
}
```
现在开始构建 server。
## 构建服务器
### 导入包并设置实例
将以下内容添加到 `src/index.ts` 顶部:
```typescript theme={null}
import { McpServer } from "@modelcontextprotocol/sdk/server/mcp.js";
import { StdioServerTransport } from "@modelcontextprotocol/sdk/server/stdio.js";
import { z } from "zod";
const NWS_API_BASE = "https://api.weather.gov";
const USER_AGENT = "weather-app/1.0";
// Create server instance
const server = new McpServer({
name: "weather",
version: "1.0.0",
});
```
### 辅助函数
接下来添加 helper functions,用于查询并格式化 National Weather Service API 的数据:
```typescript theme={null}
// Helper function for making NWS API requests
async function makeNWSRequest(url: string): Promise {
const headers = {
"User-Agent": USER_AGENT,
Accept: "application/geo+json",
};
try {
const response = await fetch(url, { headers });
if (!response.ok) {
throw new Error(`HTTP error! status: ${response.status}`);
}
return (await response.json()) as T;
} catch (error) {
console.error("Error making NWS request:", error);
return null;
}
}
interface AlertFeature {
properties: {
event?: string;
areaDesc?: string;
severity?: string;
status?: string;
headline?: string;
};
}
// Format alert data
function formatAlert(feature: AlertFeature): string {
const props = feature.properties;
return [
`Event: ${props.event || "Unknown"}`,
`Area: ${props.areaDesc || "Unknown"}`,
`Severity: ${props.severity || "Unknown"}`,
`Status: ${props.status || "Unknown"}`,
`Headline: ${props.headline || "No headline"}`,
"---",
].join("\n");
}
interface ForecastPeriod {
name?: string;
temperature?: number;
temperatureUnit?: string;
windSpeed?: string;
windDirection?: string;
shortForecast?: string;
}
interface AlertsResponse {
features: AlertFeature[];
}
interface PointsResponse {
properties: {
forecast?: string;
};
}
interface ForecastResponse {
properties: {
periods: ForecastPeriod[];
};
}
```
### 实现工具执行
tool execution handler 负责实际执行每个 tool 的逻辑。添加如下内容:
```typescript theme={null}
// Register weather tools
server.registerTool(
"get_alerts",
{
description: "Get weather alerts for a state",
inputSchema: {
state: z
.string()
.length(2)
.describe("Two-letter state code (e.g. CA, NY)"),
},
},
async ({ state }) => {
const stateCode = state.toUpperCase();
const alertsUrl = `${NWS_API_BASE}/alerts?area=${stateCode}`;
const alertsData = await makeNWSRequest(alertsUrl);
if (!alertsData) {
return {
content: [
{
type: "text",
text: "Failed to retrieve alerts data",
},
],
};
}
const features = alertsData.features || [];
if (!features.length) {
return {
content: [
{
type: "text",
text: `No active alerts for ${stateCode}`,
},
],
};
}
const formattedAlerts = features.map(formatAlert);
const alertsText = `Active alerts for ${stateCode}:\n\n${formattedAlerts.join("\n")}`;
return {
content: [
{
type: "text",
text: alertsText,
},
],
};
},
);
server.registerTool(
"get_forecast",
{
description: "Get weather forecast for a location",
inputSchema: {
latitude: z
.number()
.min(-90)
.max(90)
.describe("Latitude of the location"),
longitude: z
.number()
.min(-180)
.max(180)
.describe("Longitude of the location"),
},
},
async ({ latitude, longitude }) => {
// Get grid point data
const pointsUrl = `${NWS_API_BASE}/points/${latitude.toFixed(4)},${longitude.toFixed(4)}`;
const pointsData = await makeNWSRequest(pointsUrl);
if (!pointsData) {
return {
content: [
{
type: "text",
text: `Failed to retrieve grid point data for coordinates: ${latitude}, ${longitude}. This location may not be supported by the NWS API (only US locations are supported).`,
},
],
};
}
const forecastUrl = pointsData.properties?.forecast;
if (!forecastUrl) {
return {
content: [
{
type: "text",
text: "Failed to get forecast URL from grid point data",
},
],
};
}
// Get forecast data
const forecastData = await makeNWSRequest(forecastUrl);
if (!forecastData) {
return {
content: [
{
type: "text",
text: "Failed to retrieve forecast data",
},
],
};
}
const periods = forecastData.properties?.periods || [];
if (periods.length === 0) {
return {
content: [
{
type: "text",
text: "No forecast periods available",
},
],
};
}
// Format forecast periods
const formattedForecast = periods.map((period: ForecastPeriod) =>
[
`${period.name || "Unknown"}:`,
`Temperature: ${period.temperature || "Unknown"}°${period.temperatureUnit || "F"}`,
`Wind: ${period.windSpeed || "Unknown"} ${period.windDirection || ""}`,
`${period.shortForecast || "No forecast available"}`,
"---",
].join("\n"),
);
const forecastText = `Forecast for ${latitude}, ${longitude}:\n\n${formattedForecast.join("\n")}`;
return {
content: [
{
type: "text",
text: forecastText,
},
],
};
},
);
```
### 运行服务器
最后,实现用于运行 server 的 main 函数:
```typescript theme={null}
async function main() {
const transport = new StdioServerTransport();
await server.connect(transport);
console.error("Weather MCP Server running on stdio");
}
main().catch((error) => {
console.error("Fatal error in main():", error);
process.exit(1);
});
```
请务必运行 `npm run build` 构建 server。这是让 server 能够连接的重要步骤。
现在从已有 MCP host Claude for Desktop 测试 server。
## 使用 Claude for Desktop 测试服务器
Claude for Desktop 尚不支持 Linux。Linux 用户可以继续阅读[构建 client](/docs/develop/build-client)教程,构建一个连接刚才 server 的 MCP client。
首先,确保已安装 Claude for Desktop。[可以在这里安装最新版](https://claude.ai/download)。如果已经安装 Claude for Desktop,**请确保它已更新到最新版本。**
需要为你想使用的 MCP servers 配置 Claude for Desktop。为此,请用文本编辑器打开 Claude for Desktop App 配置文件 `~/Library/Application Support/Claude/claude_desktop_config.json`。如果文件不存在,请创建它。
例如,如果你安装了 [VS Code](https://code.visualstudio.com/):
```bash macOS/Linux theme={null}
code ~/Library/Application\ Support/Claude/claude_desktop_config.json
```
```powershell Windows theme={null}
code $env:AppData\Claude\claude_desktop_config.json
```
然后在 `mcpServers` key 中添加 servers。只有至少正确配置了一个 server,MCP UI 元素才会出现在 Claude for Desktop 中。
在本例中,我们按如下方式添加单个 weather server:
```json macOS/Linux theme={null}
{
"mcpServers": {
"weather": {
"command": "node",
"args": ["/ABSOLUTE/PATH/TO/PARENT/FOLDER/weather/build/index.js"]
}
}
}
```
```json Windows theme={null}
{
"mcpServers": {
"weather": {
"command": "node",
"args": ["C:\\PATH\\TO\\PARENT\\FOLDER\\weather\\build\\index.js"]
}
}
}
```
这会告诉 Claude for Desktop:
1. 有一个名为 "weather" 的 MCP server
2. 通过运行 `node /ABSOLUTE/PATH/TO/PARENT/FOLDER/weather/build/index.js` 启动它
保存文件并重启 **Claude for Desktop**。
这是一个基于 Spring AI MCP auto-configuration 和 boot starters 的 quickstart demo。
如需了解如何手动创建同步和异步 MCP Servers,请参考 [Java SDK Server](https://java.sdk.modelcontextprotocol.io/) 文档。
开始构建 weather server。
[本教程将构建内容的完整代码见这里。](https://github.com/spring-projects/spring-ai-examples/tree/main/model-context-protocol/weather/starter-stdio-server)
更多信息请参阅 [MCP Server Boot Starter](https://docs.spring.io/spring-ai/reference/api/mcp/mcp-server-boot-starter-docs.html) 参考文档。
手动实现 MCP Server 请参考 [MCP Server Java SDK documentation](https://java.sdk.modelcontextprotocol.io/)。
### MCP 服务器中的日志
实现 MCP servers 时,请谨慎处理日志:
**对于基于 STDIO 的 servers:** 绝不要使用 `System.out.println()` 或 `System.out.print()`,因为它们会写入 standard output (stdout)。写入 stdout 会破坏 JSON-RPC 消息并导致 server 失效。
**对于基于 HTTP 的 servers:** standard output 日志可以使用,因为它不会干扰 HTTP responses。
### 最佳实践
* 使用写入 stderr 或文件的日志库。
* 确保任何已配置日志库都不会写入 stdout。
### 系统要求
* 已安装 Java 17 或更高版本。
* [Spring Boot 3.3.x](https://docs.spring.io/spring-boot/installing.html) or higher
### 设置环境
使用 [Spring Initializer](https://start.spring.io/) 引导项目。
需要添加以下依赖:
```xml Maven theme={null}
org.springframework.ai
spring-ai-starter-mcp-server
org.springframework
spring-web
```
```groovy Gradle theme={null}
dependencies {
implementation platform("org.springframework.ai:spring-ai-starter-mcp-server")
implementation platform("org.springframework:spring-web")
}
```
然后通过设置 application properties 配置应用:
```bash application.properties theme={null}
spring.main.bannerMode=off
logging.pattern.console=
```
```yaml application.yml theme={null}
logging:
pattern:
console:
spring:
main:
banner-mode: off
```
所有可用属性记录在 [Server Configuration Properties](https://docs.spring.io/spring-ai/reference/api/mcp/mcp-server-boot-starter-docs.html#_configuration_properties) 中。
现在开始构建 server。
## 构建服务器
### 天气服务
实现一个 [WeatherService.java](https://github.com/spring-projects/spring-ai-examples/blob/main/model-context-protocol/weather/starter-stdio-server/src/main/java/org/springframework/ai/mcp/sample/server/WeatherService.java),使用 REST client 查询 National Weather Service API 的数据:
```java theme={null}
@Service
public class WeatherService {
private final RestClient restClient;
public WeatherService() {
this.restClient = RestClient.builder()
.baseUrl("https://api.weather.gov")
.defaultHeader("Accept", "application/geo+json")
.defaultHeader("User-Agent", "WeatherApiClient/1.0 (your@email.com)")
.build();
}
@Tool(description = "Get weather forecast for a specific latitude/longitude")
public String getWeatherForecastByLocation(
double latitude, // Latitude coordinate
double longitude // Longitude coordinate
) {
// Returns detailed forecast including:
// - Temperature and unit
// - Wind speed and direction
// - Detailed forecast description
}
@Tool(description = "Get weather alerts for a US state")
public String getAlerts(
@ToolParam(description = "Two-letter US state code (e.g. CA, NY)") String state
) {
// Returns active alerts including:
// - Event type
// - Affected area
// - Severity
// - Description
// - Safety instructions
}
// ......
}
```
`@Service` annotation 会在应用上下文中自动注册该 service。
Spring AI `@Tool` annotation 让创建和维护 MCP tools 更简单。
auto-configuration 会自动将这些 tools 注册到 MCP server。
### 创建 Boot 应用
```java theme={null}
@SpringBootApplication
public class McpServerApplication {
public static void main(String[] args) {
SpringApplication.run(McpServerApplication.class, args);
}
@Bean
public ToolCallbackProvider weatherTools(WeatherService weatherService) {
return MethodToolCallbackProvider.builder().toolObjects(weatherService).build();
}
}
```
使用 `MethodToolCallbackProvider` utils 将 `@Tools` 转换为 MCP server 使用的可执行 callbacks。
### 运行服务器
最后,构建 server:
```bash theme={null}
./mvnw clean install
```
这会在 `target` 文件夹中生成 `mcp-weather-stdio-server-0.0.1-SNAPSHOT.jar` 文件。
现在从已有 MCP host Claude for Desktop 测试 server。
## 使用 Claude for Desktop 测试服务器
Claude for Desktop 尚不支持 Linux。
首先,确保已安装 Claude for Desktop。[可以在这里安装最新版](https://claude.ai/download)。如果已经安装 Claude for Desktop,**请确保它已更新到最新版本。**
需要为你想使用的 MCP servers 配置 Claude for Desktop。
为此,请用文本编辑器打开 Claude for Desktop App 配置文件 `~/Library/Application Support/Claude/claude_desktop_config.json`。
如果文件不存在,请创建它。
例如,如果你安装了 [VS Code](https://code.visualstudio.com/):
```bash macOS/Linux theme={null}
code ~/Library/Application\ Support/Claude/claude_desktop_config.json
```
```powershell Windows theme={null}
code $env:AppData\Claude\claude_desktop_config.json
```
然后在 `mcpServers` key 中添加 servers。
只有至少正确配置了一个 server,MCP UI 元素才会出现在 Claude for Desktop 中。
在本例中,我们按如下方式添加单个 weather server:
```json macOS/Linux theme={null}
{
"mcpServers": {
"spring-ai-mcp-weather": {
"command": "java",
"args": [
"-Dspring.ai.mcp.server.stdio=true",
"-jar",
"/ABSOLUTE/PATH/TO/PARENT/FOLDER/mcp-weather-stdio-server-0.0.1-SNAPSHOT.jar"
]
}
}
}
```
```json Windows theme={null}
{
"mcpServers": {
"spring-ai-mcp-weather": {
"command": "java",
"args": [
"-Dspring.ai.mcp.server.transport=STDIO",
"-jar",
"C:\\ABSOLUTE\\PATH\\TO\\PARENT\\FOLDER\\weather\\mcp-weather-stdio-server-0.0.1-SNAPSHOT.jar"
]
}
}
}
```
请确保传入 server 的绝对路径。
这会告诉 Claude for Desktop:
1. 有一个名为 "my-weather-server" 的 MCP server
2. 通过运行 `java -jar /ABSOLUTE/PATH/TO/PARENT/FOLDER/mcp-weather-stdio-server-0.0.1-SNAPSHOT.jar` 启动它
保存文件并重启 **Claude for Desktop**。
## 使用 Java 客户端测试服务器
### 手动创建 MCP 客户端
使用 `McpClient` 连接到 server:
```java theme={null}
var stdioParams = ServerParameters.builder("java")
.args("-jar", "/ABSOLUTE/PATH/TO/PARENT/FOLDER/mcp-weather-stdio-server-0.0.1-SNAPSHOT.jar")
.build();
var stdioTransport = new StdioClientTransport(stdioParams);
var mcpClient = McpClient.sync(stdioTransport).build();
mcpClient.initialize();
ListToolsResult toolsList = mcpClient.listTools();
CallToolResult weather = mcpClient.callTool(
new CallToolRequest("getWeatherForecastByLocation",
Map.of("latitude", "47.6062", "longitude", "-122.3321")));
CallToolResult alert = mcpClient.callTool(
new CallToolRequest("getAlerts", Map.of("state", "NY")));
mcpClient.closeGracefully();
```
### 使用 MCP Client Boot Starter
使用 `spring-ai-starter-mcp-client` 依赖创建新的 boot starter 应用:
```xml theme={null}
org.springframework.ai
spring-ai-starter-mcp-client
```
并将 `spring.ai.mcp.client.stdio.servers-configuration` 属性指向你的 `claude_desktop_config.json`。
可以复用现有 Anthropic Desktop 配置:
```properties theme={null}
spring.ai.mcp.client.stdio.servers-configuration=file:PATH/TO/claude_desktop_config.json
```
启动 client application 后,auto-configuration 会自动从 claude\_desktop\_config.json 创建 MCP clients。
更多信息见 [MCP Client Boot Starters](https://docs.spring.io/spring-ai/reference/api/mcp/mcp-server-boot-client-docs.html) 参考文档。
## 更多 Java MCP 服务器示例
[starter-webflux-server](https://github.com/spring-projects/spring-ai-examples/tree/main/model-context-protocol/weather/starter-webflux-server) 演示了如何使用 SSE transport 创建 MCP server。
它展示了如何利用 Spring Boot 的 auto-configuration 能力定义并注册 MCP Tools、Resources 和 Prompts。
开始构建 weather server。[本教程将构建内容的完整代码见这里。](https://github.com/modelcontextprotocol/kotlin-sdk/tree/main/samples/weather-stdio-server)
### 前置知识
本快速开始假设你熟悉:
* Kotlin
* Claude 等 LLM
### MCP 服务器中的日志
实现 MCP servers 时,请谨慎处理日志:
**对于基于 STDIO 的 servers:** 绝不要使用 `println()`,因为它默认写入 standard output (stdout)。写入 stdout 会破坏 JSON-RPC 消息并导致 server 失效。
**对于基于 HTTP 的 servers:** standard output 日志可以使用,因为它不会干扰 HTTP responses。
### 最佳实践
* 使用写入 stderr 或文件的日志库。
### 系统要求
* 已安装 JDK 11 或更高版本。
### 设置环境
如果尚未安装,请先安装 `java` 和 `gradle`。
你可以从 [official Oracle JDK website](https://www.oracle.com/java/technologies/downloads/) 下载 `java`。
验证 `java` 安装:
```bash theme={null}
java --version
```
现在创建并设置项目:
```bash macOS/Linux theme={null}
# Create a new directory for our project
mkdir weather
cd weather
# Initialize a new kotlin project
gradle init
```
```powershell Windows theme={null}
# Create a new directory for our project
md weather
cd weather
# Initialize a new kotlin project
gradle init
```
运行 `gradle init` 后,选择 **Application** 作为项目类型,选择 **Kotlin** 作为编程语言。
或者,也可以使用 [IntelliJ IDEA project wizard](https://kotlinlang.org/docs/jvm-get-started.html) 创建 Kotlin 应用。
创建项目后,用以下内容替换 `build.gradle.kts`:
```kotlin build.gradle.kts theme={null}
// Check latest versions at https://github.com/modelcontextprotocol/kotlin-sdk/releases
val mcpVersion = "0.9.0"
val ktorVersion = "3.2.3"
val slf4jVersion = "2.0.17"
plugins {
kotlin("jvm") version "2.3.20"
kotlin("plugin.serialization") version "2.3.20"
id("com.gradleup.shadow") version "8.3.9"
application
}
application {
mainClass.set("MainKt")
}
dependencies {
implementation("io.modelcontextprotocol:kotlin-sdk:$mcpVersion")
implementation("io.ktor:ktor-client-content-negotiation:$ktorVersion")
implementation("io.ktor:ktor-serialization-kotlinx-json:$ktorVersion")
implementation("io.ktor:ktor-client-cio:$ktorVersion")
implementation("org.slf4j:slf4j-simple:$slf4jVersion")
}
```
验证所有内容已正确设置:
```bash theme={null}
./gradlew build
```
现在开始构建 server。
## 构建服务器
### 设置实例
添加 server 初始化函数:
```kotlin theme={null}
fun runMcpServer() {
val server = Server(
Implementation(
name = "weather",
version = "1.0.0",
),
ServerOptions(
capabilities = ServerCapabilities(tools = ServerCapabilities.Tools(listChanged = true)),
),
)
// register tools on server here
val transport = StdioServerTransport(
System.`in`.asInput(),
System.out.asSink().buffered(),
)
runBlocking {
val session = server.createSession(transport)
val done = Job()
session.onClose {
done.complete()
}
done.join()
}
}
```
### Weather API 辅助函数
接下来添加用于查询 National Weather Service API 并转换响应的函数和 data classes:
```kotlin theme={null}
val httpClient = HttpClient(CIO) {
defaultRequest {
url("https://api.weather.gov")
headers {
append("Accept", "application/geo+json")
append("User-Agent", "WeatherApiClient/1.0")
}
contentType(ContentType.Application.Json)
}
install(ContentNegotiation) {
json(Json { ignoreUnknownKeys = true })
}
}
// Extension function to fetch weather alerts for a given state
suspend fun HttpClient.getAlerts(state: String): List {
val alerts = this.get("/alerts/active/area/$state").body()
return alerts.features.map { feature ->
"""
Event: ${feature.properties.event}
Area: ${feature.properties.areaDesc}
Severity: ${feature.properties.severity}
Status: ${feature.properties.status}
Headline: ${feature.properties.headline}
""".trimIndent()
}
}
// Extension function to fetch forecast information for given latitude and longitude
suspend fun HttpClient.getForecast(latitude: Double, longitude: Double): List {
val points = this.get("/points/$latitude,$longitude").body()
val forecastUrl = points.properties.forecast ?: error("No forecast URL available")
val forecast = this.get(forecastUrl).body()
return forecast.properties.periods.map { period ->
"""
${period.name}:
Temperature: ${period.temperature}°${period.temperatureUnit}
Wind: ${period.windSpeed} ${period.windDirection}
${period.shortForecast}
""".trimIndent()
}
}
@Serializable
data class PointsResponse(val properties: PointsProperties)
@Serializable
data class PointsProperties(val forecast: String? = null)
@Serializable
data class ForecastResponse(val properties: ForecastProperties)
@Serializable
data class ForecastProperties(val periods: List = emptyList())
@Serializable
data class ForecastPeriod(
val name: String? = null,
val temperature: Int? = null,
val temperatureUnit: String? = null,
val windSpeed: String? = null,
val windDirection: String? = null,
val shortForecast: String? = null,
)
@Serializable
data class AlertsResponse(val features: List = emptyList())
@Serializable
data class AlertFeature(val properties: AlertProperties)
@Serializable
data class AlertProperties(
val event: String? = null,
val areaDesc: String? = null,
val severity: String? = null,
val status: String? = null,
val headline: String? = null,
)
```
### 实现工具执行
tool execution handler 负责实际执行每个 tool 的逻辑。添加如下内容:
```kotlin theme={null}
// Register weather tools
server.addTool(
name = "get_alerts",
description = "Get weather alerts for a US state. Input is a two-letter US state code (e.g. CA, NY)",
inputSchema = ToolSchema(
properties = buildJsonObject {
putJsonObject("state") {
put("type", "string")
put("description", "Two-letter US state code (e.g. CA, NY)")
}
},
required = listOf("state"),
),
) { request ->
val state = request.arguments?.get("state")?.jsonPrimitive?.content
?: return@addTool CallToolResult(
content = listOf(TextContent("The 'state' parameter is required.")),
)
val alerts = httpClient.getAlerts(state)
CallToolResult(content = alerts.map { TextContent(it) })
}
server.addTool(
name = "get_forecast",
description = "Get weather forecast for a location. Note: only US locations are supported by the NWS API.",
inputSchema = ToolSchema(
properties = buildJsonObject {
putJsonObject("latitude") {
put("type", "number")
put("description", "Latitude of the location")
}
putJsonObject("longitude") {
put("type", "number")
put("description", "Longitude of the location")
}
},
required = listOf("latitude", "longitude"),
),
) { request ->
val latitude = request.arguments?.get("latitude")?.jsonPrimitive?.doubleOrNull
val longitude = request.arguments?.get("longitude")?.jsonPrimitive?.doubleOrNull
if (latitude == null || longitude == null) {
return@addTool CallToolResult(
content = listOf(TextContent("The 'latitude' and 'longitude' parameters are required.")),
)
}
val forecast = httpClient.getForecast(latitude, longitude)
CallToolResult(content = forecast.map { TextContent(it) })
}
```
### 运行服务器
最后,实现用于运行 server 的 main 函数:
```kotlin theme={null}
fun main() = runMcpServer()
```
开发期间可以直接运行 server:
```bash theme={null}
./gradlew run
```
生产使用时,构建 shadow JAR:
```bash theme={null}
./gradlew build
java -jar build/libs/weather-0.1.0-all.jar
```
现在从已有 MCP host Claude for Desktop 测试 server。
## 使用 Claude for Desktop 测试服务器
Claude for Desktop 尚不支持 Linux。Linux 用户可以继续阅读[构建 client](/docs/develop/build-client)教程,构建一个连接刚才 server 的 MCP client。
首先,确保已安装 Claude for Desktop。[可以在这里安装最新版](https://claude.ai/download)。如果已经安装 Claude for Desktop,**请确保它已更新到最新版本。**
需要为你想使用的 MCP servers 配置 Claude for Desktop。
为此,请用文本编辑器打开 Claude for Desktop App 配置文件 `~/Library/Application Support/Claude/claude_desktop_config.json`。
如果文件不存在,请创建它。
例如,如果你安装了 [VS Code](https://code.visualstudio.com/):
```bash macOS/Linux theme={null}
code ~/Library/Application\ Support/Claude/claude_desktop_config.json
```
```powershell Windows theme={null}
code $env:AppData\Claude\claude_desktop_config.json
```
然后在 `mcpServers` key 中添加 servers。
只有至少正确配置了一个 server,MCP UI 元素才会出现在 Claude for Desktop 中。
在本例中,我们按如下方式添加单个 weather server:
```json macOS/Linux theme={null}
{
"mcpServers": {
"weather": {
"command": "java",
"args": [
"-jar",
"/ABSOLUTE/PATH/TO/PARENT/FOLDER/weather/build/libs/weather-0.1.0-all.jar"
]
}
}
}
```
```json Windows theme={null}
{
"mcpServers": {
"weather": {
"command": "java",
"args": [
"-jar",
"C:\\PATH\\TO\\PARENT\\FOLDER\\weather\\build\\libs\\weather-0.1.0-all.jar"
]
}
}
}
```
这会告诉 Claude for Desktop:
1. 有一个名为 "weather" 的 MCP server
2. 通过运行 `java -jar /ABSOLUTE/PATH/TO/PARENT/FOLDER/weather/build/libs/weather-0.1.0-all.jar` 启动它
保存文件并重启 **Claude for Desktop**。
开始构建 weather server。[本教程将构建内容的完整代码见这里。](https://github.com/modelcontextprotocol/csharp-sdk/tree/main/samples/QuickstartWeatherServer)
### 前置知识
本快速开始假设你熟悉:
* C#
* Claude 等 LLM
* .NET 8 or higher
### MCP 服务器中的日志
实现 MCP servers 时,请谨慎处理日志:
**对于基于 STDIO 的 servers:** 绝不要使用 `Console.WriteLine()` 或 `Console.Write()`,因为它们会写入 standard output (stdout)。写入 stdout 会破坏 JSON-RPC 消息并导致 server 失效。
**对于基于 HTTP 的 servers:** standard output 日志可以使用,因为它不会干扰 HTTP responses。
### 最佳实践
* 使用写入 stderr 或文件的日志库。
### 系统要求
* 已安装 [.NET 8 SDK](https://dotnet.microsoft.com/download/dotnet/8.0) 或更高版本。
### 设置环境
如果尚未安装,请先安装 `dotnet`。可以从 [official Microsoft .NET website](https://dotnet.microsoft.com/download/) 下载 `dotnet`。验证 `dotnet` 安装:
```bash theme={null}
dotnet --version
```
现在创建并设置项目:
```bash macOS/Linux theme={null}
# Create a new directory for our project
mkdir weather
cd weather
# Initialize a new C# project
dotnet new console
```
```powershell Windows theme={null}
# Create a new directory for our project
mkdir weather
cd weather
# Initialize a new C# project
dotnet new console
```
运行 `dotnet new console` 后,你会得到一个新的 C# 项目。
可以在偏好的 IDE 中打开项目,例如 [Visual Studio](https://visualstudio.microsoft.com/) 或 [Rider](https://www.jetbrains.com/rider/)。
也可以使用 [Visual Studio project wizard](https://learn.microsoft.com/en-us/visualstudio/get-started/csharp/tutorial-console?view=vs-2022) 创建 C# 应用。
创建项目后,添加 Model Context Protocol SDK 和 hosting 的 NuGet package:
```bash theme={null}
# Add the Model Context Protocol SDK NuGet package
dotnet add package ModelContextProtocol --prerelease
# Add the .NET Hosting NuGet package
dotnet add package Microsoft.Extensions.Hosting
```
现在开始构建 server。
## 构建服务器
打开项目中的 `Program.cs` 文件,并用以下代码替换其内容:
```csharp theme={null}
using Microsoft.Extensions.DependencyInjection;
using Microsoft.Extensions.Hosting;
using ModelContextProtocol;
using System.Net.Http.Headers;
var builder = Host.CreateEmptyApplicationBuilder(settings: null);
builder.Services.AddMcpServer()
.WithStdioServerTransport()
.WithToolsFromAssembly();
builder.Services.AddSingleton(_ =>
{
var client = new HttpClient() { BaseAddress = new Uri("https://api.weather.gov") };
client.DefaultRequestHeaders.UserAgent.Add(new ProductInfoHeaderValue("weather-tool", "1.0"));
return client;
});
var app = builder.Build();
await app.RunAsync();
```
创建 `ApplicationHostBuilder` 时,请确保使用 `CreateEmptyApplicationBuilder` 而不是 `CreateDefaultBuilder`。这可以确保 server 不会向 console 写入额外消息。只有使用 STDIO transport 的 servers 才需要这样做。
这段代码会设置一个基础 console application,使用 Model Context Protocol SDK 创建带 standard I/O transport 的 MCP server。
### Weather API 辅助函数
创建一个 `HttpClient` 扩展类,用于简化 JSON request 处理:
```csharp theme={null}
using System.Text.Json;
internal static class HttpClientExt
{
public static async Task ReadJsonDocumentAsync(this HttpClient client, string requestUri)
{
using var response = await client.GetAsync(requestUri);
response.EnsureSuccessStatusCode();
return await JsonDocument.ParseAsync(await response.Content.ReadAsStreamAsync());
}
}
```
接下来,定义一个包含 tool execution handlers 的类,用于查询 National Weather Service API 并转换响应:
```csharp theme={null}
using ModelContextProtocol.Server;
using System.ComponentModel;
using System.Globalization;
using System.Text.Json;
namespace QuickstartWeatherServer.Tools;
[McpServerToolType]
public static class WeatherTools
{
[McpServerTool, Description("Get weather alerts for a US state code.")]
public static async Task GetAlerts(
HttpClient client,
[Description("The US state code to get alerts for.")] string state)
{
using var jsonDocument = await client.ReadJsonDocumentAsync($"/alerts/active/area/{state}");
var jsonElement = jsonDocument.RootElement;
var alerts = jsonElement.GetProperty("features").EnumerateArray();
if (!alerts.Any())
{
return "No active alerts for this state.";
}
return string.Join("\n--\n", alerts.Select(alert =>
{
JsonElement properties = alert.GetProperty("properties");
return $"""
Event: {properties.GetProperty("event").GetString()}
Area: {properties.GetProperty("areaDesc").GetString()}
Severity: {properties.GetProperty("severity").GetString()}
Description: {properties.GetProperty("description").GetString()}
Instruction: {properties.GetProperty("instruction").GetString()}
""";
}));
}
[McpServerTool, Description("Get weather forecast for a location.")]
public static async Task GetForecast(
HttpClient client,
[Description("Latitude of the location.")] double latitude,
[Description("Longitude of the location.")] double longitude)
{
var pointUrl = string.Create(CultureInfo.InvariantCulture, $"/points/{latitude},{longitude}");
using var jsonDocument = await client.ReadJsonDocumentAsync(pointUrl);
var forecastUrl = jsonDocument.RootElement.GetProperty("properties").GetProperty("forecast").GetString()
?? throw new Exception($"No forecast URL provided by {client.BaseAddress}points/{latitude},{longitude}");
using var forecastDocument = await client.ReadJsonDocumentAsync(forecastUrl);
var periods = forecastDocument.RootElement.GetProperty("properties").GetProperty("periods").EnumerateArray();
return string.Join("\n---\n", periods.Select(period => $"""
{period.GetProperty("name").GetString()}
Temperature: {period.GetProperty("temperature").GetInt32()}°F
Wind: {period.GetProperty("windSpeed").GetString()} {period.GetProperty("windDirection").GetString()}
Forecast: {period.GetProperty("detailedForecast").GetString()}
"""));
}
}
```
### 运行服务器
最后,使用以下命令运行 server:
```bash theme={null}
dotnet run
```
这会启动 server,并在 standard input/output 上监听传入请求。
## 使用 Claude for Desktop 测试服务器
Claude for Desktop 尚不支持 Linux。Linux 用户可以继续阅读[构建 client](/docs/develop/build-client)教程,构建一个连接刚才 server 的 MCP client。
首先,确保已安装 Claude for Desktop。[可以在这里安装最新版](https://claude.ai/download)。如果已经安装 Claude for Desktop,**请确保它已更新到最新版本。**
需要为你想使用的 MCP servers 配置 Claude for Desktop。为此,请用文本编辑器打开 Claude for Desktop App 配置文件 `~/Library/Application Support/Claude/claude_desktop_config.json`。如果文件不存在,请创建它。
例如,如果你安装了 [VS Code](https://code.visualstudio.com/):
```bash macOS/Linux theme={null}
code ~/Library/Application\ Support/Claude/claude_desktop_config.json
```
```powershell Windows theme={null}
code $env:AppData\Claude\claude_desktop_config.json
```
然后在 `mcpServers` key 中添加 servers。只有至少正确配置了一个 server,MCP UI 元素才会出现在 Claude for Desktop 中。
在本例中,我们按如下方式添加单个 weather server:
```json macOS/Linux theme={null}
{
"mcpServers": {
"weather": {
"command": "dotnet",
"args": ["run", "--project", "/ABSOLUTE/PATH/TO/PROJECT", "--no-build"]
}
}
}
```
```json Windows theme={null}
{
"mcpServers": {
"weather": {
"command": "dotnet",
"args": [
"run",
"--project",
"C:\\ABSOLUTE\\PATH\\TO\\PROJECT",
"--no-build"
]
}
}
}
```
这会告诉 Claude for Desktop:
1. 有一个名为 "weather" 的 MCP server
2. 通过运行 `dotnet run /ABSOLUTE/PATH/TO/PROJECT` 启动它
保存文件并重启 **Claude for Desktop**。
开始构建 weather server。[本教程将构建内容的完整代码见这里。](https://github.com/modelcontextprotocol/quickstart-resources/tree/main/weather-server-ruby)
### 前置知识
本快速开始假设你熟悉:
* Ruby
* Claude 等 LLM
### MCP 服务器中的日志
实现 MCP servers 时,请谨慎处理日志:
**对于基于 STDIO 的 servers:** 绝不要使用 `puts` 或 `print`,因为它们默认写入 standard output (stdout)。写入 stdout 会破坏 JSON-RPC 消息并导致 server 失效。
**对于基于 HTTP 的 servers:** standard output 日志可以使用,因为它不会干扰 HTTP responses。
### 最佳实践
* 使用写入 stderr 或文件的日志库。
### 快速示例
```ruby theme={null}
# ❌ Bad (STDIO)
puts "Processing request"
# ✅ Good (STDIO)
require "logger"
logger = Logger.new($stderr)
logger.info("Processing request")
```
### 系统要求
* 已安装 Ruby 2.7 或更高版本。
### 设置环境
首先,确认已安装 Ruby。可以运行以下命令检查:
```bash theme={null}
ruby --version
```
现在创建并设置项目:
```bash macOS/Linux theme={null}
# Create a new directory for our project
mkdir weather
cd weather
# Create a Gemfile
bundle init
# Add the MCP SDK dependency
bundle add mcp
# Create our server file
touch weather.rb
```
```powershell Windows theme={null}
# Create a new directory for our project
mkdir weather
cd weather
# Create a Gemfile
bundle init
# Add the MCP SDK dependency
bundle add mcp
# Create our server file
new-item weather.rb
```
现在开始构建 server。
## 构建服务器
### 导入包并设置常量
打开 `weather.rb`,在顶部添加这些 requires 和 constants:
```ruby theme={null}
require "json"
require "mcp"
require "net/http"
require "uri"
NWS_API_BASE = "https://api.weather.gov"
USER_AGENT = "weather-app/1.0"
```
`mcp` gem 提供 Ruby 版 Model Context Protocol SDK,包含 server 实现和 stdio transport 所需类。
### 辅助方法
接下来添加 helper methods,用于查询并格式化 National Weather Service API 的数据:
```ruby theme={null}
module HelperMethods
def make_nws_request(url)
uri = URI(url)
request = Net::HTTP::Get.new(uri)
request["User-Agent"] = USER_AGENT
request["Accept"] = "application/geo+json"
response = Net::HTTP.start(uri.hostname, uri.port, use_ssl: true) do |http|
http.request(request)
end
raise "HTTP #{response.code}: #{response.message}" unless response.is_a?(Net::HTTPSuccess)
JSON.parse(response.body)
end
def format_alert(feature)
properties = feature["properties"]
<<~ALERT
Event: #{properties["event"] || "Unknown"}
Area: #{properties["areaDesc"] || "Unknown"}
Severity: #{properties["severity"] || "Unknown"}
Description: #{properties["description"] || "No description available"}
Instructions: #{properties["instruction"] || "No specific instructions provided"}
ALERT
end
end
```
### 实现工具执行
现在定义 tool classes。每个 tool 都继承 `MCP::Tool` 并实现 tool 逻辑:
```ruby theme={null}
class GetAlerts < MCP::Tool
extend HelperMethods
tool_name "get_alerts"
description "Get weather alerts for a US state"
input_schema(
properties: {
state: {
type: "string",
description: "Two-letter US state code (e.g. CA, NY)"
}
},
required: ["state"]
)
def self.call(state:)
url = "#{NWS_API_BASE}/alerts/active/area/#{state.upcase}"
data = make_nws_request(url)
if data["features"].empty?
return MCP::Tool::Response.new([{
type: "text",
text: "No active alerts for this state."
}])
end
alerts = data["features"].map { |feature| format_alert(feature) }
MCP::Tool::Response.new([{
type: "text",
text: alerts.join("\n---\n")
}])
end
end
class GetForecast < MCP::Tool
extend HelperMethods
tool_name "get_forecast"
description "Get weather forecast for a location"
input_schema(
properties: {
latitude: {
type: "number",
description: "Latitude of the location"
},
longitude: {
type: "number",
description: "Longitude of the location"
}
},
required: ["latitude", "longitude"]
)
def self.call(latitude:, longitude:)
# First get the forecast grid endpoint.
points_url = "#{NWS_API_BASE}/points/#{latitude},#{longitude}"
points_data = make_nws_request(points_url)
# Get the forecast URL from the points response.
forecast_url = points_data["properties"]["forecast"]
forecast_data = make_nws_request(forecast_url)
# Format the periods into a readable forecast.
periods = forecast_data["properties"]["periods"]
forecasts = periods.first(5).map do |period|
<<~FORECAST
#{period["name"]}:
Temperature: #{period["temperature"]}°#{period["temperatureUnit"]}
Wind: #{period["windSpeed"]} #{period["windDirection"]}
Forecast: #{period["detailedForecast"]}
FORECAST
end
MCP::Tool::Response.new([{
type: "text",
text: forecasts.join("\n---\n")
}])
end
end
```
### 运行服务器
最后,初始化并运行 server:
```ruby theme={null}
server = MCP::Server.new(
name: "weather",
version: "1.0.0",
tools: [GetAlerts, GetForecast]
)
transport = MCP::Server::Transports::StdioTransport.new(server)
transport.open
```
server 已完成。运行 `bundle exec ruby weather.rb` 启动 MCP server,它会监听来自 MCP hosts 的消息。
现在从已有 MCP host Claude for Desktop 测试 server。
## 使用 Claude for Desktop 测试服务器
Claude for Desktop 尚不支持 Linux。Linux 用户可以继续阅读[构建 client](/docs/develop/build-client)教程,构建一个连接刚才 server 的 MCP client。
首先,确保已安装 Claude for Desktop。[可以在这里安装最新版](https://claude.ai/download)。如果已经安装 Claude for Desktop,**请确保它已更新到最新版本。**
需要为你想使用的 MCP servers 配置 Claude for Desktop。为此,请用文本编辑器打开 Claude for Desktop App 配置文件 `~/Library/Application Support/Claude/claude_desktop_config.json`。如果文件不存在,请创建它。
例如,如果你安装了 [VS Code](https://code.visualstudio.com/):
```bash macOS/Linux theme={null}
code ~/Library/Application\ Support/Claude/claude_desktop_config.json
```
```powershell Windows theme={null}
code $env:AppData\Claude\claude_desktop_config.json
```
然后在 `mcpServers` key 中添加 servers。只有至少正确配置了一个 server,MCP UI 元素才会出现在 Claude for Desktop 中。
在本例中,我们按如下方式添加单个 weather server:
```json macOS/Linux theme={null}
{
"mcpServers": {
"weather": {
"command": "bundle",
"args": ["exec", "ruby", "weather.rb"],
"cwd": "/ABSOLUTE/PATH/TO/PARENT/FOLDER/weather"
}
}
}
```
```json Windows theme={null}
{
"mcpServers": {
"weather": {
"command": "bundle",
"args": ["exec", "ruby", "weather.rb"],
"cwd": "C:\\ABSOLUTE\\PATH\\TO\\PARENT\\FOLDER\\weather"
}
}
}
```
请确保在 `cwd` 字段中传入项目目录的绝对路径。可以在 macOS/Linux 上运行 `pwd`,或在 Windows Command Prompt 中从项目目录运行 `cd` 获取。Windows 上请记得在 JSON 路径中使用双反斜杠(`\\`)或正斜杠(`/`)。
这会告诉 Claude for Desktop:
1. 有一个名为 "weather" 的 MCP server
2. 在指定目录中运行 `bundle exec ruby weather.rb` 启动它
保存文件并重启 **Claude for Desktop**。
开始构建 weather server。[本教程将构建内容的完整代码见这里。](https://github.com/modelcontextprotocol/quickstart-resources/tree/main/weather-server-rust)
### 前置知识
本快速开始假设你熟悉:
* Rust 编程语言
* Rust 中的 async/await
* Claude 等 LLM
### MCP 服务器中的日志
实现 MCP servers 时,请谨慎处理日志:
**对于基于 STDIO 的 servers:** 绝不要使用 `println!()` 或 `print!()`,因为它们会写入 standard output (stdout)。写入 stdout 会破坏 JSON-RPC 消息并导致 server 失效。
**对于基于 HTTP 的 servers:** standard output 日志可以使用,因为它不会干扰 HTTP responses。
### 最佳实践
* 使用写入 stderr 或文件的日志库,例如 Rust 中的 `tracing` 或 `log`。
* 配置日志框架以避免 stdout 输出。
### 快速示例
```rust theme={null}
// ❌ Bad (STDIO)
println!("Processing request");
// ✅ Good (STDIO)
eprintln!("Processing request"); // writes to stderr
```
### 系统要求
* 已安装 Rust 1.70 或更高版本。
* Cargo(随 Rust 安装提供)。
### 设置环境
如果尚未安装,请先安装 Rust。可以从 [rust-lang.org](https://www.rust-lang.org/tools/install) 安装 Rust:
```bash macOS/Linux theme={null}
curl --proto '=https' --tlsv1.2 -sSf https://sh.rustup.rs | sh
```
```powershell Windows theme={null}
# Download and run rustup-init.exe from https://rustup.rs/
```
验证 Rust 安装:
```bash theme={null}
rustc --version
cargo --version
```
现在创建并设置项目:
```bash macOS/Linux theme={null}
# Create a new Rust project
cargo new weather
cd weather
```
```powershell Windows theme={null}
# Create a new Rust project
cargo new weather
cd weather
```
更新 `Cargo.toml`,添加所需依赖:
```toml Cargo.toml theme={null}
[package]
name = "weather"
version = "0.1.0"
edition = "2024"
[dependencies]
rmcp = { version = "0.3", features = ["server", "macros", "transport-io"] }
tokio = { version = "1.46", features = ["full"] }
reqwest = { version = "0.12", features = ["json"] }
serde = { version = "1.0", features = ["derive"] }
serde_json = "1.0"
anyhow = "1.0"
tracing = "0.1"
tracing-subscriber = { version = "0.3", features = ["env-filter", "std", "fmt"] }
```
现在开始构建 server。
## 构建服务器
### 导入包和常量
打开 `src/main.rs`,在顶部添加这些 imports 和 constants:
```rust theme={null}
use anyhow::Result;
use rmcp::{
ServerHandler, ServiceExt,
handler::server::{router::tool::ToolRouter, tool::Parameters},
model::*,
schemars, tool, tool_handler, tool_router,
};
use serde::Deserialize;
use serde::de::DeserializeOwned;
const NWS_API_BASE: &str = "https://api.weather.gov";
const USER_AGENT: &str = "weather-app/1.0";
```
`rmcp` crate 提供 Rust 版 Model Context Protocol SDK,包含 server 实现、procedural macros 和 stdio transport 等功能。
### 数据结构
接下来,定义用于反序列化 National Weather Service API 响应的数据结构:
```rust theme={null}
#[derive(Debug, Deserialize)]
struct AlertsResponse {
features: Vec,
}
#[derive(Debug, Deserialize)]
struct AlertFeature {
properties: AlertProperties,
}
#[derive(Debug, Deserialize)]
struct AlertProperties {
event: Option,
#[serde(rename = "areaDesc")]
area_desc: Option,
severity: Option,
description: Option,
instruction: Option,
}
#[derive(Debug, Deserialize)]
struct PointsResponse {
properties: PointsProperties,
}
#[derive(Debug, Deserialize)]
struct PointsProperties {
forecast: String,
}
#[derive(Debug, Deserialize)]
struct ForecastResponse {
properties: ForecastProperties,
}
#[derive(Debug, Deserialize)]
struct ForecastProperties {
periods: Vec,
}
#[derive(Debug, Deserialize)]
struct ForecastPeriod {
name: String,
temperature: i32,
#[serde(rename = "temperatureUnit")]
temperature_unit: String,
#[serde(rename = "windSpeed")]
wind_speed: String,
#[serde(rename = "windDirection")]
wind_direction: String,
#[serde(rename = "detailedForecast")]
detailed_forecast: String,
}
```
现在定义 MCP clients 将发送的请求类型:
```rust theme={null}
#[derive(serde::Deserialize, schemars::JsonSchema)]
pub struct MCPForecastRequest {
latitude: f32,
longitude: f32,
}
#[derive(serde::Deserialize, schemars::JsonSchema)]
pub struct MCPAlertRequest {
state: String,
}
```
### 辅助函数
添加 helper functions,用于发起 API requests 并格式化 responses:
```rust theme={null}
async fn make_nws_request(url: &str) -> Result {
let client = reqwest::Client::new();
let rsp = client
.get(url)
.header(reqwest::header::USER_AGENT, USER_AGENT)
.header(reqwest::header::ACCEPT, "application/geo+json")
.send()
.await?
.error_for_status()?;
Ok(rsp.json::().await?)
}
fn format_alert(feature: &AlertFeature) -> String {
let props = &feature.properties;
format!(
"Event: {}\nArea: {}\nSeverity: {}\nDescription: {}\nInstructions: {}",
props.event.as_deref().unwrap_or("Unknown"),
props.area_desc.as_deref().unwrap_or("Unknown"),
props.severity.as_deref().unwrap_or("Unknown"),
props
.description
.as_deref()
.unwrap_or("No description available"),
props
.instruction
.as_deref()
.unwrap_or("No specific instructions provided")
)
}
fn format_period(period: &ForecastPeriod) -> String {
format!(
"{}:\nTemperature: {}°{}\nWind: {} {}\nForecast: {}",
period.name,
period.temperature,
period.temperature_unit,
period.wind_speed,
period.wind_direction,
period.detailed_forecast
)
}
```
### 实现天气服务器和工具
现在实现带 tool handlers 的主 Weather server struct:
```rust theme={null}
pub struct Weather {
tool_router: ToolRouter,
}
#[tool_router]
impl Weather {
fn new() -> Self {
Self {
tool_router: Self::tool_router(),
}
}
#[tool(description = "Get weather alerts for a US state.")]
async fn get_alerts(
&self,
Parameters(MCPAlertRequest { state }): Parameters,
) -> String {
let url = format!(
"{}/alerts/active/area/{}",
NWS_API_BASE,
state.to_uppercase()
);
match make_nws_request::(&url).await {
Ok(data) => {
if data.features.is_empty() {
"No active alerts for this state.".to_string()
} else {
data.features
.iter()
.map(format_alert)
.collect::>()
.join("\n---\n")
}
}
Err(_) => "Unable to fetch alerts or no alerts found.".to_string(),
}
}
#[tool(description = "Get weather forecast for a location.")]
async fn get_forecast(
&self,
Parameters(MCPForecastRequest {
latitude,
longitude,
}): Parameters,
) -> String {
let points_url = format!("{NWS_API_BASE}/points/{latitude},{longitude}");
let Ok(points_data) = make_nws_request::(&points_url).await else {
return "Unable to fetch forecast data for this location.".to_string();
};
let forecast_url = points_data.properties.forecast;
let Ok(forecast_data) = make_nws_request::(&forecast_url).await else {
return "Unable to fetch forecast data for this location.".to_string();
};
let periods = &forecast_data.properties.periods;
let forecast_summary: String = periods
.iter()
.take(5) // Next 5 periods only
.map(format_period)
.collect::>()
.join("\n---\n");
forecast_summary
}
}
```
`#[tool_router]` macro 会自动生成路由逻辑,`#[tool]` attribute 会将方法标记为 MCP tools。
### 实现 ServerHandler
Implement the `ServerHandler` trait to define server capabilities:
```rust theme={null}
#[tool_handler]
impl ServerHandler for Weather {
fn get_info(&self) -> ServerInfo {
ServerInfo {
capabilities: ServerCapabilities::builder().enable_tools().build(),
..Default::default()
}
}
}
```
### 运行服务器
Finally, implement the main function to run the server with stdio transport:
```rust theme={null}
#[tokio::main]
async fn main() -> Result<()> {
let transport = (tokio::io::stdin(), tokio::io::stdout());
let service = Weather::new().serve(transport).await?;
service.waiting().await?;
Ok(())
}
```
使用以下命令构建 server:
```bash theme={null}
cargo build --release
```
编译后的 binary 位于 `target/release/weather`。
现在从已有 MCP host Claude for Desktop 测试 server。
## 使用 Claude for Desktop 测试服务器
Claude for Desktop is not yet available on Linux. Linux users can proceed to the [Building a client](/docs/develop/build-client) tutorial to build an MCP client that connects to the server we just built.
首先,确保已安装 Claude for Desktop。[可以在这里安装最新版](https://claude.ai/download)。如果已经安装 Claude for Desktop,**请确保它已更新到最新版本。**
需要为你想使用的 MCP servers 配置 Claude for Desktop。为此,请用文本编辑器打开 Claude for Desktop App 配置文件 `~/Library/Application Support/Claude/claude_desktop_config.json`。如果文件不存在,请创建它。
例如,如果你安装了 [VS Code](https://code.visualstudio.com/):
```bash macOS/Linux theme={null}
code ~/Library/Application\ Support/Claude/claude_desktop_config.json
```
```powershell Windows theme={null}
code $env:AppData\Claude\claude_desktop_config.json
```
然后在 `mcpServers` key 中添加 servers。只有至少正确配置了一个 server,MCP UI 元素才会出现在 Claude for Desktop 中。
在本例中,我们按如下方式添加单个 weather server:
```json macOS/Linux theme={null}
{
"mcpServers": {
"weather": {
"command": "/ABSOLUTE/PATH/TO/PARENT/FOLDER/weather/target/release/weather"
}
}
}
```
```json Windows theme={null}
{
"mcpServers": {
"weather": {
"command": "C:\\ABSOLUTE\\PATH\\TO\\PARENT\\FOLDER\\weather\\target\\release\\weather.exe"
}
}
}
```
请确保传入已编译 binary 的绝对路径。可以在 macOS/Linux 上运行 `pwd`,或在 Windows Command Prompt 中从项目目录运行 `cd` 获取。Windows 上请记得在 JSON 路径中使用双反斜杠(`\\`)或正斜杠(`/`),并添加 `.exe` 扩展名。
这会告诉 Claude for Desktop:
1. There's an MCP server named "weather"
2. Launch it by running the compiled binary at the specified path
Save the file, and restart **Claude for Desktop**.
开始构建 weather server。[本教程将构建内容的完整代码见这里。](https://github.com/modelcontextprotocol/quickstart-resources/tree/main/weather-server-go)
### 前置知识
本快速开始假设你熟悉:
* Go
* LLMs like Claude
### MCP 服务器中的日志
实现 MCP servers 时,请谨慎处理日志:
**For STDIO-based servers:** Never use `fmt.Println()` or `fmt.Printf()`, as they write to standard output (stdout). Writing to stdout will corrupt the JSON-RPC messages and break your server.
**For HTTP-based servers:** Standard output logging is fine since it doesn't interfere with HTTP responses.
### 最佳实践
* Use `log.Println()` (which defaults to stderr) or a logging library that writes to stderr or files.
* Use `fmt.Fprintf(os.Stderr, ...)` to write to stderr explicitly.
### 快速示例
```go theme={null}
// ❌ Bad (STDIO)
fmt.Println("Processing request")
// ✅ Good (STDIO)
log.Println("Processing request") // defaults to stderr
// ✅ Good (STDIO)
fmt.Fprintln(os.Stderr, "Processing request")
```
### 系统要求
* Go 1.24 or higher installed.
### 设置环境
如果尚未安装,请先安装 Go。可以从 [go.dev](https://go.dev/dl/) 下载并安装 Go。
验证 Go 安装:
```bash theme={null}
go version
```
现在创建并设置项目:
```bash macOS/Linux theme={null}
# Create a new directory for our project
mkdir weather
cd weather
# Initialize Go module
go mod init weather
# Install dependencies
go get github.com/modelcontextprotocol/go-sdk/mcp
# Create our server file
touch main.go
```
```powershell Windows theme={null}
# Create a new directory for our project
md weather
cd weather
# Initialize Go module
go mod init weather
# Install dependencies
go get github.com/modelcontextprotocol/go-sdk/mcp
# Create our server file
new-item main.go
```
现在开始构建 server。
## 构建服务器
### 导入包和常量
将以下内容添加到 `main.go` 顶部:
```go theme={null}
package main
import (
"cmp"
"context"
"encoding/json"
"fmt"
"io"
"log"
"net/http"
"strings"
"github.com/modelcontextprotocol/go-sdk/mcp"
)
const (
NWSAPIBase = "https://api.weather.gov"
UserAgent = "weather-app/1.0"
)
```
### 数据结构
接下来,定义 tools 使用的数据结构:
```go theme={null}
type PointsResponse struct {
Properties struct {
Forecast string `json:"forecast"`
} `json:"properties"`
}
type ForecastResponse struct {
Properties struct {
Periods []ForecastPeriod `json:"periods"`
} `json:"properties"`
}
type ForecastPeriod struct {
Name string `json:"name"`
Temperature int `json:"temperature"`
TemperatureUnit string `json:"temperatureUnit"`
WindSpeed string `json:"windSpeed"`
WindDirection string `json:"windDirection"`
DetailedForecast string `json:"detailedForecast"`
}
type AlertsResponse struct {
Features []AlertFeature `json:"features"`
}
type AlertFeature struct {
Properties AlertProperties `json:"properties"`
}
type AlertProperties struct {
Event string `json:"event"`
AreaDesc string `json:"areaDesc"`
Severity string `json:"severity"`
Description string `json:"description"`
Instruction string `json:"instruction"`
}
type ForecastInput struct {
Latitude float64 `json:"latitude" jsonschema:"Latitude of the location"`
Longitude float64 `json:"longitude" jsonschema:"Longitude of the location"`
}
type AlertsInput struct {
State string `json:"state" jsonschema:"Two-letter US state code (e.g. CA, NY)"`
}
```
### 辅助函数
接下来添加 helper functions,用于查询并格式化 National Weather Service API 的数据:
```go theme={null}
func makeNWSRequest[T any](ctx context.Context, url string) (*T, error) {
req, err := http.NewRequestWithContext(ctx, http.MethodGet, url, nil)
if err != nil {
return nil, fmt.Errorf("failed to create request: %w", err)
}
req.Header.Set("User-Agent", UserAgent)
req.Header.Set("Accept", "application/geo+json")
client := http.DefaultClient
resp, err := client.Do(req)
if err != nil {
return nil, fmt.Errorf("failed to make request to %s: %w", url, err)
}
defer resp.Body.Close()
if resp.StatusCode != http.StatusOK {
body, _ := io.ReadAll(resp.Body)
return nil, fmt.Errorf("HTTP error %d: %s", resp.StatusCode, string(body))
}
var result T
if err := json.NewDecoder(resp.Body).Decode(&result); err != nil {
return nil, fmt.Errorf("failed to decode response: %w", err)
}
return &result, nil
}
func formatAlert(alert AlertFeature) string {
props := alert.Properties
event := cmp.Or(props.Event, "Unknown")
areaDesc := cmp.Or(props.AreaDesc, "Unknown")
severity := cmp.Or(props.Severity, "Unknown")
description := cmp.Or(props.Description, "No description available")
instruction := cmp.Or(props.Instruction, "No specific instructions provided")
return fmt.Sprintf(`
Event: %s
Area: %s
Severity: %s
Description: %s
Instructions: %s
`, event, areaDesc, severity, description, instruction)
}
func formatPeriod(period ForecastPeriod) string {
return fmt.Sprintf(`
%s:
Temperature: %d°%s
Wind: %s %s
Forecast: %s
`, period.Name, period.Temperature, period.TemperatureUnit,
period.WindSpeed, period.WindDirection, period.DetailedForecast)
}
```
### 实现工具执行
tool execution handler 负责实际执行每个 tool 的逻辑。添加如下内容:
```go theme={null}
func getForecast(ctx context.Context, req *mcp.CallToolRequest, input ForecastInput) (
*mcp.CallToolResult, any, error,
) {
// Get points data
pointsURL := fmt.Sprintf("%s/points/%f,%f", NWSAPIBase, input.Latitude, input.Longitude)
pointsData, err := makeNWSRequest[PointsResponse](ctx, pointsURL)
if err != nil {
return &mcp.CallToolResult{
Content: []mcp.Content{
&mcp.TextContent{Text: "Unable to fetch forecast data for this location."},
},
}, nil, nil
}
// Get forecast data
forecastURL := pointsData.Properties.Forecast
if forecastURL == "" {
return &mcp.CallToolResult{
Content: []mcp.Content{
&mcp.TextContent{Text: "Unable to fetch forecast URL."},
},
}, nil, nil
}
forecastData, err := makeNWSRequest[ForecastResponse](ctx, forecastURL)
if err != nil {
return &mcp.CallToolResult{
Content: []mcp.Content{
&mcp.TextContent{Text: "Unable to fetch detailed forecast."},
},
}, nil, nil
}
// Format the periods
periods := forecastData.Properties.Periods
if len(periods) == 0 {
return &mcp.CallToolResult{
Content: []mcp.Content{
&mcp.TextContent{Text: "No forecast periods available."},
},
}, nil, nil
}
// Show next 5 periods
var forecasts []string
for i := range min(5, len(periods)) {
forecasts = append(forecasts, formatPeriod(periods[i]))
}
result := strings.Join(forecasts, "\n---\n")
return &mcp.CallToolResult{
Content: []mcp.Content{
&mcp.TextContent{Text: result},
},
}, nil, nil
}
func getAlerts(ctx context.Context, req *mcp.CallToolRequest, input AlertsInput) (
*mcp.CallToolResult, any, error,
) {
// Build alerts URL
stateCode := strings.ToUpper(input.State)
alertsURL := fmt.Sprintf("%s/alerts/active/area/%s", NWSAPIBase, stateCode)
alertsData, err := makeNWSRequest[AlertsResponse](ctx, alertsURL)
if err != nil {
return &mcp.CallToolResult{
Content: []mcp.Content{
&mcp.TextContent{Text: "Unable to fetch alerts or no alerts found."},
},
}, nil, nil
}
// Check if there are any alerts
if len(alertsData.Features) == 0 {
return &mcp.CallToolResult{
Content: []mcp.Content{
&mcp.TextContent{Text: "No active alerts for this state."},
},
}, nil, nil
}
// Format alerts
var alerts []string
for _, feature := range alertsData.Features {
alerts = append(alerts, formatAlert(feature))
}
result := strings.Join(alerts, "\n---\n")
return &mcp.CallToolResult{
Content: []mcp.Content{
&mcp.TextContent{Text: result},
},
}, nil, nil
}
```
### 运行服务器
Finally, implement the main function to run the server:
```go theme={null}
func main() {
// Create MCP server
server := mcp.NewServer(&mcp.Implementation{
Name: "weather",
Version: "1.0.0",
}, nil)
// Add get_forecast tool
mcp.AddTool(server, &mcp.Tool{
Name: "get_forecast",
Description: "Get weather forecast for a location",
}, getForecast)
// Add get_alerts tool
mcp.AddTool(server, &mcp.Tool{
Name: "get_alerts",
Description: "Get weather alerts for a US state",
}, getAlerts)
// Run server on stdio transport
if err := server.Run(context.Background(), &mcp.StdioTransport{}); err != nil {
log.Fatal(err)
}
}
```
使用以下命令构建 server:
```bash theme={null}
go build -o weather .
```
编译后的 binary 位于 `./weather`。
现在从已有 MCP host Claude for Desktop 测试 server。
## 使用 Claude for Desktop 测试服务器
Claude for Desktop is not yet available on Linux. Linux users can proceed to the [Building a client](/docs/develop/build-client) tutorial to build an MCP client that connects to the server we just built.
首先,确保已安装 Claude for Desktop。[可以在这里安装最新版](https://claude.ai/download)。如果已经安装 Claude for Desktop,**请确保它已更新到最新版本。**
需要为你想使用的 MCP servers 配置 Claude for Desktop。为此,请用文本编辑器打开 Claude for Desktop App 配置文件 `~/Library/Application Support/Claude/claude_desktop_config.json`。如果文件不存在,请创建它。
例如,如果你安装了 [VS Code](https://code.visualstudio.com/):
```bash macOS/Linux theme={null}
code ~/Library/Application\ Support/Claude/claude_desktop_config.json
```
```powershell Windows theme={null}
code $env:AppData\Claude\claude_desktop_config.json
```
然后在 `mcpServers` key 中添加 servers。只有至少正确配置了一个 server,MCP UI 元素才会出现在 Claude for Desktop 中。
在本例中,我们按如下方式添加单个 weather server:
```json macOS/Linux theme={null}
{
"mcpServers": {
"weather": {
"command": "/ABSOLUTE/PATH/TO/PARENT/FOLDER/weather/weather"
}
}
}
```
```json Windows theme={null}
{
"mcpServers": {
"weather": {
"command": "C:\\ABSOLUTE\\PATH\\TO\\PARENT\\FOLDER\\weather\\weather.exe"
}
}
}
```
请确保传入已编译 binary 的绝对路径。可以在 macOS/Linux 上运行 `pwd`,或在 Windows Command Prompt 中从项目目录运行 `cd` 获取。Windows 上请记得在 JSON 路径中使用双反斜杠(`\\`)或正斜杠(`/`),并添加 `.exe` 扩展名。
这会告诉 Claude for Desktop:
1. There's an MCP server named "weather"
2. Launch it by running the compiled binary at the specified path
Save the file, and restart **Claude for Desktop**.
### 使用命令测试
确认 Claude for Desktop 能识别 `weather` server 暴露的两个 tools。可以查找 "Add files, connectors, and more /"  图标:
图标:
 点击加号图标后,悬停到 "Connectors" 菜单。你应该能看到列出的 `weather` servers:
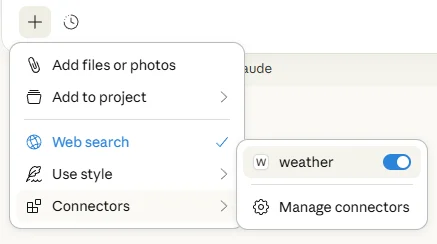 如果 Claude for Desktop 没有识别到 server,请跳到[排障](#troubleshooting)部分查看调试建议。
如果 server 已出现在 "Connectors" 菜单中,现在可以在 Claude for Desktop 中运行以下命令测试 server:
* What's the weather in Sacramento?
* What are the active weather alerts in Texas?
如果 Claude for Desktop 没有识别到 server,请跳到[排障](#troubleshooting)部分查看调试建议。
如果 server 已出现在 "Connectors" 菜单中,现在可以在 Claude for Desktop 中运行以下命令测试 server:
* What's the weather in Sacramento?
* What are the active weather alerts in Texas?
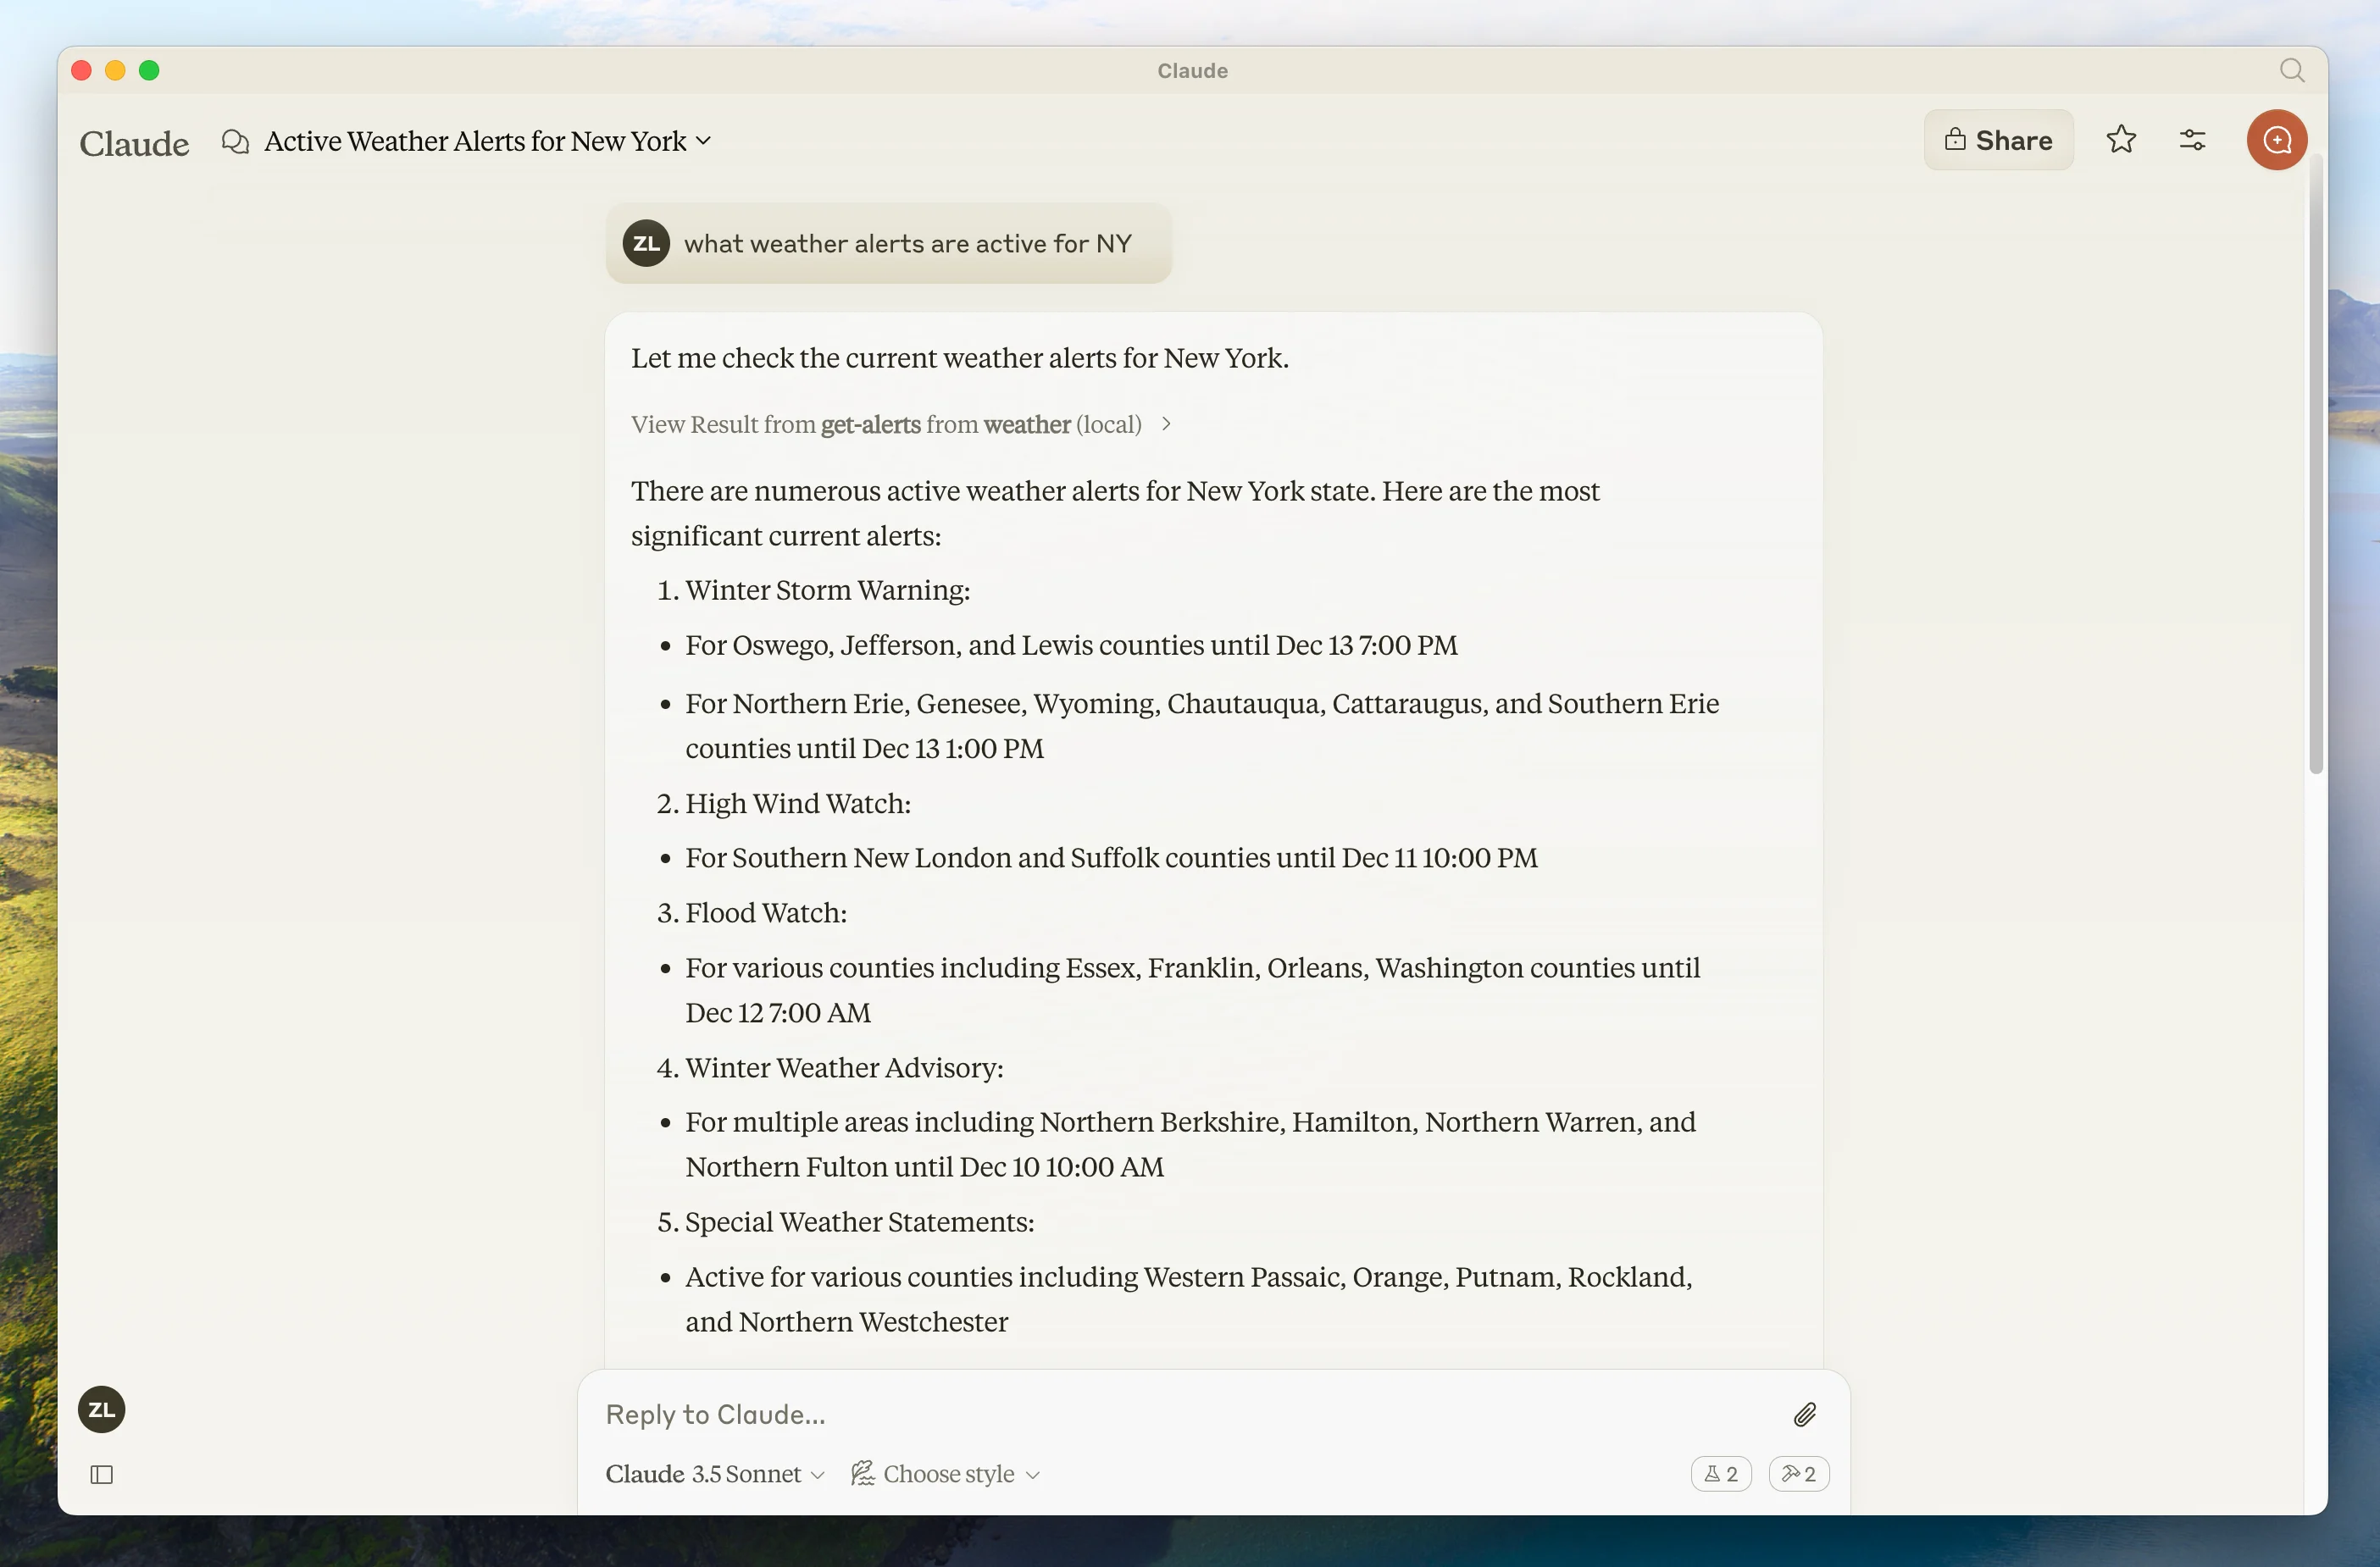 Since this is the US National Weather service, the queries will only work for US locations.
## 底层发生了什么
提问时:
1. The client sends your question to Claude
2. Claude analyzes the available tools and decides which one(s) to use
3. The client executes the chosen tool(s) through the MCP server
4. The results are sent back to Claude
5. Claude formulates a natural language response
6. The response is displayed to you!
## 排障
**Getting logs from Claude for Desktop**
Claude.app logging related to MCP is written to log files in `~/Library/Logs/Claude`:
* `mcp.log` will contain general logging about MCP connections and connection failures.
* Files named `mcp-server-SERVERNAME.log` will contain error (stderr) logging from the named server.
可以运行以下命令列出最近日志并持续查看新增日志:
```bash theme={null}
# Check Claude's logs for errors
tail -n 20 -f ~/Library/Logs/Claude/mcp*.log
```
**Server not showing up in Claude**
1. Check your `claude_desktop_config.json` file syntax
2. Make sure the path to your project is absolute and not relative
3. Restart Claude for Desktop completely
要正确重启 Claude for Desktop,必须完全退出应用:
* **Windows**: Right-click the Claude icon in the system tray (which may be hidden in the "hidden icons" menu) and select "Quit" or "Exit".
* **macOS**: Use Cmd+Q or select "Quit Claude" from the menu bar.
Simply closing the window does not fully quit the application, and your MCP server configuration changes will not take effect.
**Tool calls failing silently**
如果 Claude 尝试使用 tools 但失败:
1. Check Claude's logs for errors
2. Verify your server builds and runs without errors
3. Try restarting Claude for Desktop
**None of this is working. What do I do?**
Please refer to our [debugging guide](/docs/tools/debugging) for better debugging tools and more detailed guidance.
**Error: Failed to retrieve grid point data**
这通常意味着:
1. The coordinates are outside the US
2. The NWS API is having issues
3. You're being rate limited
Fix:
* Verify you're using US coordinates
* Add a small delay between requests
* Check the NWS API status page
**Error: No active alerts for \[STATE]**
这不是错误,只表示该州当前没有天气警报。可以尝试其他州,或在恶劣天气期间再检查。
如需更高级排障,请查看[调试 MCP](/docs/tools/debugging)指南。
## 后续步骤
Learn how to build your own MCP client that can connect to your server
Check out our gallery of official MCP servers and implementations
Learn how to effectively debug MCP servers and integrations
Use agent skills to guide AI coding assistants through server design
Since this is the US National Weather service, the queries will only work for US locations.
## 底层发生了什么
提问时:
1. The client sends your question to Claude
2. Claude analyzes the available tools and decides which one(s) to use
3. The client executes the chosen tool(s) through the MCP server
4. The results are sent back to Claude
5. Claude formulates a natural language response
6. The response is displayed to you!
## 排障
**Getting logs from Claude for Desktop**
Claude.app logging related to MCP is written to log files in `~/Library/Logs/Claude`:
* `mcp.log` will contain general logging about MCP connections and connection failures.
* Files named `mcp-server-SERVERNAME.log` will contain error (stderr) logging from the named server.
可以运行以下命令列出最近日志并持续查看新增日志:
```bash theme={null}
# Check Claude's logs for errors
tail -n 20 -f ~/Library/Logs/Claude/mcp*.log
```
**Server not showing up in Claude**
1. Check your `claude_desktop_config.json` file syntax
2. Make sure the path to your project is absolute and not relative
3. Restart Claude for Desktop completely
要正确重启 Claude for Desktop,必须完全退出应用:
* **Windows**: Right-click the Claude icon in the system tray (which may be hidden in the "hidden icons" menu) and select "Quit" or "Exit".
* **macOS**: Use Cmd+Q or select "Quit Claude" from the menu bar.
Simply closing the window does not fully quit the application, and your MCP server configuration changes will not take effect.
**Tool calls failing silently**
如果 Claude 尝试使用 tools 但失败:
1. Check Claude's logs for errors
2. Verify your server builds and runs without errors
3. Try restarting Claude for Desktop
**None of this is working. What do I do?**
Please refer to our [debugging guide](/docs/tools/debugging) for better debugging tools and more detailed guidance.
**Error: Failed to retrieve grid point data**
这通常意味着:
1. The coordinates are outside the US
2. The NWS API is having issues
3. You're being rate limited
Fix:
* Verify you're using US coordinates
* Add a small delay between requests
* Check the NWS API status page
**Error: No active alerts for \[STATE]**
这不是错误,只表示该州当前没有天气警报。可以尝试其他州,或在恶劣天气期间再检查。
如需更高级排障,请查看[调试 MCP](/docs/tools/debugging)指南。
## 后续步骤
Learn how to build your own MCP client that can connect to your server
Check out our gallery of official MCP servers and implementations
Learn how to effectively debug MCP servers and integrations
Use agent skills to guide AI coding assistants through server design